BC FOODSAFE Registry
User Manual
CLERICAL ROLE
Prepared by Annalisa Taylor, King’s
Printer, Digital Publishing, Ministry of Citizens’ Services. Some material is
based on the user manual for FOODSAFE Registry 1, ‘Using the FOODSAFE Registry’,
prepared by Corinne Cook, Ministry of Health
King’s Printer, Digital
Publishing, Ministry Citizen’s Services
Created: September
3, 2013
Updated: September
20, 2022
Contents
1.2 Who
should read this document?
1.3.1 Public Health Act of British Columbia
1.3.2 Freedom of Information and Protection of Privacy Act
(FOIPPA) of British Columbia
2.1 Access
to the FOODSAFE Registry
2.2 Log
in to the FOODSAFE Registry
2.3 FOODSAFE
Registry functions
3 SEARCH STUDENTS AND INSTRUCTORS
3.3 Search
for Student Who Have One Name.
3.4 Start
a New Search / Add Criteria to a Search
3.7 Search
by Personal Health Number (PHN)
3.10 Open
a student record from the search results /return to search results
4 SEARCH STUDENT EXAMINATION RESULTS
4.1.1 Search exam by multiple criteria
4.1.2 Search by Level 1 Equivalent
5.1 Search
Instructors by Name
5.2 Search
Instructor by Teaching Level and Other Criteria
5.3 Search
Instructors by Teaching Level Expiry Dates
6.2 Maximum
Characters for Student Names
6.5 Validation
errors in the Student Details Form
6.5.1 Missing data in required Student Details fields
7.2.2 Address Format Safeguards in the Registry
8.1 Add
FoodSafe or MarketSafe Exam
8.3 Record
a Level 1 Equivalent
8.4 Add
a ProcessSafe Exam or Introduction to Food Microbiology Exam
9.1 Email
a Certificate (ProcessSafe or Introduction to Food Microbiology)
10 VIEW EXAMS / CERTIFICATIONS
12.1 Delete
Student Record (Duplicate Records)
12.1.1 Delete student records within your Health Authority
12.1.2 Delete student records outside your Health Authority
13.3 Add
Course Level to Instructor Qualifications
13.3.2 Update expiry date for instructor qualifications
14.2 Certificate
Print Settings for Adobe Acrobat Reader DC
14.3 Print
a Single Certificate, Wallet Card, or Mailing Label
14.3.1 Print Single Certificate
14.3.2 Print Single Wallet Card
14.3.3 Print Label – Avery 05161
14.4 Print
a Single Instructor Certificate
14.5 Long
Names in Certificates and Wallet Cards
14.6 Certificate
Queues - Print Batches of Certificates
14.8 Print
My Instructor Queue
14.9 Print
My MarketSafe Student Queue
14.10 Print
My MarketSafe Instructor Queue.
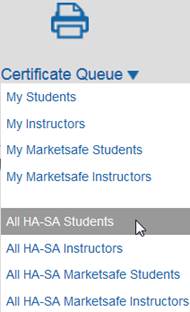
15.1 All
Heath Authority-Service Area Queues (HA-SA)
15.2 Move
a Certificate from the All HA-SA Students Queue to My Student Queue
15.3 Move
a Certificate from the All HA-SA Instructors Queue to My Instructor Queue
16 OPEN SCHOOL AND THE FOODSAFE REGISTRY
16.1 Prerequisite
to take FoodSafe Level 2
16.2 Prerequisite
to take FoodSafe Level 1 Refresher
16.3 FoodSafe
Level 1 Equivalents
16.4 Submission
of Open School Exam Results for FOODSAFE Level 1 and Level 2
16.5 Submission
of Open School Exam Results for FOODSAFE Refresher
16.6 Submission
of Open School Exam Results for MarketSafe
16.7 Open
School Roles in the Registry
16.7.1 The Open School Role (FOODSAFE Level 1and 2 and
MarketSafe queues)
16.7.2 The Open School Refresher Role
16.8 Print
Open School Queue - FOODSAFE Level 1 and 2 Certificates
16.9 Print
Open School Refresher Queue - FOODSAFE Refresher Certificates
16.10 Print
Open School MarketSafe Queue - MarketSafe Certificates
17 BC CIPHI - Processing Out-of-Province Records from
Open School
18.1 R01
Student Registry Report
18.2 R02
Student Statistical Breakdown.
18.3 R03
Instructor Registry Report
18.4 R04
Expired Instructors Report for Region
18.5 R14
Refresher Certificates Report (for Refresher Role)
19.1 Certificate
Shells and Mockups
1 INTRODUCTION
1.1 FOODSAFE Registry
This manual describes the FOODSAFE Registry 2 web application developed by the King’s Printer (formerly Queen’s Printer), which is used by the provincial Health Authorities in British Columbia to record the names of people who have taken FOODSAFE courses, the results of their examination, and the instructors who can teach FOODSAFE courses in their respective jurisdictions.
This document describes how to search the registry, create and edit data, print FOODSAFE certificates for students and instructors, and run reports.
Specifically, this manual describes the FOODSAFE Registry 2 application, developed in 2013 by King’s Printer, Digital Publishing, to replace the FOODSAFE Registry 1 system.
The FOODSAFE Registry 2 application contains information about all the students who have taken BC FOODSAFE courses from April 1, 1986, onwards.
|
Historical Note: The
development of the FOODSAFE Registry 1 application included the conversion of
all historical data from an older system to the FOODSAFE Registry 1.
Historical records from April 1, 1986, to November 24, 1999, are labelled ‘conversion’
and are dated November 24, 1999, the date the data conversion took
place. |
|
MarketSafe: This document includes updates made to the Registry to handle MarketSafe certifications. Phase 1 updates were implemented on March 29, 2015. Phase 2 updates (print queue functions) were implemented on January 22, 2016. MarketSafe legacy data was imported into the FOODSAFE Registry on January 7, 2016. |
|
ProcessSafe: This
document includes updates made to the Registry in February 2020 to handle
ProcessSafe certifications and Level 1 Equivalents. |
|
Introduction to Food Microbiology: This
document includes updates made to the Registry on August 19, 2022, to handle
Introduction to Food Microbiology certifications. |
1.2 Who should read this document?
This document is intended for FOODSAFE Registry users who are assigned the Clerical role in the registry. The Clerical role is a data entry role, which allows the user to search all data, enter and modify student and instructor data, print certificates, and run reports.
1.3 Legislation
1.3.1
Public
Health Act of British Columbia
As the FOODSAFE Program is a legislative requirement, it is necessary to gather and store information on students in B.C. who have taken the FOODSAFE courses.
The British Columbia FOODSAFE program is authorized by the Public Health Act, Food Premises Regulation, section 10, which states that the operator of a food service establishment (or one employee while the operator is away) must have taken the FOODSAFE course (or its equivalent).
1.3.2 Freedom of Information and Protection of Privacy Act (FOIPPA) of British Columbia
The personal information used by the FOODSAFE Registry is collected in accordance with the Freedom of Information and Protection of Privacy Act, section 26. The personal information used by the FOODSAFE Registry relates directly to and is necessary for the operation of the FOODSAFE Program.
In accordance with Section 27(1) of the FOIPPA, all personal information will be collected directly from the individual. The accuracy of FOODSAFE information is verified by the FOODSAFE client at the time the information is collected. At any time, an individual can verify the accuracy of his or her personal information held in the FOODSAFE Registry by contacting the local health office. An individual FOODSAFE client consents to this use of personal information when he or she completes a FOODSAFE form or writes a FOODSAFE exam.
An individual may have his or her own records corrected through the local health office. At the request of the individual, authorized personnel in the local health office can make corrections to any FOODSAFE information, except exam scores. If the original data entry form is still available in the local health office the authorized personnel can refer to it to check the validity of the exam scores.
Employers do not
have direct access to FOODSAFE Registry information and any requests from an
employer or any other party for information about a FOODSAFE client will be
referred to the individual in question.
FOODSAFE information may be released to an employer (or other party) only where
there is written permission from the client.
1.4 Contact Technical support
To get help with FOODSAFE Registry technical issues, please
contact customer service at Crown Publications,
King’s Printer in Victoria, B.C. Please state at the beginning of your call or
email that you need help with the FOODSAFE Registry.
Crown Publications, King’s Printer
Hours of operation: Monday to Friday 7:30 to 4:30
Toll-Free: 1-800-663-6105
Victoria: 250 387-6409
Email: FoodSafe.TechSupport@qp.gov.bc.ca
1.5 Minimum Requirements
You must use an up-to-date version of one of these browsers:
· Chrome™
· Firefox®
· Microsoft Edge
· Safari
2 GETTING STARTED
2.1 Access to the FOODSAFE Registry
· Forgot your password?
· Need access to the FOODSAFE Registry for a new employee?
· Need to remove access for a departing employee?
· Need to delete a duplicate student record?
Please contact Environmental Health Services at the BC Centre for Disease Control at fpinfo@bccdc.ca
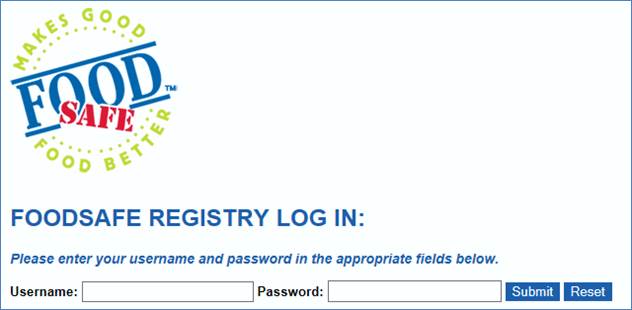
2.2 Log in to the FOODSAFE Registry
To log in to the FOODSAFE Registry:
1. Open your internet browser and go to the FOODSAFE Registry web address: https://foodsafe.qp.gov.bc.ca
2. On the Log in page, enter your username and password in the data fields and click on Submit.
|
|
2.3 FOODSAFE Registry functions
The FOODSAFE Registry Clerical functions (Search, Add Client, Certificate Queue, Reports) are accessed by clicking on the icons along the top of the page.
|
|

|
|
2.4 Sign Out
To log off from the FOODSAFE Registry, click on the Sign out button in the top right corner of the page.
|
|
|
TIP: The FOODSAFE Registry will automatically time-out and sign-off after 2 hours of idleness. |

2.5 Username and profile
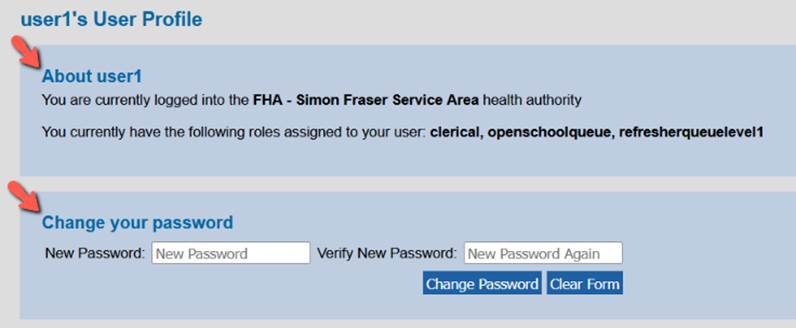
Your username is always visible in the top right corner of the FOODSAFE Registry.
To view the details of your User Profile:
1. Click on the username:
|
|

2. On the User Profile page, you can review information about the Health Authority you are logged in under and which roles are assigned to your username. You can also change your password:
|
|
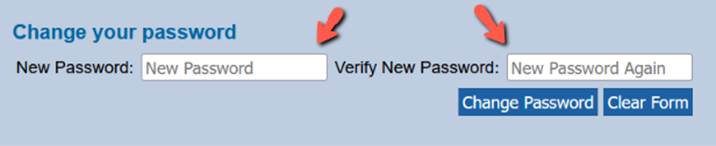
2.6 Change your password
To change your password:
1. Click on your username in the top right corner:
|
|

2. In the Change your password section of the User Profile page, enter the new password in the two password data entry fields:
|
|
3. When you enter the password information, it is hidden from view:
|
|
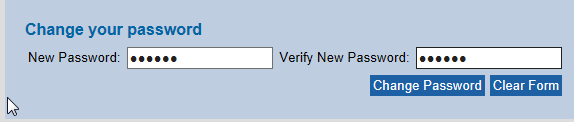
4. If you think you’ve made a mistake, click on the Clear Form button:
|
|

5. If you are satisfied with your changes, click on the Change Password button:
|
|

|
TIP: If you forget your password and
need a new one, contact Environmental Health Services at the BC Centre for
Disease Control at fpinfo@bccdc.ca |
3 SEARCH STUDENTS AND INSTRUCTORS
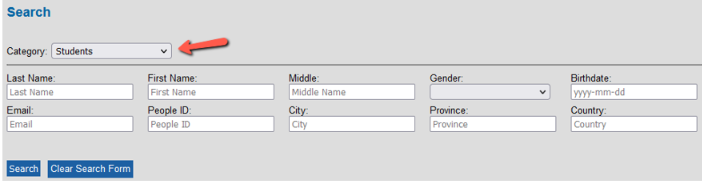
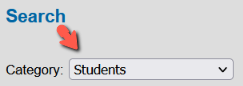
3.1 Search Students
The Students search is the default search in the search Category menu:
|
|
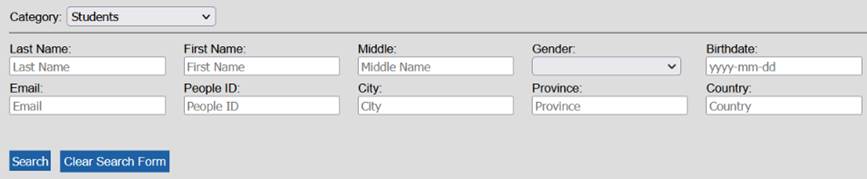
You can search for a student by one or more of the following search criteria:
|
|
|
TIPS 1. To move from one search field to the next, use the Tab key. 2. Search results are ordered alphabetically by last name and then by first name. 3. Name searches behave like
wildcard searches: 4. Data can be entered in the search criteria fields in upper- or lower-case letters. Searches are case insensitive. |
3.2 Search by Name
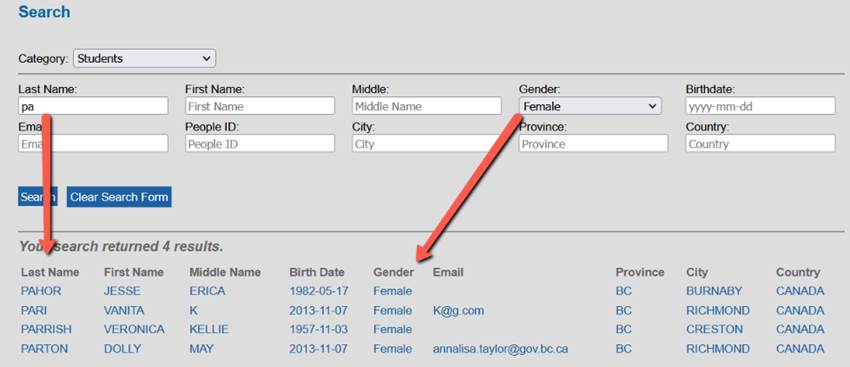
If you are not sure of the spelling of a name, enter the first few letters of the name. The name searches behave like wildcard searches. A search for ‘Deb’ will return ‘Deb’, ‘Debbie’, ‘Debra’, ‘Deborah’, etc.
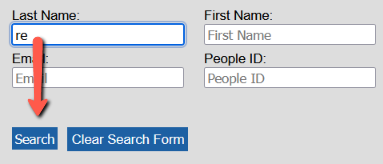
In the following example, to search by Last Name:
1.
In the ‘Last Name’ field, enter the first few
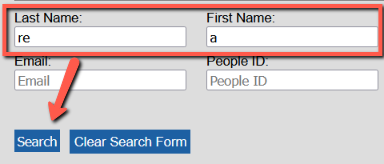
letters of the student’s last name. Example: ‘r-e’.
Click on the Search button (or hit
the ‘Enter’ key on your keyboard).
|
|
2.
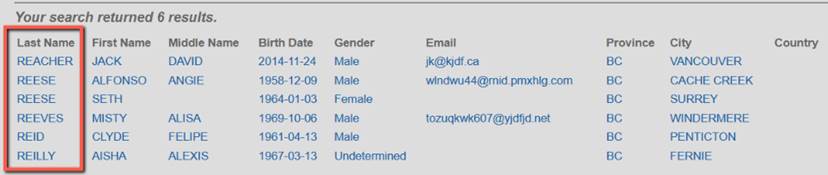
The name searches perform like a wildcard search
and returns results for ‘Reacher, Reese, Reid’, etc.
The search results are ordered alphabetically by last name and then
alphabetically by first name and middle name:
|
|
3. To refine the search, return to the search form and enter additional data. Click on Search.
|
|
4. Now the search results include only students with last name starting with ‘re’, and first name starting with ‘a’:
|
|

3.3 Search for Student Who Have One Name
If an individual has only one name, search for the name in the ‘First Name’ field:
|
|
|
TIP In one-name cases, the Last Name is entered as two periods. For example:
See Section 6.3 Add Single Names |
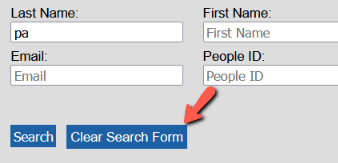
3.4 Start a New Search / Add Criteria to a Search
To add criteria to the last search you performed, simply select or enter additional criteria, and click on Search.
|
|
|
|

To start a new search, click on the Clear Search Form button, and enter new criteria.
|
|
3.5 Search by Gender
To search students by Gender:
1.
Enter any known data in the name fields and
select Male, Female, X or Undetermined.
You may use the mouse to access the drop-down menu, or simply type in ‘M’, ‘F’,
‘X’ or ‘U’ in the field. In this example, the search is for
last names starting with ‘re’ and ‘Female’ gender:
|
|
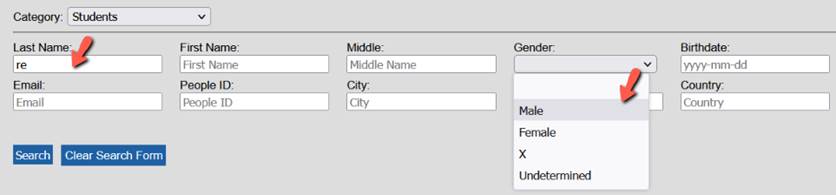
2. The search results include only records for ‘Female’ and exclude records with ‘Male’, ‘X’ or ‘Undetermined’ gender:
|
|

|
Update
January 2020 British Columbians who do not identify as male or female have the choice to display an ‘X’ as a third option in the gender field of the Foodsafe exam registration forms. Accordingly, a new gender value of ‘X’ has been added to the Registry. If a form is submitted without a gender selection, please enter ‘Undetermined’. |
3.6 Search by Birthdate
To search by Birthdate:
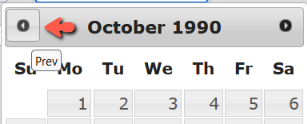
1. When you click in the Birthdate field or tab to the Birthdate field, a calendar pops open.
2. You may enter the birthdate by clicking on a date in the calendar.
Use the back-arrow icon at the top of the calendar to navigate to earlier months and years in the calendar.
|
|
3. Alternatively, you can enter the birthdate by typing data into the birthdate field in the following format, including dashes: YYYY-MM-DD
|
|
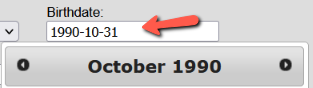
4. After you enter the date, hit Enter or the Tab key and the calendar will close.
3.7 Search by Personal Health Number (PHN)
|
Update In November 2017, at the request of the
BC Ministry of Health, Personal Health Number (PHN) data was removed from the
BC FOODSAFE Registry to comply with privacy directives from the Office of the
Chief Information Officer. As of August 2022 the Personal Health Number fields no longer display in the Registry. |
3.8 Search by People ID
Every client (student or instructor) has a People ID which is a unique identifier number generated automatically by the system when a new client record is created. The student keeps the same People ID if they become an instructor. The same people ID is applied to every certification the person achieves at the student or instructor level.
Student and Instructor records can be searched by their People ID. The people ID is printed on all student and instructor certificates and wallet cards.
|
|
|
Historical Note: Students imported from the B.C. Registry 1 into Registry 2 retained the people ID created in the previous system. |

3.9 Search by Province
To search students by province:
1.
Enter the two-character abbreviation for the
province.
Example: BC, AB, SK
|
|
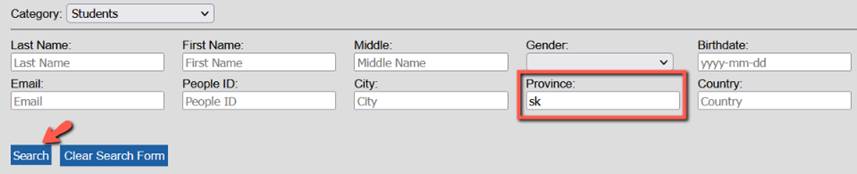
2. The search results list student from the province entered:
|
|

|
TIPS 1. To search by province or state, enter the two-character province or state abbreviations. Example: BC, AB, SK, YT, WA. 2. If you are uncertain about the abbreviation, search by the first character. Example: ‘Y’ for Yukon Territory |
3.10 Open a student record from the search results /return to search results
To view more detailed data for a student in the search results list:
1. Click on the student anywhere in the row:
|
Students search results
|
|
Student Examination search results
|


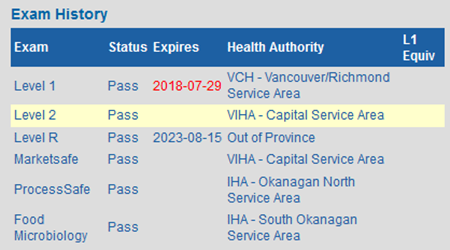
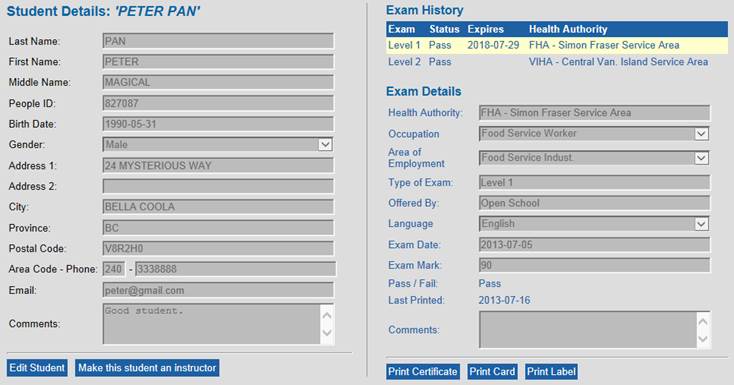
2. The Student Details page opens, displaying student details, exam history, and exam details:
|
|
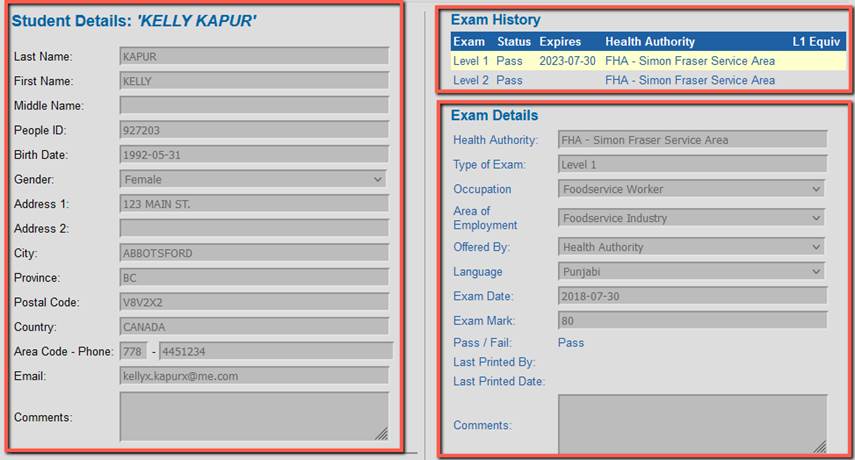
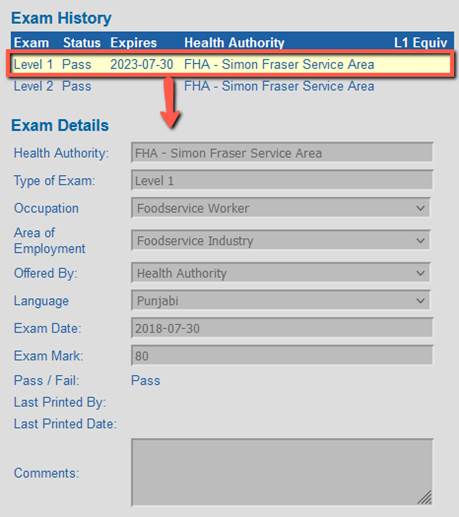
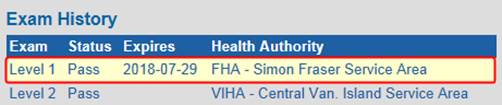
3.
Under Exam
History, the Level 1 exam is
currently selected, as indicated by the yellow background, and the
Exam Details are displayed for the Level 1 exam:
|
|
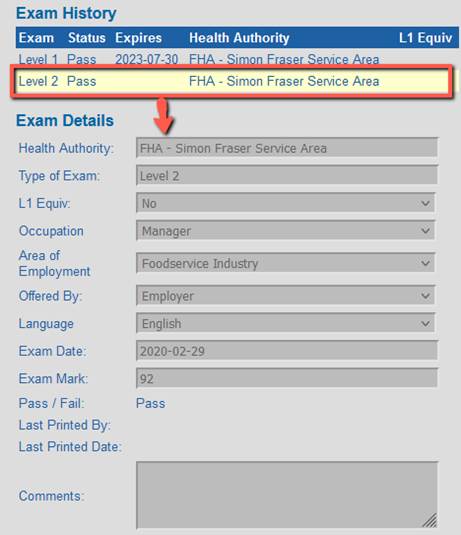
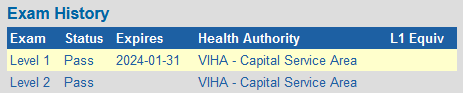
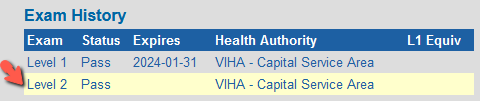
4. To see the exam details for the Level 2 exam, click on Level 2 in the Exam History section. Now the Level 2 exam is highlighted by the yellow background, and the Exam Details are displayed for the Level 2 exam:
|
|
5. To return to the Search Results page, click on the Search Results breadcrumb:
|
|
4 SEARCH STUDENT EXAMINATION RESULTS
4.1.1 Search exam by multiple criteria
To search for students who
share particular attributes associated with their exam records:
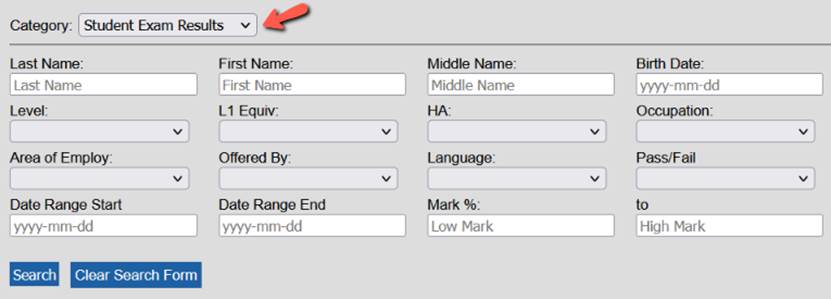
1. Select the ‘Student Examination Results’ option from the search category menu:
|
|
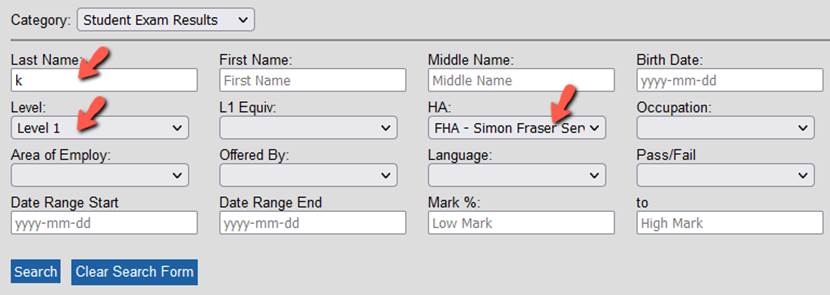
2. Enter data or select options in one or more of the search criteria fields and click on the Search button.
In the following example, a search is performed for students with ‘Last Name’ starting with ‘k’, exam ‘Level 1’, from the health authority, ‘FHA – Simon Fraser Service Area’.
|
|
3. The search results include the student’s name, exam level, exam date, exam expiry, grade (pass/fail), level 1 equivalent status, and health authority:
|
|
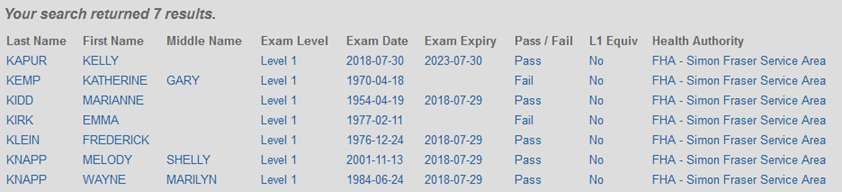
4. To open a student record, click anywhere in the student row:
|
|
4.1.2
Search
by Level 1 Equivalent
Some
students have a food safety certification deemed equivalent to the BC Foodsafe
Level 1, as verified by FoodSafe authorities. The Level 1 equivalency enables
the student to register for the Foodsafe Level 2 course and receive a Level 2
certificate.
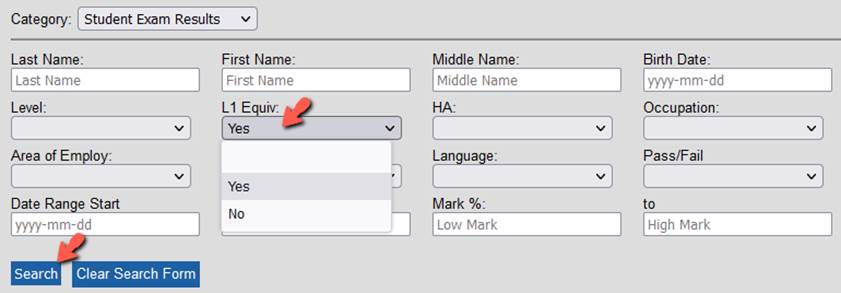
To search
for students with a Level 1 Equivalency:
1.
Select the ‘Student Exam Results’ category:
|
|

2.
Select the ‘Yes’ value from the L1 Equivalency field and
click on Search:
|
|
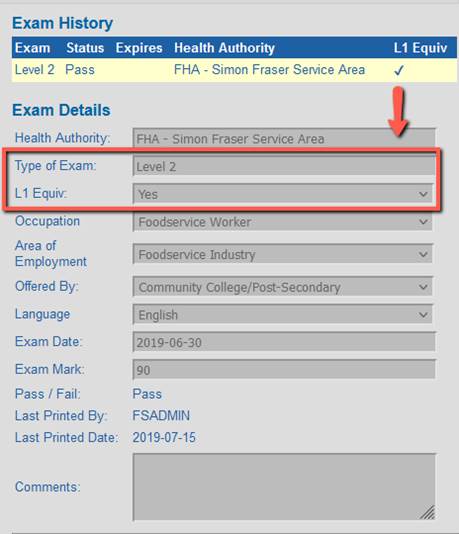
3.
In the search results, records with a Level 1 Equivalency
display a ‘Yes’ result:
|
|

4.
In the student’s exam record, the Level 1 Equivalency status
is displayed in the Exam History and in the
Exam Details for the Level 2 exam:
|
|
|
TIP:
In a search by L1 Equivalent where the value selected is ‘No’, the search
results will include records in which the L1 Equivalent field value is ‘No’ or
no value selected. |
5 SEARCH INSTRUCTORS
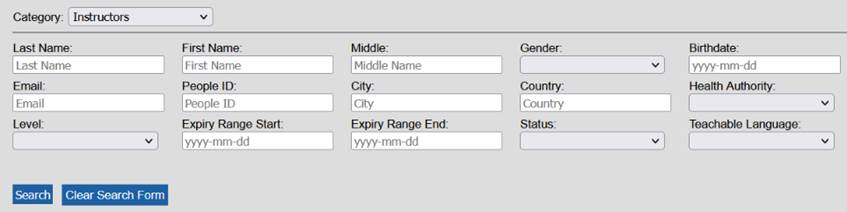
5.1 Search Instructors by Name
To search for instructors:
1.
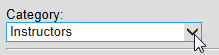
Select
the ‘Instructors’ option from the search category
menu:
|
|
2. You can search for instructors by one or more of the following search criteria:
|
|
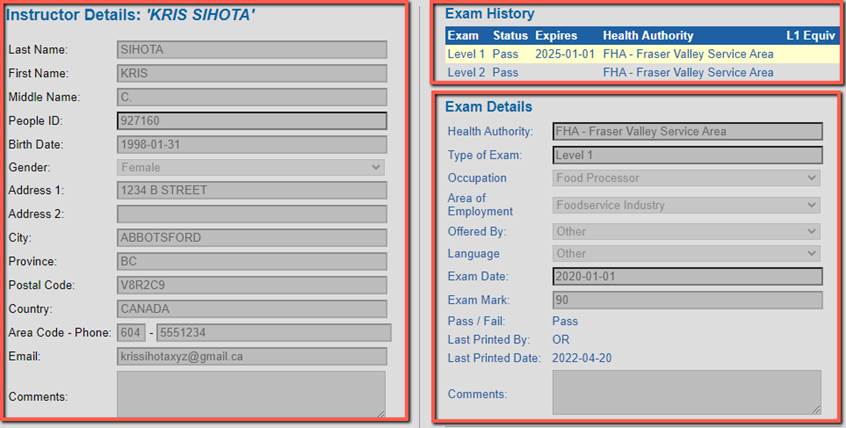
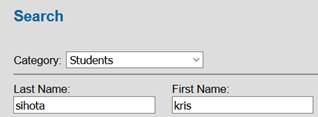
3. If you are looking for a particular instructor, perform a name search. In this example a search by last name ‘Sihota’ returns the following results. To view more details about the instructor, click in the row to open the record:
|
|

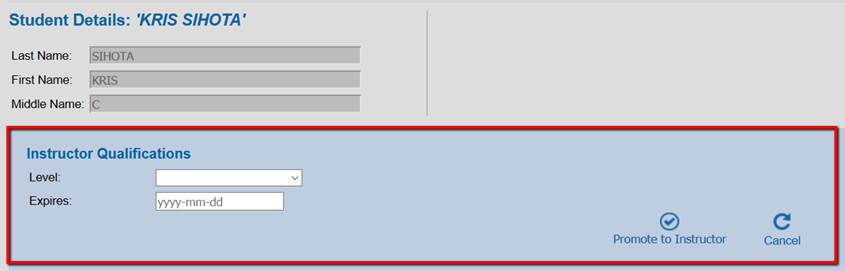
4. The Instructor Details page opens and displays the instructor’s personal information, student exam history, student exam details:
|
|
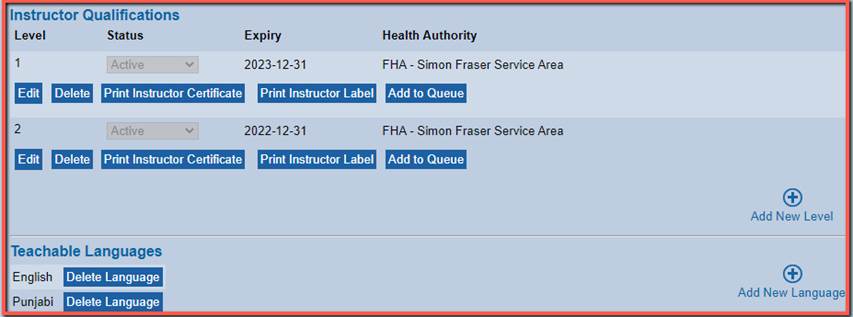
|
Below the instructor details is the ‘Instructor Qualifications’ panel, displaying the: ·
teaching
level in which the instructor is certified, ·
status of the teaching certification, ·
expiry
date of the teaching certification, ·
health
authority service area in which the instructor is certified to teach, ·
languages
in which the instructor is authorized to teach. |
|
|
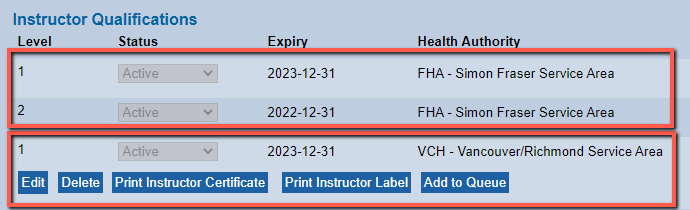
5.
For instructors who are certified to teach in
more than one health authority service area you can view their qualifications across all health authorities; however, you
will only be able to edit, delete or print the instructor
certification if you are logged in under the same health authority service area
as the instructor’s certification.
In the following example, the user is logged in under ‘Vancouver / Richmond’. Therefore,
they have view only capability for
the FHA – Simon Fraser certifications, and can view, edit, delete and print capability
for the Vancouver/Richmond certification.
|
|
5.2
Search Instructor by Teaching Level and Other
Criteria
To
search instructor by teaching level:
1. Select a level from the ‘Level’ menu, and click on the Search button:
|
|
2.
The search results include all instructors in the database
with a Foodsafe Level 1 teaching certification, including active and inactive
certifications:
|
|

3.
To refine the search, select additional criteria. For
example, select a health authority
service area and the ‘active’
status, and click on Search:
|
|
4.
The search results now include a list of active instructors certified to teach
in FHA – Simon Fraser:
|
|

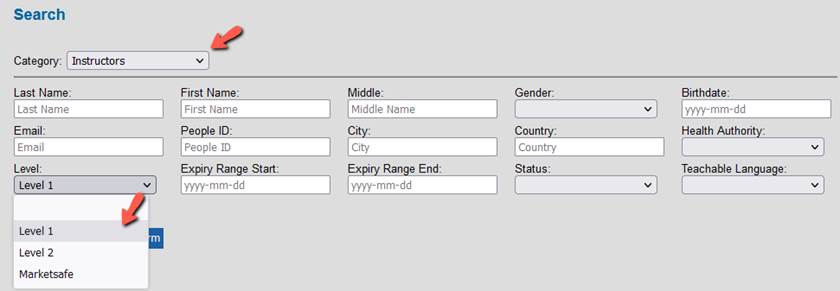
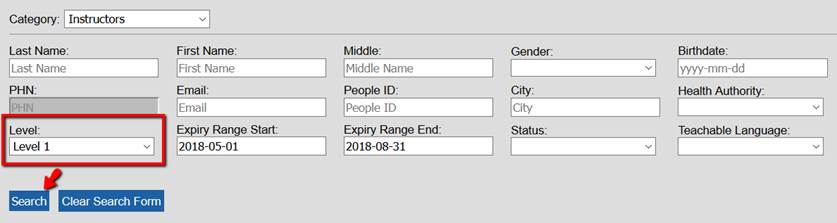
5.3 Search Instructors by Teaching Level Expiry Dates
To search for instructors by teaching level and expiry date:
1.
Select the ‘Instructors’ option from the search category
menu:
|
|
2.
Select instructor level: Foodsafe ‘Level 1’, Foodsafe ‘Level 2’ or
‘MarketSafe’ and enter an expiry start date and end date in the expiry range
fields. Click on Search:
|
|
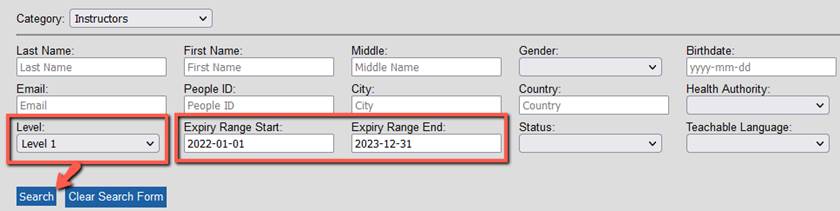
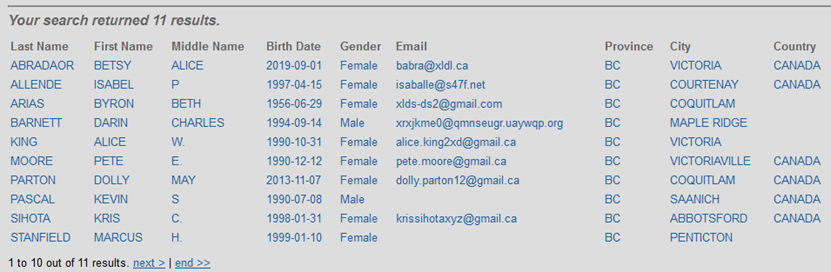
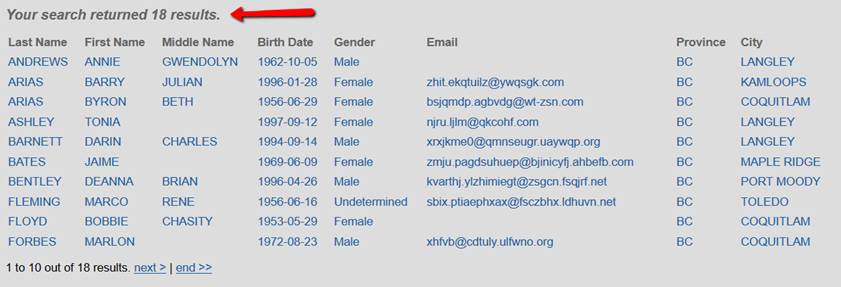
3.
The results include all instructors whose Level 1 teaching
certifications will be expiring within the date range entered:
|
|
|
TIP: If the instructor has
certifications for more than one level expiring during the selected date
range, the instructor will be listed once in the search results. Open the
record to review all teaching levels. |
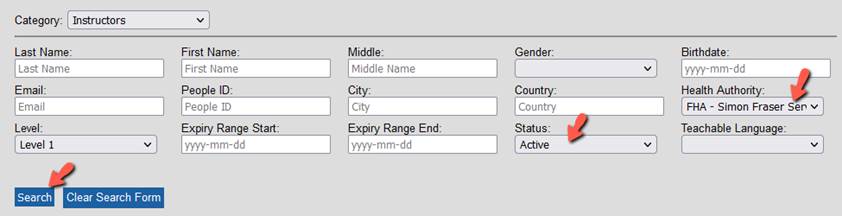
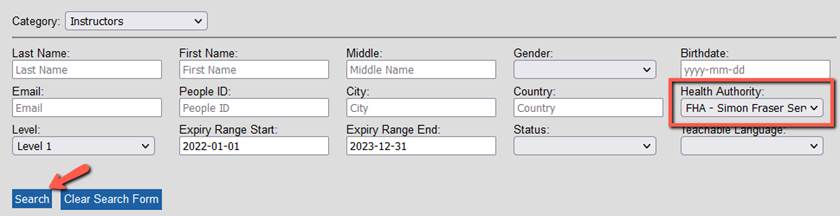
4.
To refine the search by another parameter, such as health authority,
select a value from the ‘Health Authority’ menu, and hit the Search
button:
|
|
5.
The results include all instructors certified to teach Foodsafe Level 1, whose teaching
certification will expire within the selected date range:
|
|
6.
To refine the search by Health Authority Service Area, select
the Service Area from the Health
Authority menu:
|
|
7.
The results include all instructors certified to teach Foodsafe Level 1 in the FHA Simon Fraser Service Area, whose
teaching certification will expire within the selected date range:
|
|

8. To refine the search by Teachable Language, select the language from the Teachable Language menu:
|
|
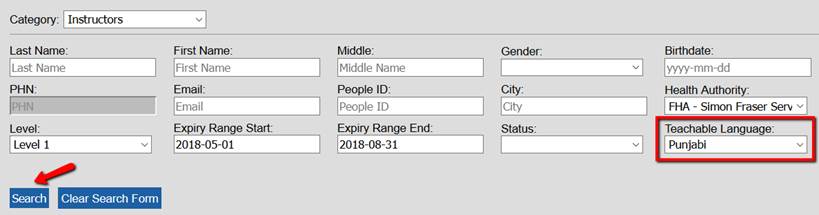
9. The results include all instructors certified to
teach Foodsafe Level 1 in the FHA Simon Fraser Service Area in the
Punjabi language, whose
certification will expire within the selected date range:
|
|

|
TIPS 1. Searches can be performed using one or more search criteria. 2. To refine a search (search the search results) don’t clear the search results but instead, add criteria to the search form and click on the Search. 3. To clear the search, use the Clear Search button or, or select a different search category or function. |
6 ADD CLIENT (STUDENT)
6.1 Add Client (Student)
To add a new client record:
1. Click on the Add Client button:
|
|

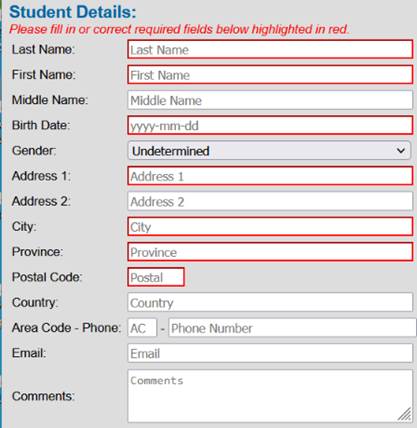
2. A blank Student Details form opens:
|
|
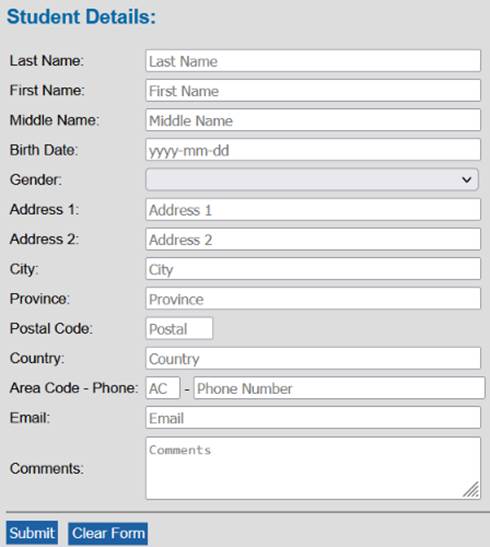
3. Required fields are marked in red:
|
|
4.
Enter the last name, first name, and middle name
data in the appropriate fields.
Use the Tab key to move from one
field to the next:
|
|
|
TIPS 1. The ‘Last Name’ field has a limit of 35 characters. 2. The ‘First Name’ field has a limit of 19 characters. 3. The ‘Middle Name’ field has a limit of 15 characters. 4. Data entered as lower case or Mixed Case is saved as UPPER CASE. |

5.
In the birthdate
field, enter the date in the following format, including hyphens: YYYY-MM-DD.
Use the Tab key to move to the next field.
|
|
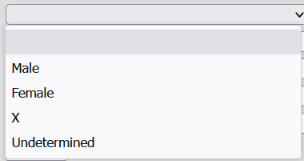
6.
In the gender
field, select one of the four options in the drop-down menu: ‘Male’, ‘Female’,
‘X’ or ‘Undetermined’.
Alternatively, type in ‘M’, ‘F’,
‘X’ or ‘U’ and then use the Tab key to go to the next field.
|
|
|
TIP:
If a student’s form is supplied without a gender selection, please enter
‘Undetermined’. |
|
Update
January 2020 British Columbians who do not identify as male or female have the choice to display an ‘X’ as a third option in the gender field of the Foodsafe exam registration forms. Accordingly, a new gender value of ‘X’ has been added to the Registry. If a form is submitted without a gender selection, please enter ‘Undetermined’. |
5.
Enter the address according to Canada
Post guidelines.
The Canada Post guidelines are found on the Canada
Post website:
|
|
|
TIP: Please take care entering this address as it is used for mailing certificates to clients. See also Section 7.1 Canada Post Guidelines |

6. In the province field enter two characters for the province or state, for example: BC, AB, WA.
|
|
7.
In the postal
code field enter the postal code with no space or enter the
5-digit zip code.
For example: V2V3A3, 98281
|
|
8. In the country field enter the country name (optional):
|
|
9. In the area code field enter a three-digit code, hit the Tab key, and in the phone field, enter the seven-digit phone number with no hyphen:
|
|
10.
In the email field, enter the student’s email address including the domain.
For example, name@domain.com: jsmith@gmail.com;
john.doe@email.ca; janedoe@telus.net
|
|
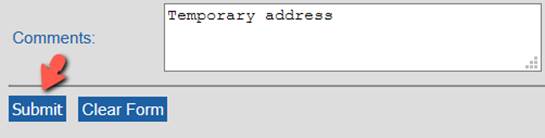
11. In the comments field, enter any comments and save the client record using Submit:
|
|
|
TIP: The comments field is meant for information only. At any time, an individual can verify the accuracy of their personal information held in the Foodsafe Registry by contacting their Health Authority. |
6.2 Maximum Characters for Student Names
To ensure that most names will print successfully onto certificates, wallet cards, and labels, the following character limits are implemented in the FOODSAFE Registry and in the Open School registration system:
1. First Name (given name) – maximum of 19 characters.
2. Middle Name – maximum of 15 characters.
3. Last Name (surname) – maximum of 35 characters.
For details on how long names are handled on certificates and wallet cards, see Section 14.5 Long Names in Certificates and Wallet Cards.
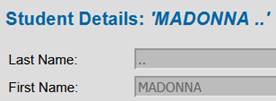
6.3 Add Single Names
If an individual’s
official documentation (Passport, Care Card, Driver’s Licence) lists only one
name, please enter the name in the ‘First Name’ field. In the ‘Last Name’
field, please enter two periods. For example:
|
Registry entry for an individual with one name
|

6.4 Add Accents in Names
For clients who have names containing accents, please use UTF-8 code
numbers to enter the accented characters in the ‘Student Details’ form,
including the first digit ‘0’.
|
COMMON ACCENTED CHARACTER CODES |
||
|
Character |
Entry |
Character Name |
|
À |
Alt + 0192 |
Latin capital
letter A with grave |
|
 |
Alt + 0194 |
Latin capital
letter A with circumflex |
|
Ç |
Alt + 0199 |
Latin capital
letter C with cedilla |
|
È |
Alt + 0200 |
Latin capital
letter E with grave |
|
É |
Alt + 0201 |
Latin capital
letter E with acute |
|
Ê |
Alt + 0202 |
Latin capital
letter E with circumflex |
|
Ë |
Alt + 0203 |
Latin capital
letter E with umlaut |
|
Ñ |
Alt + 0209 |
Latin capital
letter N with tilde |
|
Ô |
Alt + 0212 |
Latin capital
letter O with circumflex |
|
Ö |
Alt + 0214 |
Latin capital
letter O with umlaut |
To enter a character with an accent:
1.
On your keyboard Number Pad, turn the Num Lock ON.
2.
Hold down the Alt key.
3.
Position your cursor in the name field and enter the code
number using the Number Pad.
Please include the ‘0’ as the first digit in the code, for example: 0201
4.
Release the Alt key.
5.
The accented character is inserted:
|
|
|
TIPS 1.
In the ‘Student Details’ form you can
enter the accented character codes for upper- or lower-case letters; the
Registry saves both as upper case. 2.
Include a zero ‘0’ as the first digit
in the code, for example: 0201 3.
The certificates and wallet cards
display names in upper case, for example:
NOËL, HÉLÈNE 4. A list of UTF-8 codes can be found at https://www.w3schools.com/charsets/ref_utf_latin1_supplement.asp |
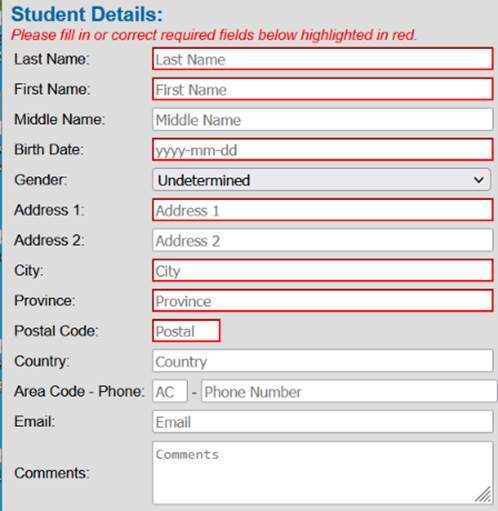
6.5 Validation errors in the Student Details Form
6.5.1 Missing data in required Student Details fields
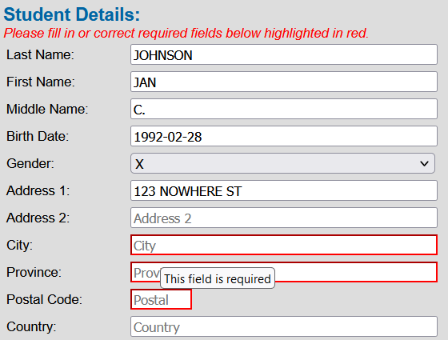
If the Student Details form is submitted when required fields are blank, a red validation error message displays at the top of the form, and red borders display on fields which require data. The record cannot be submitted until the required data is entered.
|
|
To resolve the validation errors:
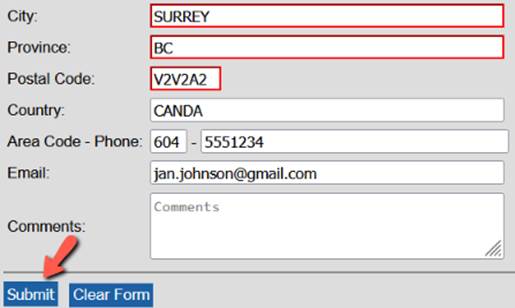
1. Enter the required data and click on Submit:
|
|
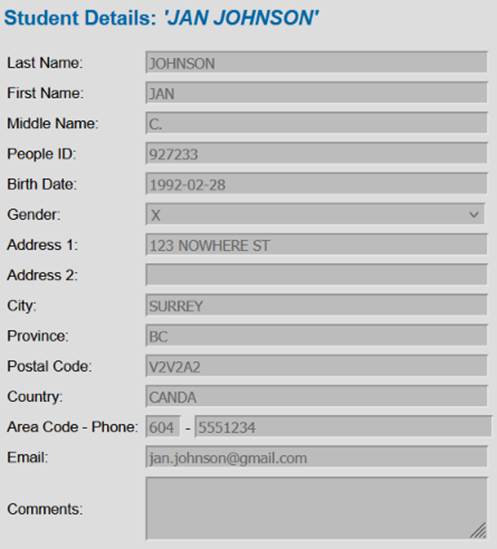
2. The data is successfully submitted and saved:
|
|
|
TIPS The required ‘Student Details’ fields are indicated below with a red border. The other fields are optional. For the Process Safe and Introduction to Food Microbiology certifications, an email address is required to send the student their digital certificate via email.
|
6.5.2 Incorrect data format
If the data format is incorrect, upon ‘submit’ a red validation error message displays at the top of the form, and red borders display on the fields containing data entered in an incorrect format:
|
|
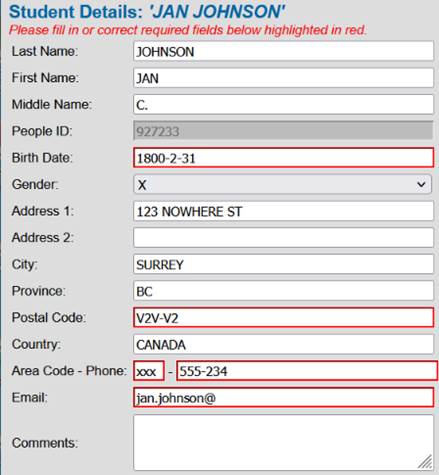
To resolve a validation error.
1. Hover the cursor over the field to view the error message with further details:
|
|

2. Enter the data in the proper format and Submit:
|
|
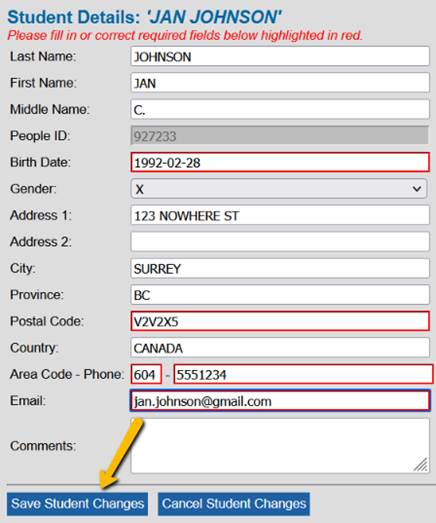
3. The corrected data is validated, successfully submitted, and saved.
|
|

|
TIPS 1. Data entered as lower case in required fields is saved as UPPER CASE. 2. In fields containing drop down menus, you can use the mouse to select an option, or type in the first letter of the value, then use Tab to go to the next field. 3. Student Details cannot be submitted to the Registry unless data is entered in all the required fields. 4. Student Details cannot be submitted to the Registry unless data is entered in the correct format. 5. To view a tool tip with the expected data format, hover your cursor over the field. 6. To view a tool tip for correcting a validation error, hover your cursor over the field displaying the red border. 7. The ‘Province’ field accepts 2 characters for a Canadian province or US state abbreviation. For addresses supplied without a province or state, enter the two digits ‘00’. 8. The ‘Postal Code’ field accepts a 6-characters code (no space) or a 5-digit zip code. For example: V2V3A3, 98281 For addresses supplied without a postal code in the required format, enter ‘00000’. 9. The ‘Telephone’ field allows seven digits, no hyphen. For example: 5551234 10. The ‘Email’ field address must include the domain information. For example, name@domain.com: jsmith@gmail.com; john.doe@email.ca; janedoe@telus.net |
6.6 Edit Student’s Details
|
Note from BCCDC: Regardless of whether the
student is within your Health Authority, if you have new personal information for a student, please update the personal
details. For example: name, address, telephone, email. |
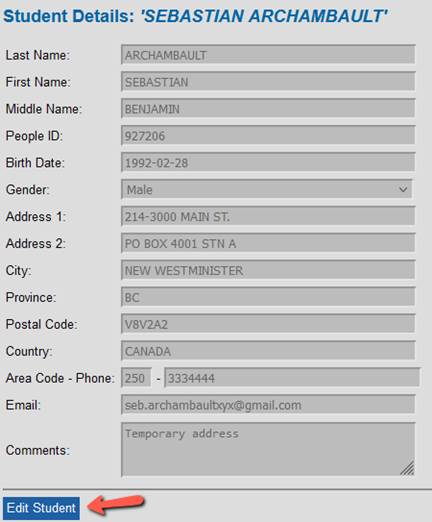
1. To open a student record from the search results page, click on the student row:
|
|

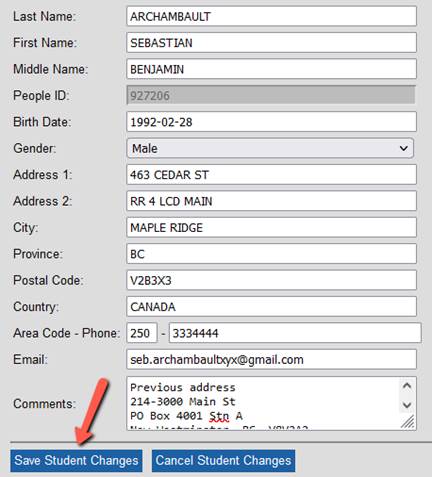
2. The ‘Student Details’ page opens. Click on the Edit Student button:
|
|
3. Enter the new data in the editable fields and click on Save Student Changes:
|
|
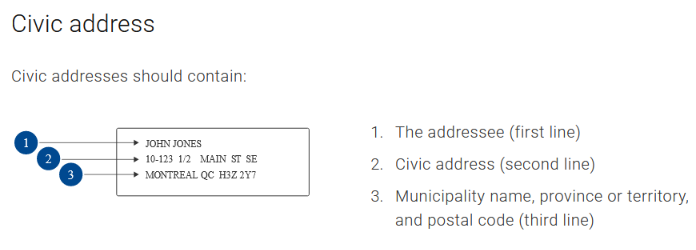
7 ADDRESS CHANGES
7.1 Canada Post Guidelines
When checking or updating a person’s
address, please refer to the Canada Post guidelines. A correctly formatted address will
ensure that the person receives their certificate and wallet card in the mail
without delay.
See Canada Post examples below.
|
|
|
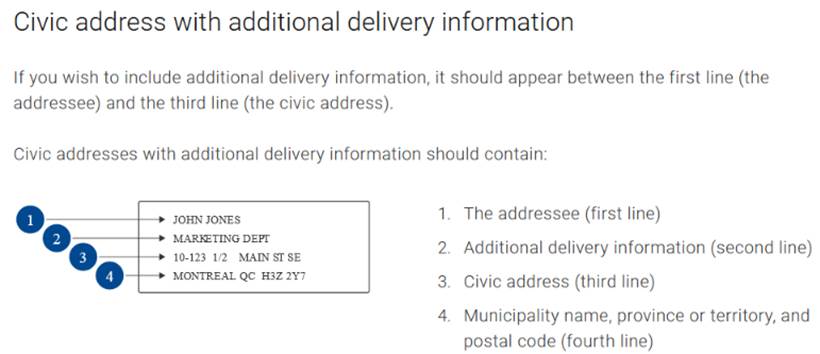
2. Civic address with additional
delivery information |
|
|
|
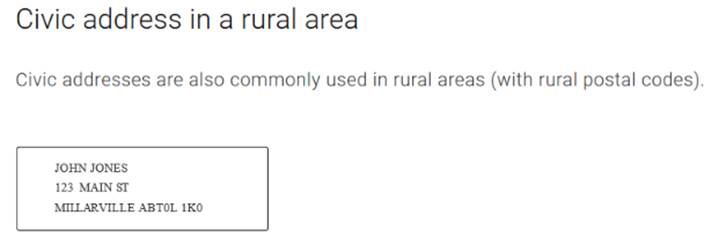
3. Civic address in a rural area |
|
|
|
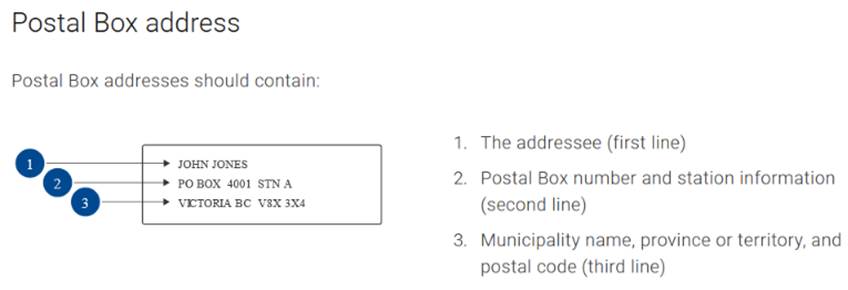
4. Postal Box address |
|
|
|
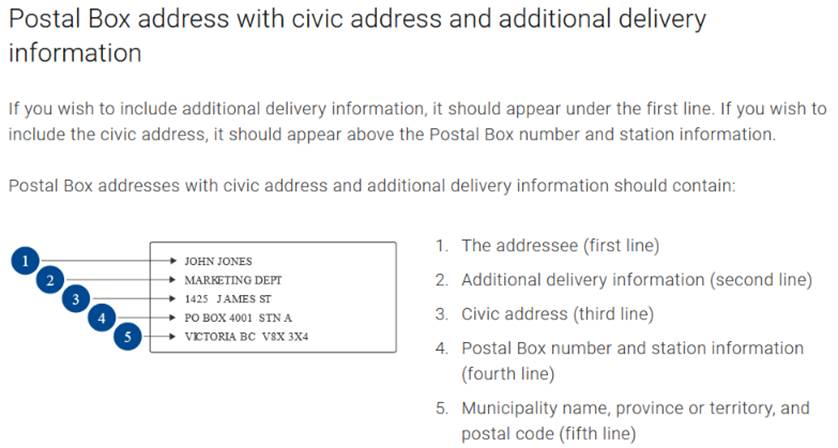
5. Postal Box address with civic address and additional delivery information |
|
|
|
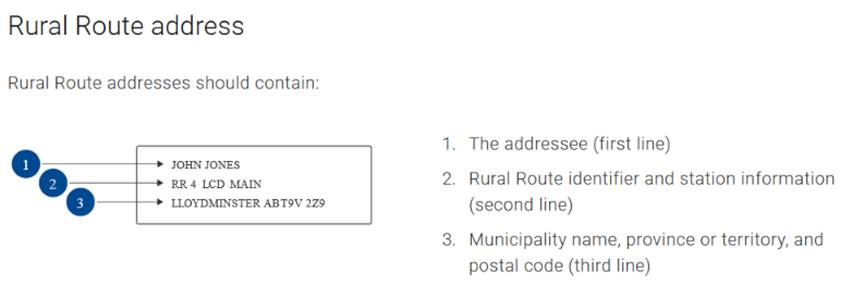
6. Rural Route address |
|
|
|
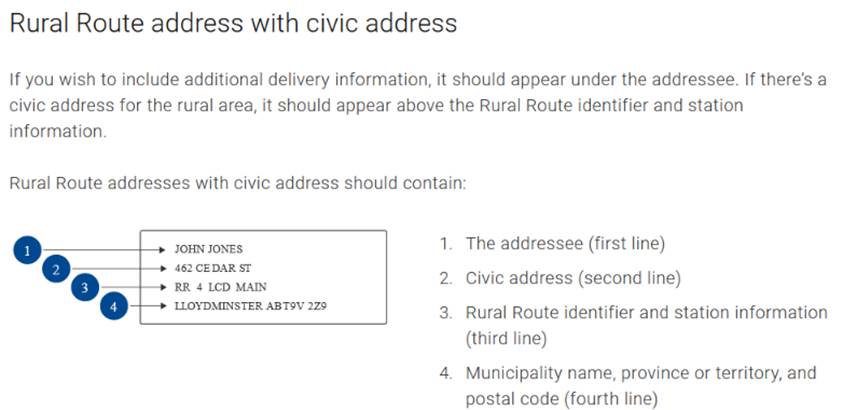
7. Rural Route address with civic
address |
|
|
|
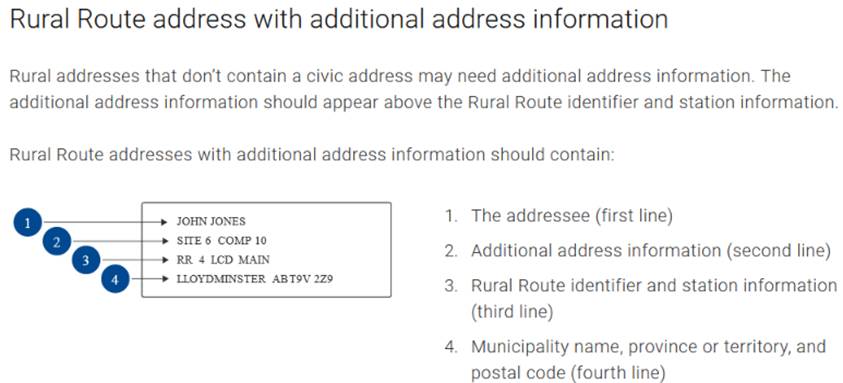
8. Rural route address with additional
address information |
|
|
|
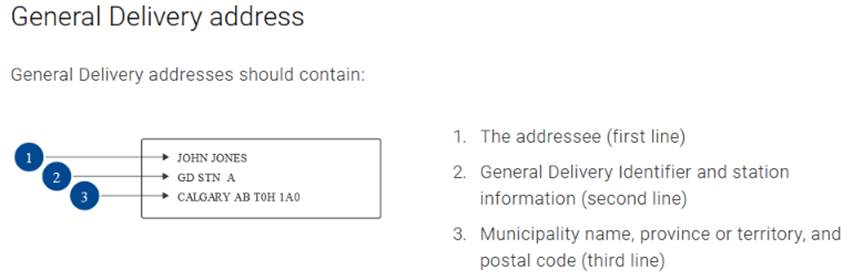
9. General Delivery Address |
|
|
7.2 Address Format Safeguards
7.2.1 Open School System
When a student completes a food safety course with Open School BC, Open School’s system submits the student’s contact information and exam data to the Foodsafe Registry in a system-to-system transfer of data.
The Open School system has the following safeguards in place to minimize student data entry errors.
1. Open School checks for the # symbol, commas, and periods to prevent submission of these symbols to the Registry.
2. Open
School has a separate field for unit/suite/apartment numbers. When the address
is submitted to the Registry a hyphen is added between unit number and street
address for insertion into the Registry’s ‘Address 1’ field.
Example: 100–6000 Main St
3. Character limits in Open School’s address fields match character limits in the Registry address fields, to prevent truncating of data.
7.2.2 Address Format Safeguards in the Registry
For student address data that is manually entered or edited by Registry users, the following Registry safeguards are in place to minimize address formatting errors:
1. The ‘Address 1’ field has a character limit of 25 characters.
2. The ‘Address 2’ field has a character limit of 25 characters.
3. The province field accepts two characters. Example: BC, WA.
4. The postal code field accepts postal codes or zip code in the following format.
Postal Code: Six characters with no space. Example: V8V2X2
Zip Code: Five digits. Example: 98281.
5. The Country field accepts up to 40 characters.
6. A validation error occurs when the user attempts to save incorrectly formed data.
7. When the cursor hovers in a data field, tool tips instruct the user on the required format.
8 ADD NEW EXAM
8.1 Add FoodSafe or MarketSafe Exam
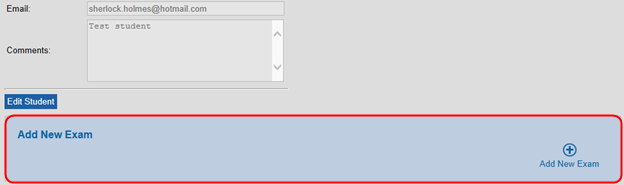
Once the student details form has been submitted, the ‘Add New Exam’ panel displays in the student record:
|
|
To add a new exam:
1. Click on Add New Exam:
|
|

2.
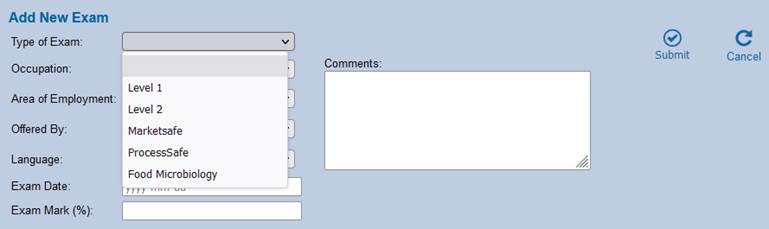
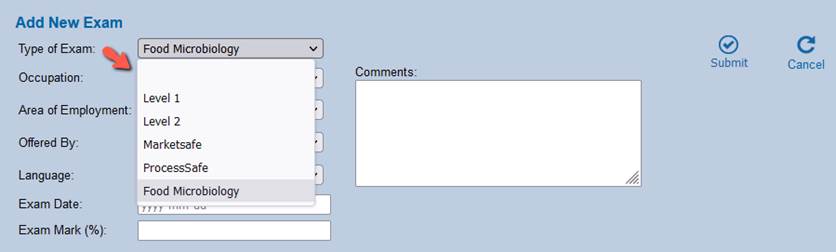
In the ‘Add
New Exam’ form, make selections from each of the drop-down menus:
‘Type of Exam’, ‘Occupation’, Area of Employment’, ‘Offered By’, and ‘Language’:
|
|
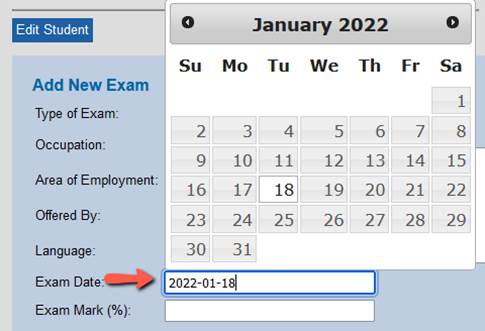
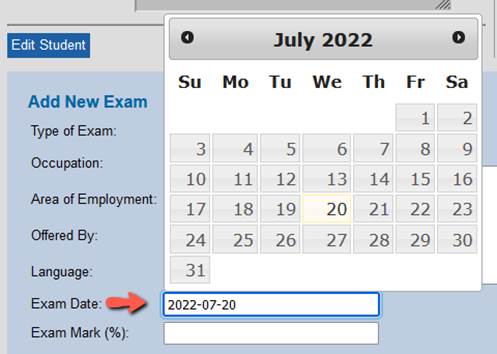
3. In the ‘Exam Date’ field, enter the exam date using the calendar, or manually enter the date in the following format, including hyphens: YYYY-MM-DD
|
|
4. In the ‘Exam Mark’ field, enter the exam mark as a whole number:
|
|
|
TIPS 1. Use numerical entries. Example: 75, 80, 100. 2. Enter whole numbers. Do not enter decimals. 3. Exam mark must be between 0 and 100. 4. Do not enter a % sign. 5. Marks required to achieve a passing grade: a. FoodSafe Level 1: A mark of 70 percent or greater. b. FoodSafe Level 2: A mark of 80 percent or greater. c. Foodsafe Refresher: A mark of 80 percent or greater. d. MarketSafe: A mark of 70 percent or greater. e. ProcessSafe: A mark of 70 percent or greater. f. Introduction to Food Microbiology: A mark of 70 percent or greater. |
5. In the ‘Exam Comments’ field, enter any additional information about the exam:
|
|

6. When you have finished entering the data, click on Submit:
|
|

8.2 Add to Queue
|
|
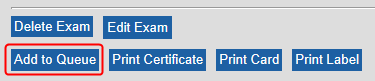
Upon submission of a Level 1 or Level 2 exam with a passing
grade, a certificate is automatically added to
‘My Student Queue’.
Upon submission of a MarketSafe exam with a passing grade, a
certificate is automatically added to
‘My MarketSafe Student Queue’.
The expected
use of the Add to Queue button is for
cases where a reprint is required for a student within your Health Authority, and
you wish to add the certificate to your queue for batch printing.
|
TIP: The Add to Queue button is also used to move a certificate from another user’s queue to your queue. See Section 15.2 Move a Certificate from the All HA-SA queue to My Student Queue. |
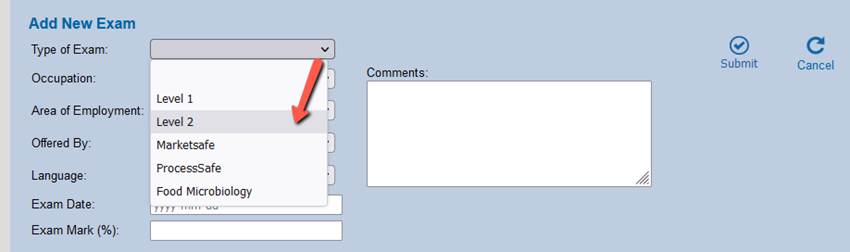
8.3 Record a Level 1 Equivalent
The BC
Center for Disease Control determines the courses equivalent to a FOODSAFE
course. Some students have a food safety certification deemed to be equivalent
to BC FOODSAFE Level 1, as verified by FOODSAFE authorities. The Level 1
equivalent enables the student to register for the FOODSAFE Level 2 course and
receive a Level 2 certificate. The Level
1 equivalency information is associated with the Level 2 exam.
To record a
Level 1 Equivalent:
1.
In the ‘Add New Exam’ form, in the ‘Type of Exam’ field, select ‘Level 2’ from the drop-down menu:
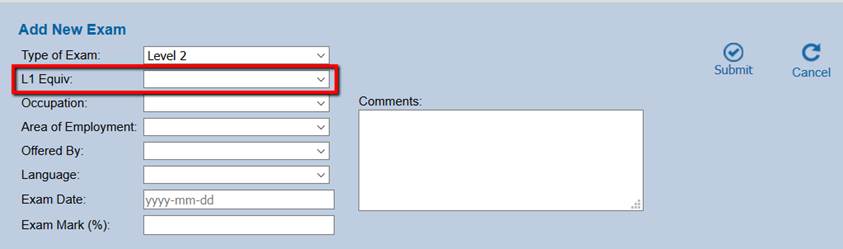
|
|
2.
When Level 2 is selected the ‘L1 Equivalent’ field is displayed:
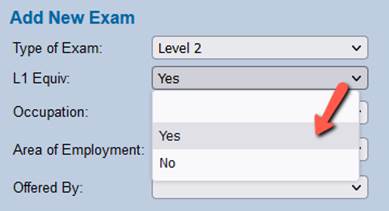
|
|
3.
If the student has a verified FOODSAFE Level 1 equivalent,
select ‘Yes’ from the menu:
|
|
4.
Enter the values for the remaining fields, and Submit:
|
|

5.
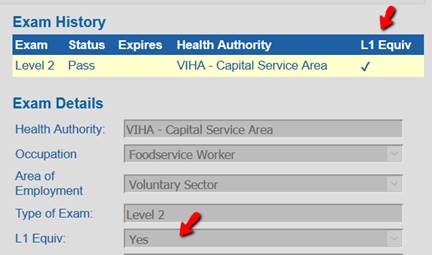
Under Exam History,
a checkmark appears in the L1 Equivalent column.
Under Exam Details, the L1
Equivalent field is marked ‘Yes’:
|
|
6.
If the student has the Level 1 Equivalent plus a passing
grade on the Level 2 exam, upon submit, a Level 2 certificate is automatically
added to My Student Queue upon submit.
|
TIPS 1.
When
adding Level 2 exams for students with a valid Level 1, in the L1 Equivalent
field enter ‘No’ (or leave it blank). Both values are treated as ‘No’ when
searches are performed on Level 1 equivalent = No. 2. When
a successful Level 2 exam with a Level 1 equivalent is manually submitted to
the Registry, the Level 2 certificate is automatically added to My Student
Queue for users with a clerical role. 3. If
the exam record is edited whereby the Level 1 Equivalent value is changed
from ‘Yes’ to ‘No’, the Level 2 certificate is automatically removed from the
certificate queue. 4. The
BC Center for Disease Control determines the courses equivalent to a FOODSAFE
course. For
more information< please visit BCCDC’s website at: |
8.4 Add a ProcessSafe Exam or Introduction to Food Microbiology Exam
The ProcessSafe and Introduction to Food Microbiology certifications
are offered exclusively by Open School BC in an online format. Exam results are
submitted to the Registry by Open School’s system. If manual entry is required:
To add a new exam:
1. Click on Add New Exam:
|
|

2. In the Add New Exam form, select ‘ProcessSafe’ or ‘Food Microbiology’ from the Type of Exam menu.
|
|
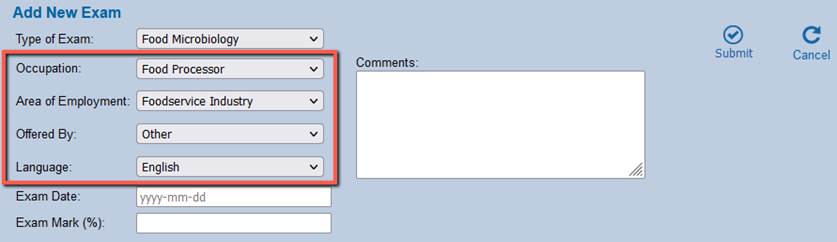
3. Select options from each of the following drop-down menus:
Occupation, Area of Employment, Offered By, and Language.
|
|
|
Language field The ProcessSafe and Introduction to Food
Microbiology courses are only offered in English at this time. |
4. In the Exam Date field, enter the exam date using the calendar, or manually enter the date in the following format, including hyphens: YYYY-MM-DD
|
|
5. In the Exam Mark field, enter the exam mark as a whole number:
|
|
|
TIPS Exam Mark field 1. Use numerical entries. Example: 75, 80, 100. 2. Enter whole numbers. Do not enter decimals. 3. Exam mark must be between 0 and 100. 4. Do not enter a % sign. 5. Marks required to achieve a passing grade: a. FoodSafe Level 1: 70 percent or greater b. FoodSafe Level 2: 80 percent or greater c. MarketSafe: 70 percent or greater d. ProcessSafe: 70 percent or greater e. Introduction to Food Microbiology: 70 percent or greater. |
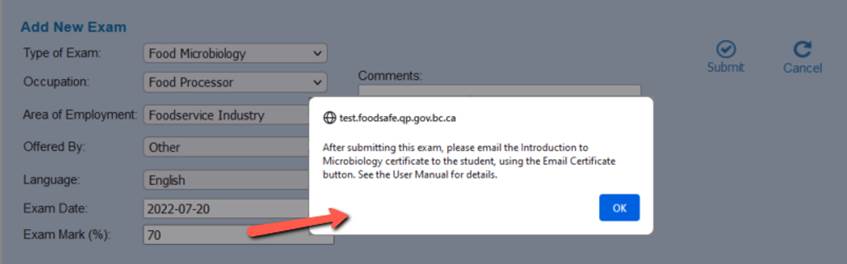
6.
Upon entering a number equal to or greater than the
passing mark of ‘70’, a pop-up message instructs you to email the certificate
to the student after the exam results are submitted, using the Email
Certificate button.
Click on OK:
|
|
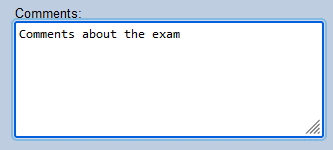
7. In the Exam Comments field, enter any additional information about the exam:
|
|
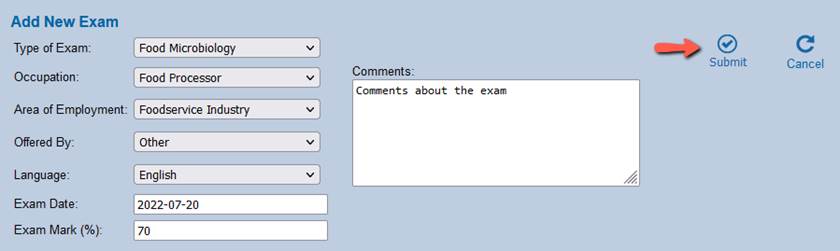
8. When you have finished entering the data, click on Submit:
|
|
9.
Continue to section 9 and follow the instructions for
emailing the certificate.
9 EMAIL CERTIFICATE
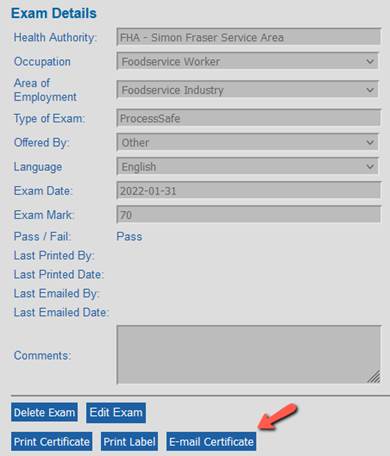
9.1 Email a Certificate (ProcessSafe or Introduction to Food Microbiology)
To email the
digital certificate to a ProcessSafe or Food Microbiology student:
1.
Select the certification under Exam History:
|
|
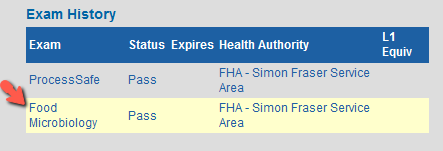
2.
Under Exam Details, click on the E-mail Certificate
button:
|
|
|
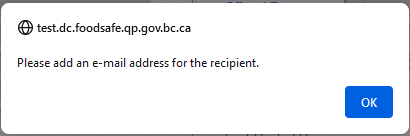
TIP If the student has no email address recorded
in the student details form, you will receive a reminder message to add an
e-mail address for the recipient: |
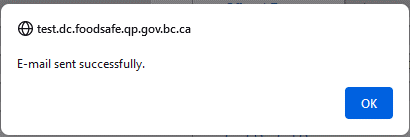
3. After clicking on the Email Certificate button, a pop-up message confirms that the email has been sent successfully:
|
|
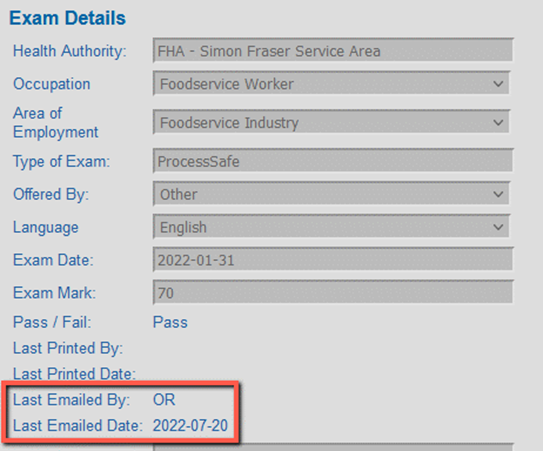
4. The Last Emailed By field is updated with the username of the person
who emailed the certificate.
The Last Emailed Date field is updated with the date that the certificate email
was sent.
|
|
|
TIP In
the event that a certificate email is bounced-back, the Registry system sends
a bounce-back email to feedback@foodsafe.ca at the Foodsafe Secretariat. The Foodsafe Secretariat
follows up with the student and BC Centre for Disease Control, as required,
to ensure the student email address is valid, and that the certificate email Given
that Open School BC validates student emails when the students take an online
course, it is expected that bounce-back emails to feedback@foodsafe.ca will be infrequent.
|
10 VIEW EXAMS / CERTIFICATIONS
10.1 View Exam History
Exam History displays a list of all the client’s
FOODSAFE exams, in the following order:
1.
FOODSAFE Level 1
2.
FOODSAFE Level 2
3.
FOODSAFE Level R (level 1 refresher)
4.
MarketSafe
5.
ProcessSafe
6.
Introduction to Food Microbiology.
If multiples of a particular exam type are present, the
oldest exam is at the top.
|
|

Exam History data includes:
1.
Exam Type – Level 1, Level 2, Level R, MarketSafe, ProcessSafe, and Introduction
to Food Microbiology.
2.
Status – pass, fail, or expired.
3.
Expiry Date
a.
The Level 1 certification expiry date is based on the exam
date + five years.
b.
The Level R certification expiry date is based on the exam
date + five years.
c.
The other certifications do not have an expiry date.
4.
Health Authority – The student’s health authority service area at the
time they wrote the exam.
5.
L1 Equivalent – A check mark indicating that the student has a food
handler training course equivalent to the BC Foodsafe Level 1 certification,
which allowed them to take FOODSAFE Level 2.
10.2 View Exam Details
To view the details of an exam:
1. Under Exam History, click on the exam. The selected exam is highlight in yellow.
|
|
2. Details of the exam are displayed in the Exam Details form:
|
|
3. A pass or fail grade is generated automatically based on the mark entered:
|
|
4.
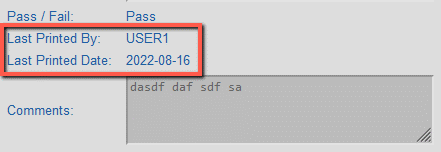
The ‘Last Printed By’ field indicates the user
who printed the certificate.
If the certificate has never been printed, the field is blank:
|
|
5. The Last Printed Date field indicates the date that the user printed the certificate (using the print queue, or the print certificate button).
|
|
|
TIPS Passing Grades A mark of 80 or greater is required to pass the Level 2 exam. A mark of 80 or greater is required to pass the Level 1 Refresher exam. A mark of 70 or greater is required to pass the MarketSafe exam. A mark of 70 or greater is required to pass the ProcessSafe exam A mark of 70 or greater is required to pass the Introduction to Food Microbiology exam. |
11 EDIT / DELETE EXAMS
11.1 Edit an Exam
To edit the student’s Exam Details:
1. Click on the Edit button at the bottom of the Exam Details form:
|
|
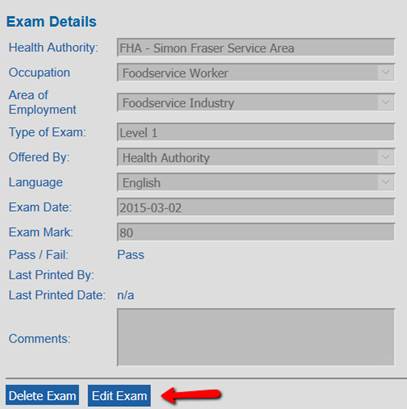
2. Enter the changes in the editable fields, and Save Exam Changes:
|
|
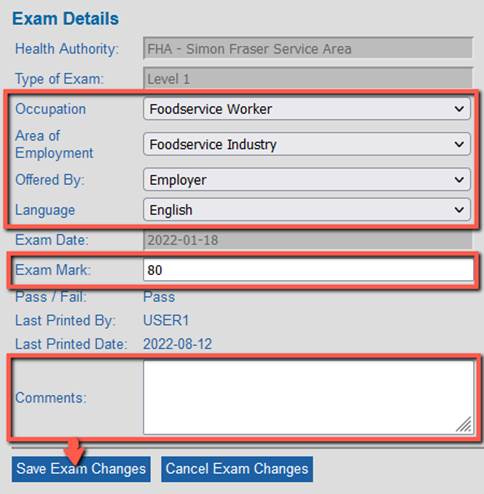
|
TIPS 1. The following fields are
restricted from editing: Health Authority, Type of Exam, and Exam Date 2.
If
the exam has been registered under your Health Authority service area, you
will have access to the |
|
|
View 1: Edit / Delete Exam Accessible The exam is registered under
your Health Authority |
View 2: Edit / Delete Exam Restricted The exam is registered under a different Health Authority service area.
|

11.2 Delete Student Exam
|
Note from BCCDC: Clerical role users can only alter or delete exam records that are within their own Health Authority and Service Area. If the record is outside your Health Authority / Service Area, please forward the information to the clerical user(s) who is designated to administer that Service Area, indicating which exam records need to be changed. Note from BCCDC: Clerical role users can update
the personal information for
students in any Health Authority / Service Area. If you have new personal information for a student,
please update their personal details. |
To delete a student exam, the student exam must be under the
Health Authority service area you
are logged in under.
A user logged in under one Health Authority service area cannot delete a
student exam for a student exam registered under another service area.
To delete an exam:
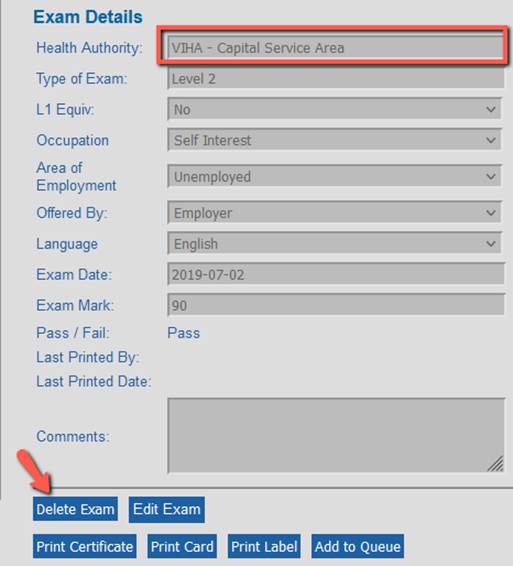
1. In the following example, the user is logged in under VIHA – Capital Service Area. The student Exam is registered under the same service area. The user may delete either or both exams.
|
|
2. To delete the Level 2 exam, click on the Level 2 exam under Exam History, to display the exam details:
|
|
3. At the bottom of the Exam Details, click on the Delete Exam button:
|
|
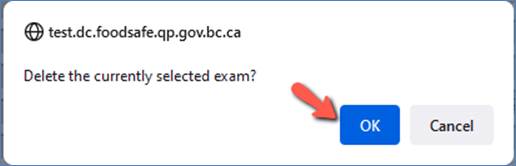
4. At the prompt, click OK:
|
|
5. The exam is deleted and removed from the Exam History:
|
|

|
TIPS 1. A student exam cannot be deleted from a client record when the client is certified as an instructor in the Registry. 2. To delete an exam from an instructor record, the instructor qualifications must be deleted first. |
12 DELETE A STUDENT
12.1 Delete Student Record (Duplicate Records)
You can only request deletion of a student record for a student within your own Health Authority.
To request a deletion for student within your Health Authority, see Section 12.1.1 Delete student records within your Health Authority.
If you have found a duplicate record for a student outside
your Health Authority, please follow the instructions under
Section 12.1.2 Delete student records outside your Health
Authority.
|
Note from BCCDC: If you have new personal information for a student in
any Health Authority / Service Area, please update their personal details.
For example: name, address, telephone, email. Note from BCCDC: BCCDC will only delete student records that have no exam results attached to the record. |
12.1.1
Delete
student records within your Health Authority
If you have identified a duplicate student record within your Health Authority:
1.
Confirm
that the person in one record is the same as the person in a suspected
duplicate record, by comparing
(and matching) personal identifiers (middle name, birth date, address, etc.)
2. Transfer any missing exam information, comments, etc. to the record that will be retained. Any questionable records should not be altered or deleted.
3. Once information has been transferred over, delete any exam records attached to the duplicate record, using the Delete Exam button.
|
|
4. Finally, advise Environmental Health Services at the BC Centre for Disease Control at fpinfo@bccdc.ca of the record to be deleted. In your email, include the student name and people ID number for the record to be deleted.
12.1.2
Delete
student records outside your Health Authority
If you have identified a duplicate student record outside your Health Authority:
1. Email Environmental Health Services at the BC Centre for Disease Control at fpinfo@bccdc.ca and include the following information:
a. Student name
b. Student people ID
c. Student Health Authority
2. The BCCDC will route these requests to the appropriate Health Authority for vetting.
13 ADD INSTRUCTOR
13.1 Create an Instructor
Attaining teaching certification as a FOODSAFE instructor involves the individual meeting several criteria, including the achievement of a valid Level 1 exam (not expired) and a Level 2 exam, with passing grades of 90% or greater for both exam levels.
Attaining teaching certification as a MarketSafe instructor involves the individual meeting several criteria, one of which is the achievement of 90% or more on the MarketSafe exam.
To promote a FOODSAFE student in the registry to a FOODSAFE instructor status:
1. Search for the student using the Students search or Student Examination Results search:
|
|
2. From the search results page, open the student’s record:
|
|

3. In the student details page, if the student has passed both the FOODSAFE Level 1 and 2 exams with 90% or greater and the Level 1 exam has not expired, the ‘Make this student an instructor’ button will be displayed at the bottom of the Student Details form. Click on the Make this student an instructor button.
|
|
|
MarketSafe Note: 1. If an individual has passed the MarketSafe exam with 90% or greater, and they are not already a FOODSAFE instructor, the ‘Make this student an instructor’ button displays. Click on the Make this student an instructor button to enable the Instructor Qualifications panel, and then add the MarketSafe instructor qualification. 2. If the individual is already a FOODSAFE instructor, to add a MarketSafe instructor level, go directly to the Instructor Qualifications panel and add the MarketSafe instructor qualification. See step 4. |
4. The Instructor Qualification panel is displayed:
|
|
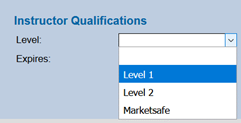
5. In the Instructor Qualifications panel, select the course level the instructor is being certified to teach:
|
|
6. Enter the expiry date for the certification; then, click on the Promote to Instructor button.
|
|
|
TIP: The expiry
date is manual entry and is determined by the person who has the authority to
certify the instructor. |

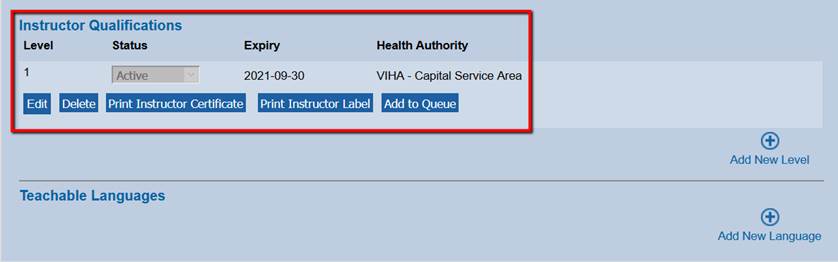
7. The student has been promoted to an instructor. The Instructor Qualifications panel displays the course level the instructor is qualified to teach, their status, teaching certification expiry date, and the Health Authority service area under which the instructor is qualified to teach:
|
|
8. To add a Language in which the instructor is able to teach click on the Add New Language icon:
|
|

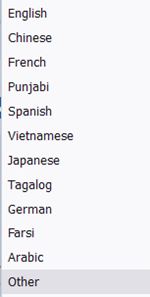
9. Select a language from the drop down menu:
|
|
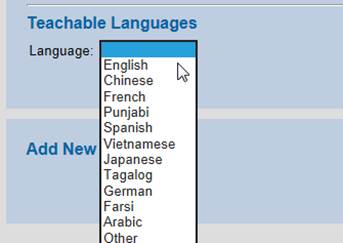
10. Once the language is selected, click on Submit:
|
|

11. The Teachable Language is now displayed under the Instructor Qualifications:
|
|
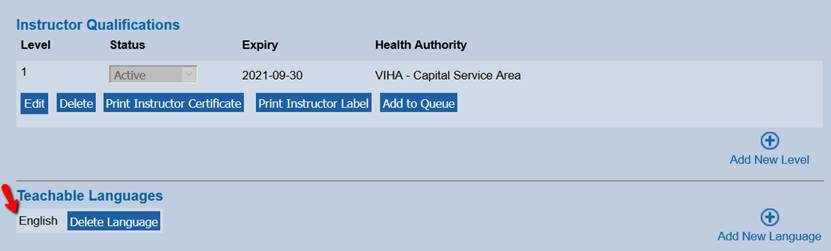
12. To add any other teachable languages, repeat steps 8 to 10.
13.
When the instructor level is added to the
Registry, an instructor certificate is automatically added to
My Instructors Certificate Queue.
When you are ready to print the instructor certificates, see Part 14 Print Certificates.
|
TIPS 1.
If Instructors are qualified to teach in multiple Health
Authority service areas, add teaching level qualifications for each Health
Authority service area. 2.
To add qualifications for another Health Authority service
area, you must be logged in to the Registry under that service area. 3.
When
a MarketSafe instructor teaching level is added to the Registry, a MarketSafe
Instructor certificate is automatically added to the My MarketSafe
Instructors Queue. 4.
My
Instructor Queue handles Instructor certificates for both FoodSafe Level 1
and Level 2 certifications. When a Student is
promoted to an Instructor, the ‘Student Details’ heading changes to ‘Instructor
Details’: |
13.2 Instructor Status
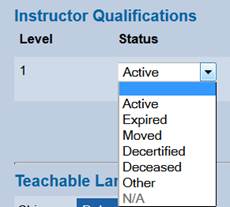
To add information about the status of an instructor:
1. In the ‘Status’ field select the appropriate value, including Active, Expired, Moved, Decertified, Deceased and Other.
|
|
2. If
you have just added an instructor course level and future expiry date (not expired),
the status field will automatically
default to Active status:
|
|

3. If the instructor’s expiry date passes, the instructor status will change automatically to Expired:
|
|

To change instructor status:
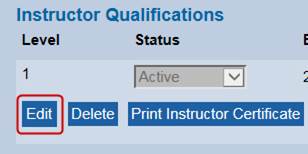
1.
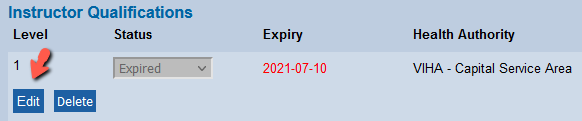
Click on Edit below the Instructor Level:
|
|
2.
Select the status value from the drop down menu.
For example: Moved.
|
|
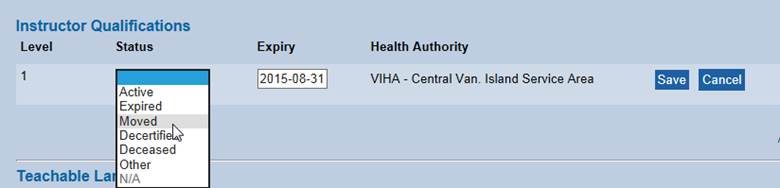
3.
Save the
changes:
|
|

|
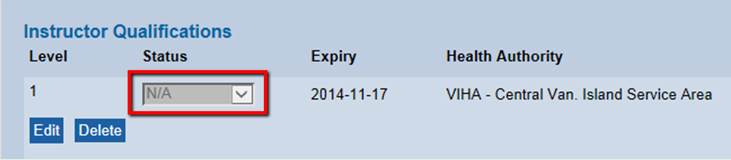
Historical
Note: When the FOODSAFE Registry 2 was first launched on July 29, 2013, the
status for existing Instructors in the Registry was defaulted to display as N/A. Users should edit the status
field to assign the appropriate status for each instructor, thus replacing
the N/A status.
|
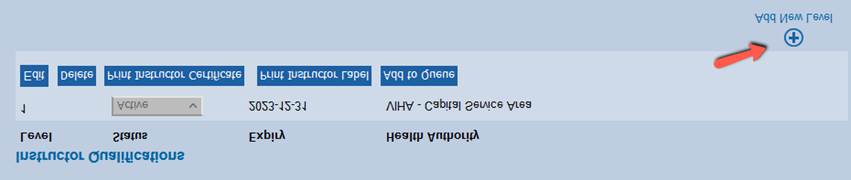
13.3 Add Course Level to Instructor Qualifications
An Instructor Qualifications record can have three course
levels assigned within each Health Authority service area:
FOODSAFE Level 1, Level 2 and MarketSafe.
13.3.1
Add
a new course level
To add a Level 2 course level to an existing instructor record:
1. In the Instructor Qualifications panel, click on Add New Level:
|
|
2. Select Level 2 from the Level menu:
|
|
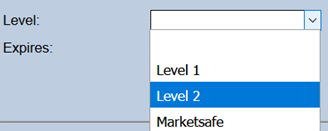
3. Enter the date of expiry for the certification:
|
|
4. Click on Save:
|
|

5. To indicate a language in which the instructor is authorized to teach, click on Add New Language:
|
|

6. In the Language drop-down menu, select a language, and Submit:
|
|

7. Course Level 2 has been added to the instructor teaching qualifications:
|
|
8. The Instructor’s teachable languages display below the instructor qualifications:
|
|

13.3.2
Update
expiry date for instructor qualifications
When an instructor’s expiry date is approaching or has passed and you want to extend their certification under the same Health Authority service area, use the edit function to update the expiry date.
|
TIP: When extending a teaching expiry date, always use the Edit function. If you try to add a second course level 1 or course level 2 under the same Health Authority service area, the FOODSAFE Registry considers it a duplicate and will not save the data. The following error message will display in the Instructor Qualifications panel.
|
To update the course level expiry date:
1. Ensure you are logged in under the Health Authority service area in which the instructor is being certified to teach.
2. In the Instructor Qualification panel, click on the Edit button below the course level you are updating:
|
|
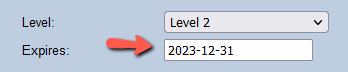
3. In the Expiry field, update the date to the new expiry date:
|
|

4. Save the change:
|
|

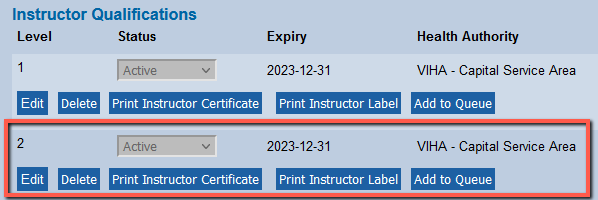
5. When the future expiry data is saved, the status field is automatically updated to ‘active’:
|
|
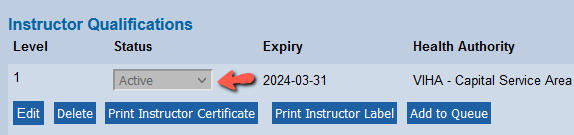
6. You may now print a new certificate and address label for the instructor.
|
TIP: When a teaching certification expiry date is updated, a certificate is not added automatically to the instructor queues. To print a new certificate with the updated expiry date, either print a single certificate and label using the Print Instructor Certificate and Print Instructor Label buttons, or, for batch printing, use the Add to Queue button. |
14 PRINT CERTIFICATES
14.1 Certificate Shell Types
There are 4 certificate shell types:
1. FOODSAFE Student Certificate for Level 1, Level 2 and Refresher certificates
2. FOODSAFE Student Wallet Cards for Level 1, Level 2 and Refresher certificates
3. FOODSAFE Instructor Certificate for Level 1 and Level 2 course levels
4. MarketSafe Certificate for student and instructor
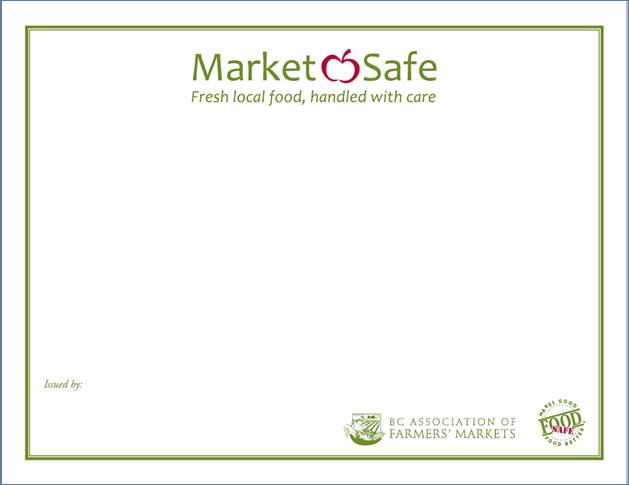
See Appendix for images of certificates, including FOODSAFE, MarketSafe ProcessSafe and Intro to Food Microbiology
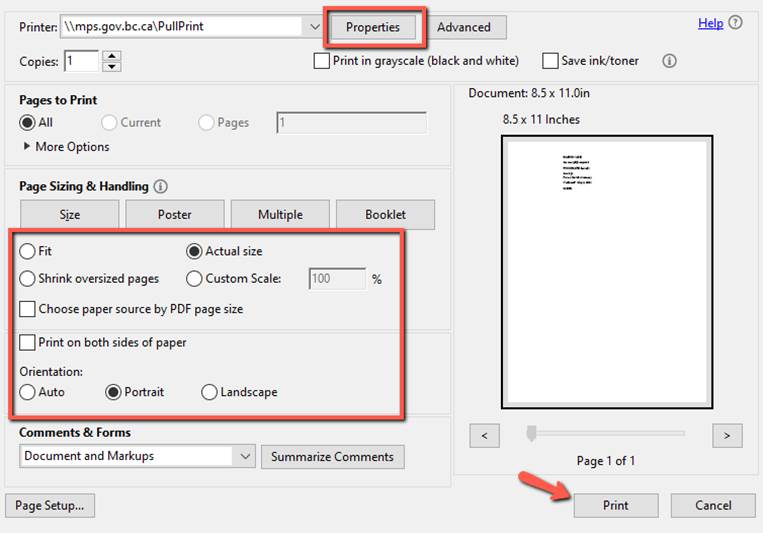
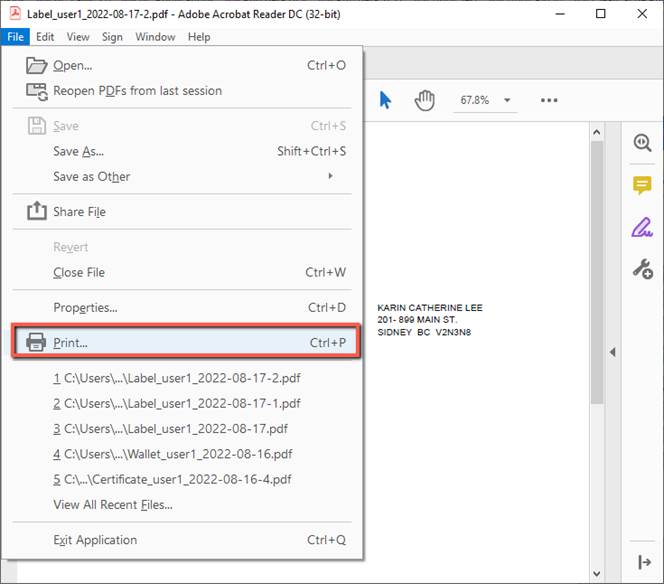
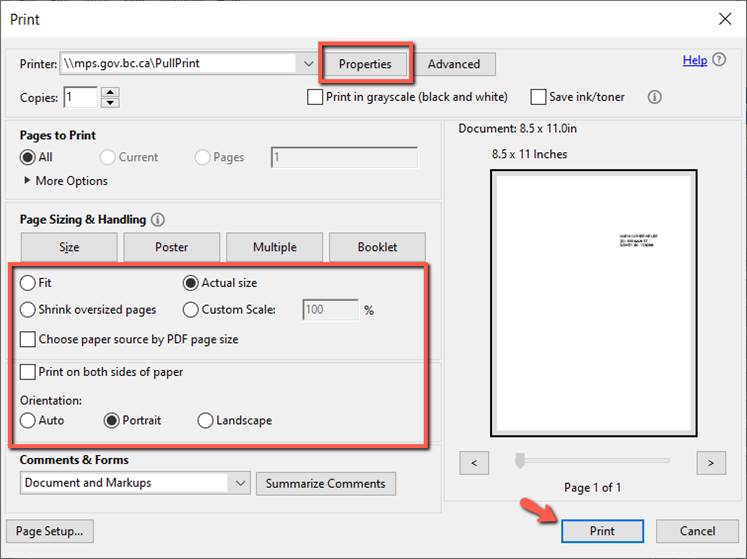
14.2 Certificate Print Settings for Adobe Acrobat Reader DC
When printing certificates, a PDF document is generated, and the document is opened in Acrobat Reader. Use the Acrobat Reader print function to send a print request to your printer.
For certificates, load certificate shells into the appropriate tray in your printer, and ensure the following settings are applied in the Acrobat ‘Print’ dialogue. These settings can affect the placement of the variable data onto the certificates (For example: name, course level, people ID).
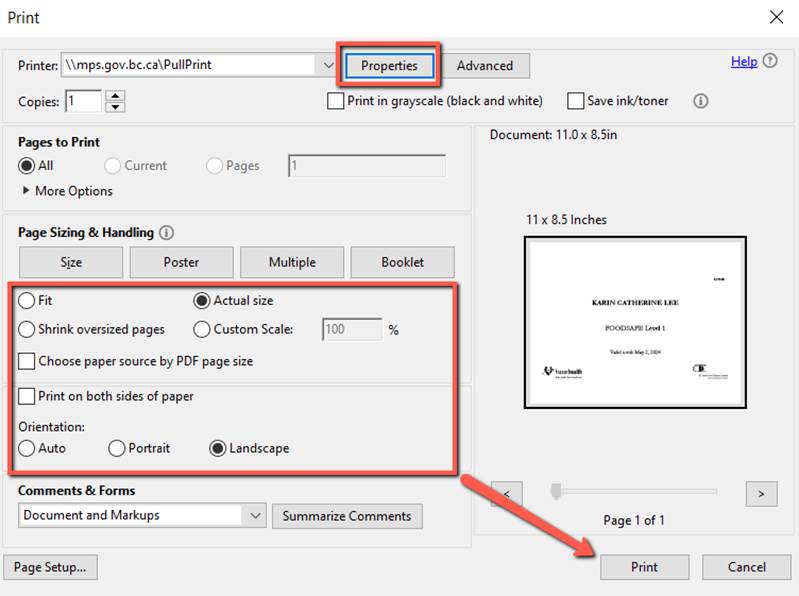
The following are the recommended settings for printing certificates in Adobe Acrobat Reader DC, Version 22.002.20.19.1.0. In the ‘Print’ dialogue:
1. Select ’Actual Size’.
2. Ensure the ‘Choose paper source by PDF page size’ checkbox is unchecked:
3. Ensure the ‘Print on both sides of paper’ checkbox is unchecked.
4. Ensure the ‘Orientation’ selected is ‘Landscape’:
|
|
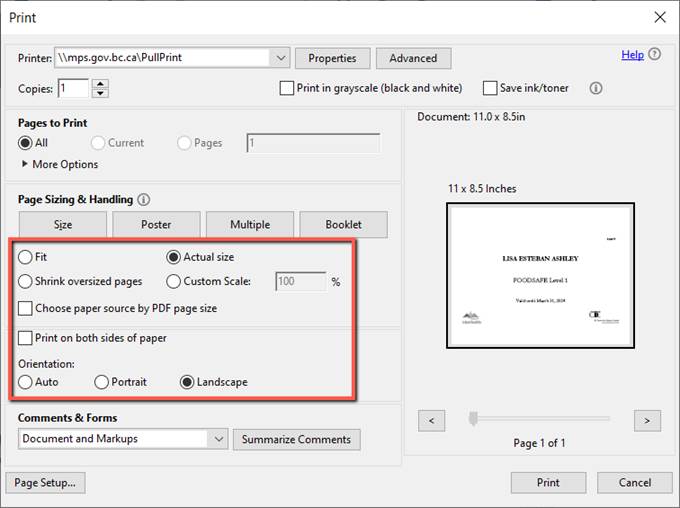
5. Click on the Properties button to select the appropriate ‘Paper source’. Example: Manual feed.
|
|
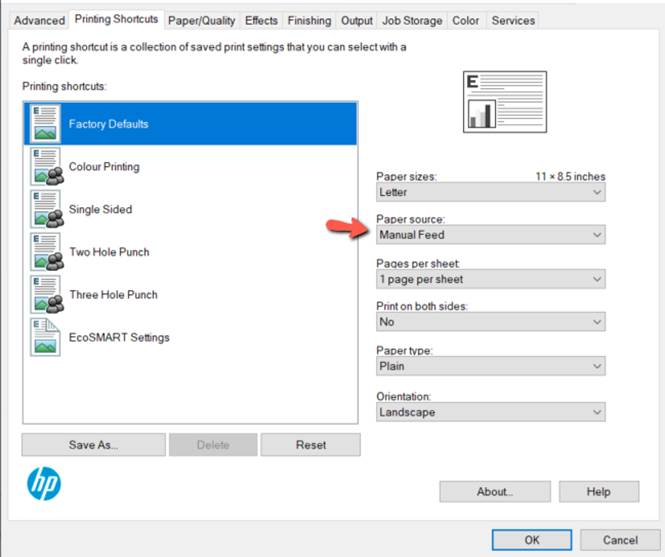
|
TIP: Depending on your printer set-up you may be able to
use the Properties button or Page
Setup button in the Print dialogue to access options for selecting a
paper source such as a tray or manual
feed: Properties
Page Setup
|


14.3 Print a Single Certificate, Wallet Card, or Mailing Label
You can print a single student certificate, wallet card or label using the Print Certificate, Print Card and Print Label buttons.
|
TIPS You can print a single certificate for a student in
any health authority, using the If the student exam is registered under a Health Authority service area different from your own, you will not have access to the Add to Queue function for the certificate. |
14.3.1
Print
Single Certificate
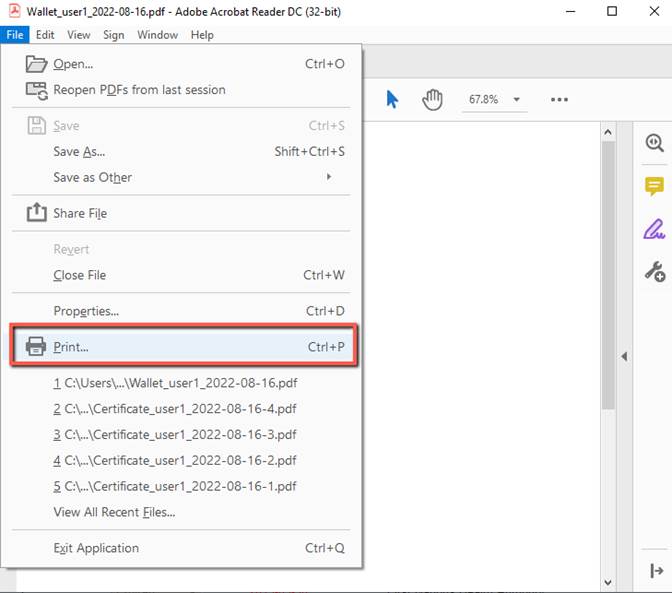
To print a certificate or replacement certificate for a single student:
1. Open the student’s record:
|
|
2. Under ‘Exam History’, select the exam:
|
|
3. Now you will see the highlighted exam in the Exam Details box:
|
|

4. Under Exam Details, click on the Print Certificate button:
|
|
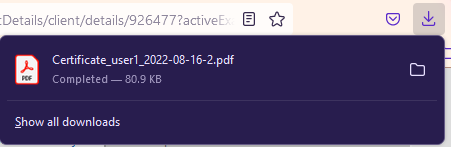
5.
A certificate document is generated in PDF format.
At the download prompt you will be asked if you want to Open or Save the PDF document.
For this example, select Open.
(Alternatively, you can save the document first and open the document for
printing afterwards).
|
TIP: Depending on the type of browser, the download prompt may appear as follows: |
|
Microsoft Edge or
Chrome |
|
Firefox |
|
|
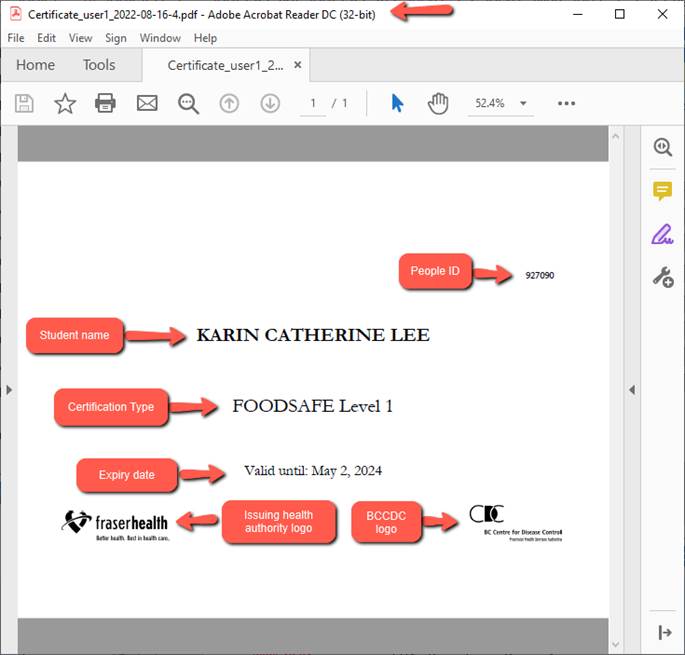
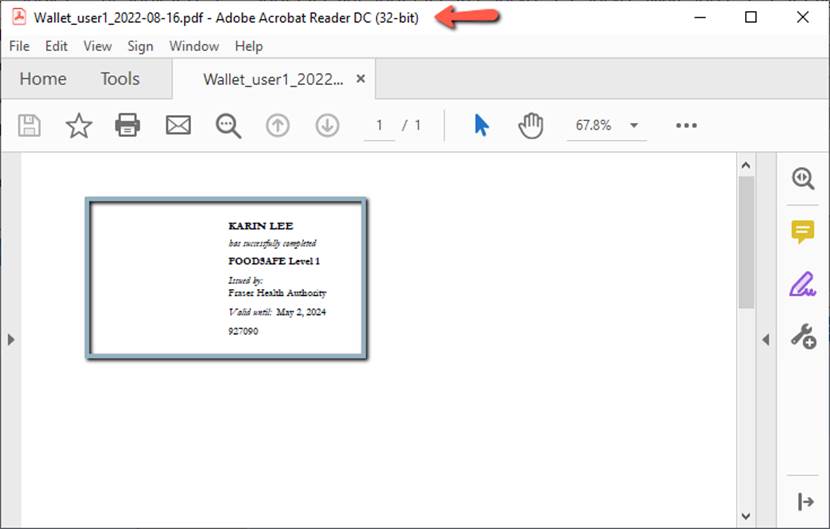
6. A PDF certificate document opens in Acrobat Reader. The file name includes the certificate type, the user who printed the certificate, and the download date.
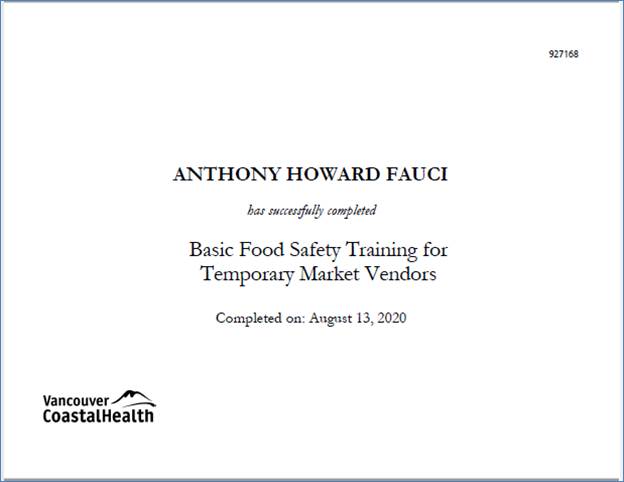
The variable data to be printed onto the certificate shell includes the student first name, middle name and last name, their unique people ID number, the FOODSAFE certification type, the logo of the original issuing Health Authority, and the logo for the BC Centre for Disease Control:
|
|
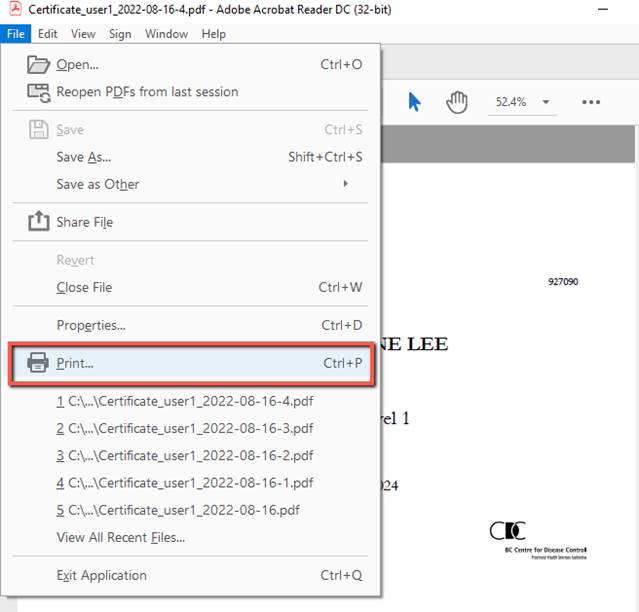
7. If you need to save this document for your records, use Acrobat’s ‘Save As’ function.
8. When you are ready to print, load a blank certificate shell into your printer, and use Acrobat’s ‘Print’ function:
|
|
9.
In the ‘Print’
dialogue, ensure the correct Acrobat Reader settings and properties are
selected, and click on
the Print button. For setting
details, see Section 14.2 Certificate Print
settings for Adobe Acrobat Reader.
|
|
10. When the certificate is printed, (save and) close the certificate document.
11. The next time you open the student’s record:
a. The ‘Last Printed By’ field will display the username of the person who printed the certificate; and,
b. The ’Last Printed Date’ field will display the date the certificate was downloaded for printing.
|
|
14.3.2
Print
Single Wallet Card
To print a single student wallet card:
1. Open the student’s record.
2. Under ‘Exam History’, select the exam:
|
|
3. Under ‘Exam Details’, click on the Print Card button:
|
|
4. A wallet card document is generated in PDF format. At the download prompt, Open (or save) the PDF document:
|
|
5. A PDF wallet card document opens in Acrobat Reader. The file name includes the certificate type, the user who printed the certificate, and the download date.
The variable data to be printed onto the wallet card shell includes the student first name and last name, their unique people ID number, the FOODSAFE certification type, and the name of the original issuing Health Authority:
|
|
6. If you still need to save this document for your records, use Acrobat’s ‘Save A’s function.
7. When you are ready to print, load a blank wallet card shell to your printer, and use Acrobat’s ‘Print’ function:
|
|
8.
In the ‘Print’
dialogue, ensure the correct Acrobat Reader settings and printing source
properties are selected, and click on the Print
button.
Note: Ensure that the ‘Portrait’
orientation is selected for the wallet card shell.
|
|
9. When the card is printed, (save and) close the wallet card document.
14.3.3
Print
Label – Avery 05161
To print a single mailing label:
1. Open the student’s record.
2. Under ‘Exam History’, select the exam:
3. Under ‘Exam Details’, click on the Print Label button:
|
|
4. At the prompt select a numerical value indicating the position where the address will be printed on the sheet of Avery 05161 labels. If you are starting with a new sheet of labels, enter position ‘1’. If you are printing to a partially used sheet of labels, enter the first available position, and click on OK.
|
|
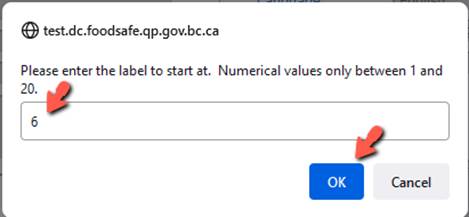
|
TIP Label position numbering Use Avery 05161 Labels - 2
columns of 10 labels each for 20 labels total.
|
5. A labels document is generated in PDF format. At the prompt, Open (or save) the document:
|
|
6. The PDF labels document opens in Acrobat Reader. The file name includes the document type, the user who printed the label, and the download date.
The address is displayed in selected position on the sheet of labels:
|
|
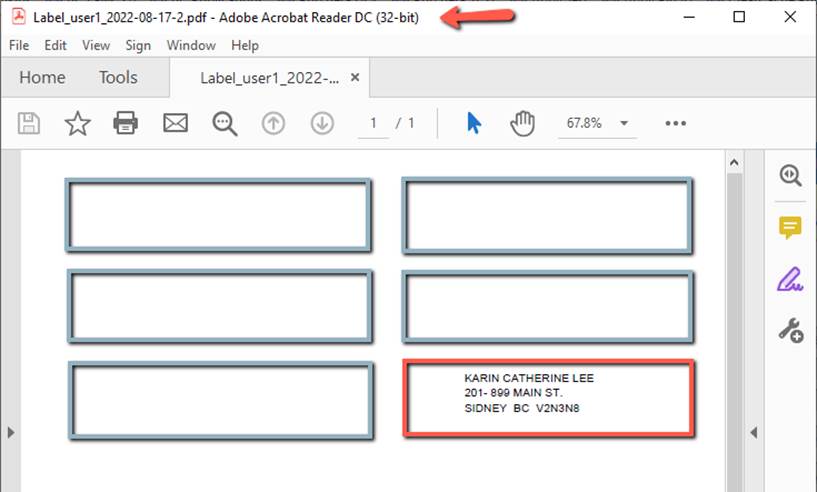
7. If you still need to save this document for your records, use Acrobat’s ‘Save A’s function.
8. When you are ready to print, load an Avery 05161 labels sheet to your printer, and use Acrobat’s ‘Print’ function:
|
|
9. In the ‘Print’ dialogue, ensure the correct Acrobat Reader settings and printing source properties are selected, and click on the Print button.
Note: Ensure that the ‘Portrait’
orientation is selected for the labels sheet.
|
|
10. When the label is printed, (save and) close the label document.
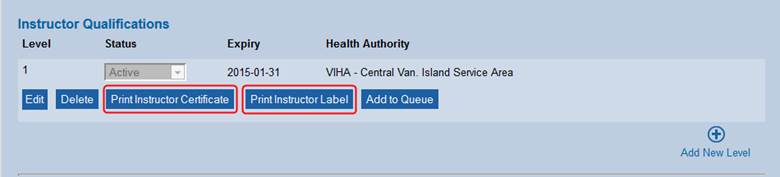
14.4 Print a Single Instructor Certificate
To print a single instructor certificate for Level 1 or Level 2 teaching levels, use the ‘Print’ functions in the ‘Instructor Qualifications’ panel. The same instructor certificate shell is used for both course level certificates.
|
|
|
TIP: You can only print an instructor certificate if you are logged in under the same Health Authority service area as the instructor. If the instructor is certified in another Health Authority, you will be able to view their qualification information, but you will not be able to print a certificate for them. |
See Section 14.2 Certificate Print Settings, and Section 14.3 Print a Single Certificate, Wallet Card or Mailing Label.
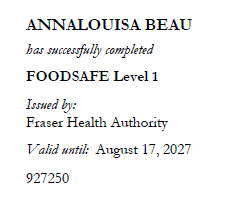
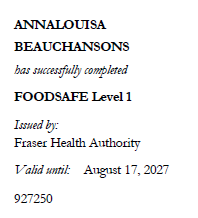
14.5 Long Names in Certificates and Wallet Cards
To ensure that names will print successfully onto certificates, wallet cards, and labels, the following character limits are implemented in the FOODSAFE Registry and in the Open School registration system:
1. First Name (given name) – maximum of 19 characters.
2. Middle Name – maximum of 15 characters.
3. Last Name (surname) – maximum of 35 characters.
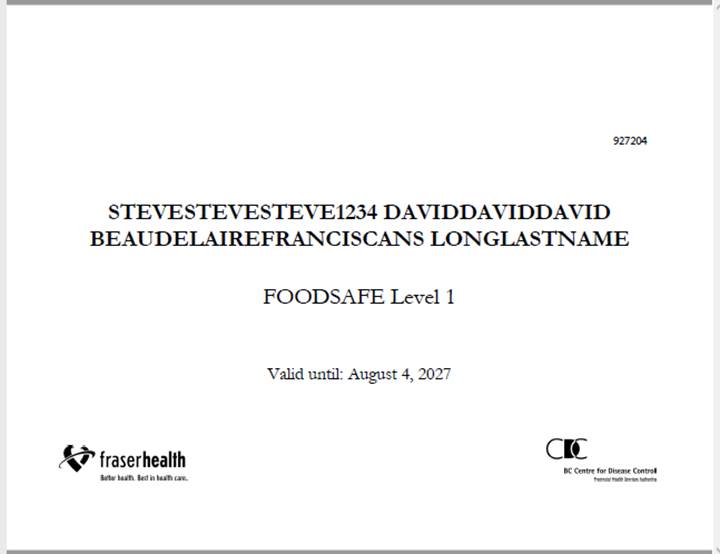
In certificates, when a student’s first name + middle name + last name exceeds 35 characters, the last name is bumped down to a second line in the certificate.
|
|
In wallet cards, when a student’s first name + last name are less than or equal to 15 characters, including a space, the first and last name are printed on one line. When first name + name exceed 15 characters, the last name is bumped down to a second line on the wallet card.
Last names longer than 28 characters will not fit on the wallet card and will be truncated.
|
|
|
14.6 Certificate Queues - Print Batches of Certificates
|
|
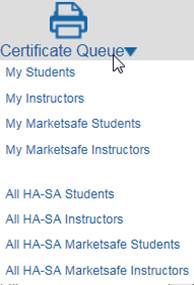
Users with the ‘clerical role’ in the registry have access to the following certificate print queues. These queues handle all the certificates added to the queue by the user, when the user and student exam share the same Health Authority service area.
A. My Students – handle FOODSAFE Level 1 and Level 2 certificates
B. My Instructors – handle FOODSAFE Instructor Level 1 and Level 2 teaching certificates
C. My MarketSafe Students – handle MarketSafe certificates
D. My MarketSafe Instructors – handle MarketSafe teaching certificates
In addition, clerical users can view the following combined queues:
A. All Health Authority Service Area Students – displays FOODSAFE Level 1 and Level 2 certificates in the queues of all users under the same Health Authority service area
B. All Health Authority Service Area Instructors – displays FOODSAFE Instructor Level 1 and Level 2 certificates in the queues of all users under the same Health Authority service area
C. All Health Authority Service Area MarketSafe Students – displays MarketSafe certificates in the queues of all users under the same Health Authority service area
D. All Health Authority Service Area MarketSafe Instructors – MarketSafe Instructor certificates in the queues of all users under the same Health Authority service area
14.7 Print My Student Queue
My Student Queue enables batch printing of FOODSAFE Level 1 and 2 certificates, wallet cards and labels.
|
|
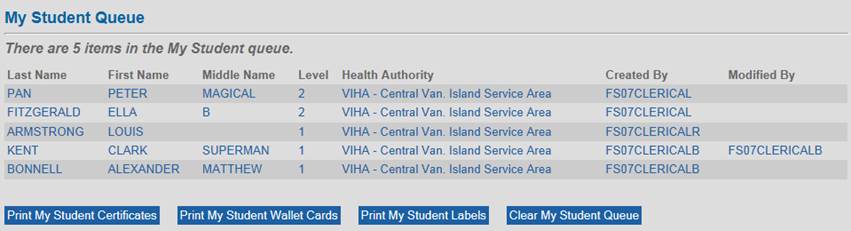
To print all the student certificates in the queue:
1. Click on the Print My Student Certificates button:
|
|
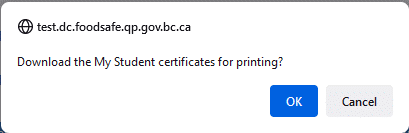
2. A certificates document, containing all the certificates in the queue, is generated in PDF format. At the download prompt, click OK:
|
|
3. Open (or save) the PDF document:
|
|
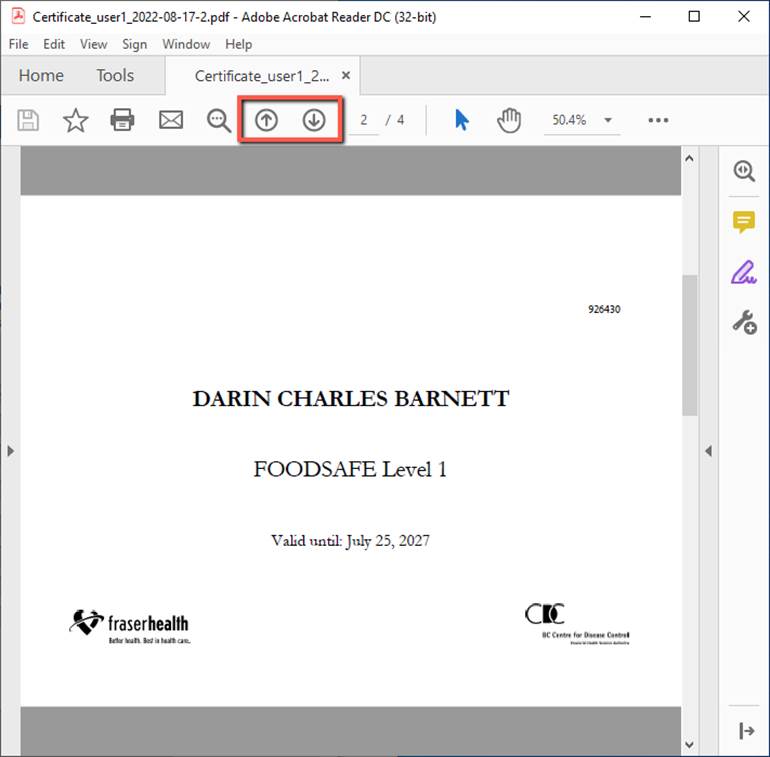
4. A PDF certificates document opens in Adobe Acrobat Reader, containing certificates for all the students in the queue. If necessary, review the certificates by using the Acrobat Reader navigation tools:
|
|
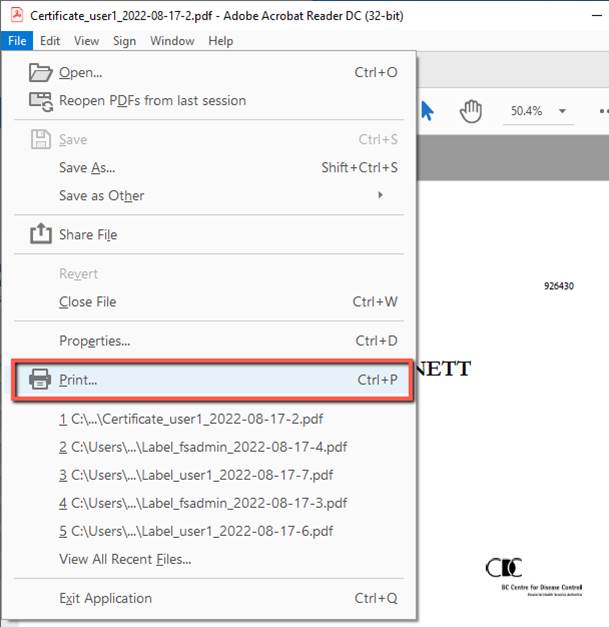
5. When you are ready to print the document, load the certificate shells into your printer and use Acrobat’s ‘Print’ function:
|
|
6. In the ‘Print’ dialogue, ensure the correct Acrobat Reader settings and properties are selected, and click on the Print button. For setting details, see Section 14.2 Certificate Print settings for Adobe Acrobat Reader.
|
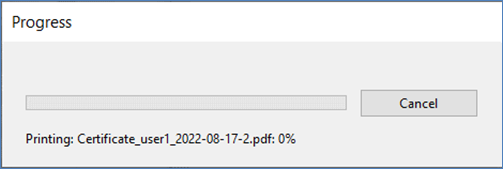
You may see a pop-up message indicating the printing is in progress.
|
7. When you are finished printing, close the PDF document, and return to the certificate queue.
8. To print the wallet cards, click on Print My Student Wallet Cards and repeat steps 2 to 7.
|
|
9. To print the mailing labels, click on Print My Student Labels, and repeat steps 2 to 7.
|
|
10. When you have finished printing the labels, return to the print queue and click on Clear My Student Queue:
|
|
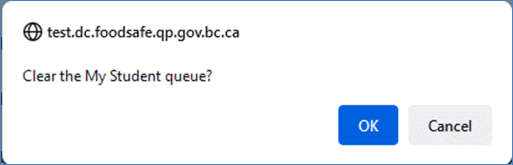
11. At the prompt, click OK:
|
|
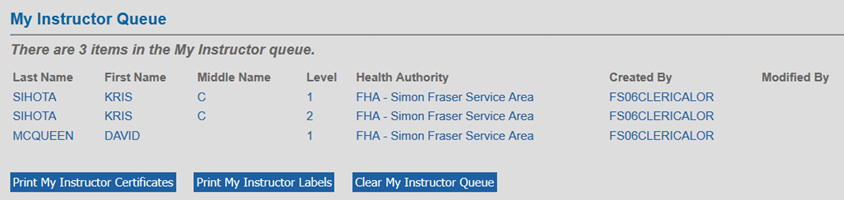
14.8 Print My Instructor Queue
My Instructor Queue provides batch printing of FOODSAFE Instructor Level 1 and Level 2 certificates.
|
|
To print all the Level 1 and Level 2 instructor certificates
in the queue, follow the steps in Section
14.7 Print My Student Queue,
skipping the steps for the wallet card:
1. These are the actions available in My Instructor Queue
|
|
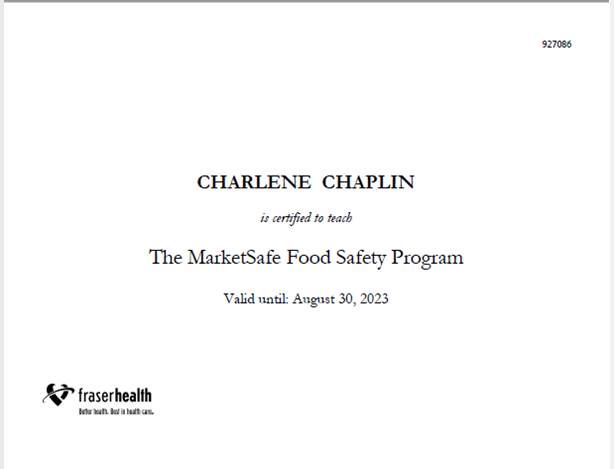
2. This is the variable data printed onto the FOODSAFE Instructor certificate shell:
|
|

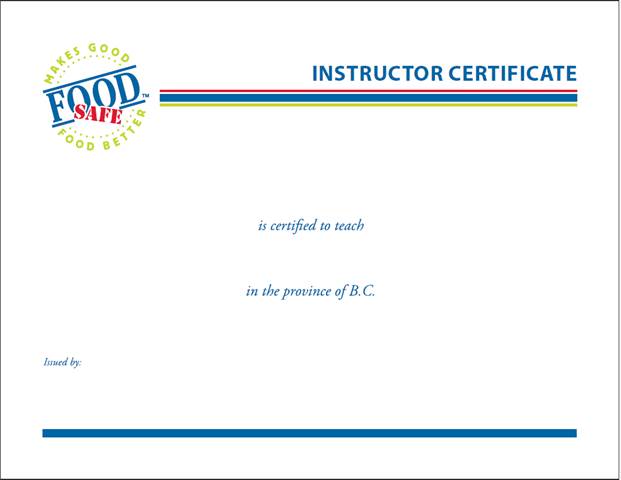
3. This is the FOODSAFE Instructor certificate shell:
|
|
|
TIPS 1. When printing FOODSAFE Instructor Certificates use the ‘Instructor Certificate Shells’. 2. To print an instructor certificate or add an instructor to My Instructor Queue you must be logged in under the same Health Authority service area in which the instructor is certified. 3. There are no wallet cards for FOODSAFE Instructors. |
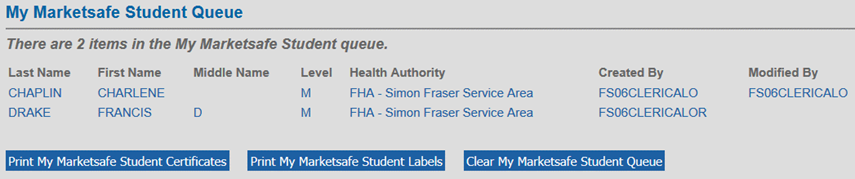
14.9 Print My MarketSafe Student Queue
My MarketSafe Student Queue provides batch printing of MarketSafe certificates.
|
|
To print all the MarketSafe certificates in the queue,
follow the steps in Section 14.7
Print My Student Queue,
skipping the steps for the wallet card.
These are the actions available in My MarketSafe Student Queue
1. Click on the Print My MarketSafe Student Certificates button:
|
|
2. This is the variable data printed onto the MarketSafe Student certificate shell:
|
|
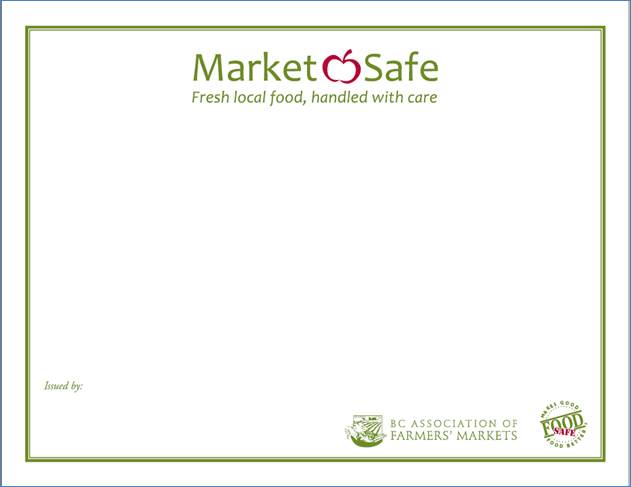
3. This is the MarketSafe Certificate shell:
|
|
|
TIPS 1. The same MarketSafe certificate shell is used for both students and instructors. 2. To add a certificate to My MarketSafe Student queue, you must be logged in under the same Health Authority service area the student’s exam is registered under. 3. There are no wallet cards for MarketSafe students. |
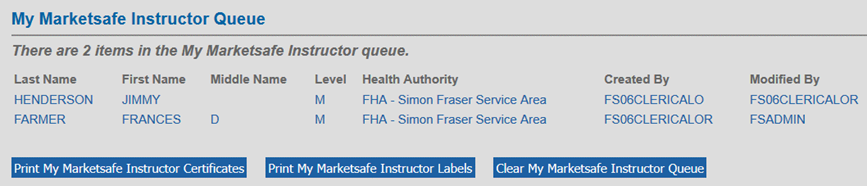
14.10 Print My MarketSafe Instructor Queue
My MarketSafe Instructor Queue provides batch printing for MarketSafe
Instructor certificates.
|
|
To print all the MarketSafe Instructor certificates in the
queue, follow the steps for under Section
14.7 Print My Student Queue,
skipping the steps for the wallet card.
1.
These are the actions available in My MarketSafe Instructor
Queue:
|
|
2.
This is the variable
data printed onto the MarketSafe certificate shell:
|
|
3.
This is the MarketSafe
Certificate shell:
|
|
|
TIPS 1. The same MarketSafe certificate shell is used for both MarketSafe students and instructors. 2. To print an instructor certificate or add an instructor certificate to the MarketSafe Instructor queue you must be logged in under the same Health Authority service area that the instructor is certified under. 3. There are no wallet cards for MarketSafe instructors. |
15 The HA-SA QUEUES
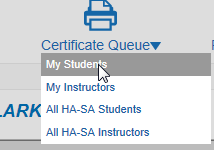
15.1 All Heath Authority-Service Area Queues (HA-SA)
There are four All HA-SA queues:
· All HA-SA Students (FOODSAFE)
· All HA-SA Instructors (FOODSAFE)
· All HA-SA MarketSafe Students
· All HA-SA MarketSafe Instructors
The All HA-SA queues allow you to view all the certificates in a Health Authority service area queue, including your certificate queue and the queues of all other clerical users under the same Health Authority service area. These are ‘view-only queues’. You cannot print certificates from these queues.
The All HA-SA Student Queue shows all the FOODSAFE Student certificates in your queue and the queues of all other clerical users under the same Health Authority service area.
The All HA-SA Instructors Queue shows all the FOODSAFE Instructor certificates in your queue and the queues of all other clerical users under the same Health Authority service area.
The All HA-SA MarketSafe Students Queue shows all the MarketSafe Student certificates in your queue and the queues of all other clerical users under the same Health Authority service area.
The All HA-SA MarketSafe Instructors Queue shows all the MarketSafe Instructor certificates in your queue and the queues of all other clerical users under the same Health Authority service area.
15.2 Move a Certificate from the All HA-SA Students Queue to My Student Queue
On occasion, you may need to determine the status of a student’s certificate and expedite the printing of their certificate. If that certificate is stranded in another user’s student queue, you can move the certificate to your queue for printing.
To move a student certificate from another user’s queue to your queue:
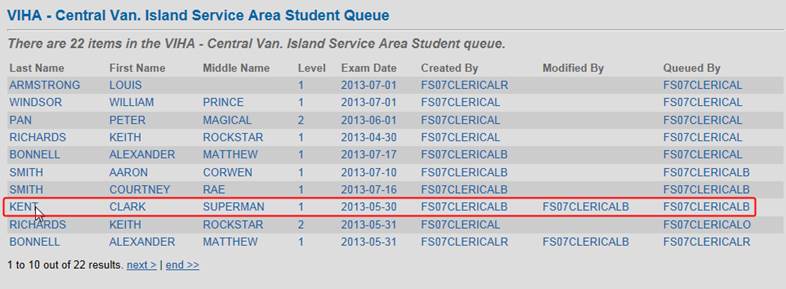
1. Open the All HA-SA Students Queue:
|
|
2.
Review the certificates in the HA-SA queue. When
you find the client’s certificate, open the record.
For example: Clark Kent created by user FS07CLERICALB:
|
|
3. Under Exam Details, click on the Add to Queue button:
|
|
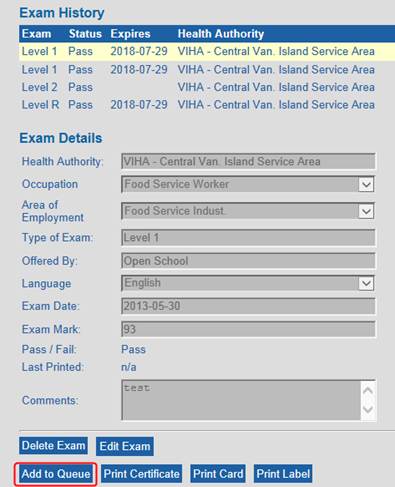
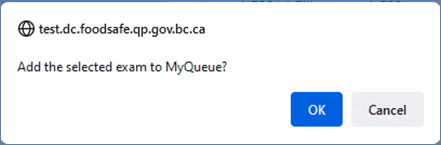
4. At the prompt, select OK:
|
|
5. Open My Student Queue. Clark Kent is now in your queue:
|
|
|
|
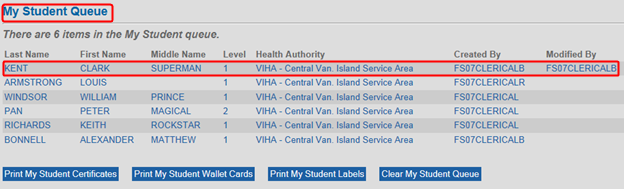
6. Print the certificates in My Student Queue.
|
|

7.
Student Clark Kent has been removed from the My
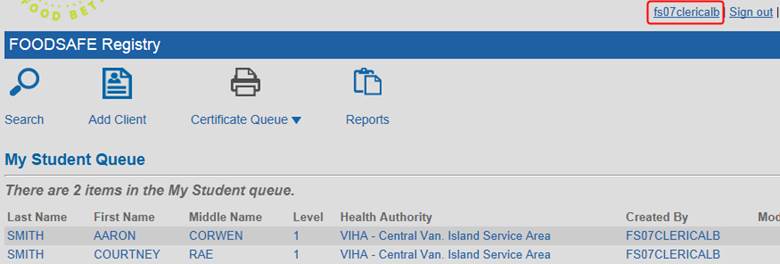
Student Queue for user FS07CLERICALB:
|
|
|
TIPS 1. Use the same process to move a
certificate to your queue from the ‘All
HA-SA MarketSafe Student Queue’. 2. Until you clear certificate queue, Clark Kent will still appear in the All HA-SA Queue. In the ‘Queued By’ column your username (FS07CLERICAL), will be displayed instead of the other user’s name (FS07CLERICALB). |
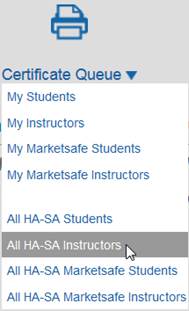
15.3 Move a Certificate from the All HA-SA Instructors Queue to My Instructor Queue
On occasion, you may need to determine the status of an instructor’s certificate and expedite the printing of their certificate. If that certificate is stranded in another user’s instructor queue, you can move the certificate to your queue for printing.
To move an instructor certificate from another user’s queue to your queue:
1. Open the All HA-SA Instructors Queue:
|
|
2.
Review the certificates in the HA-SA queue. When
you find the instructor’s certificate, open the record.
For example: Jane Austen created by TESTUSER2.
|
|

3. In the Instructor Qualifications area, click on the Add to Queue button:
|
|
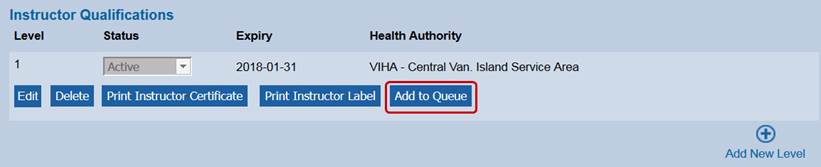
4. At the prompt select OK:
|
|
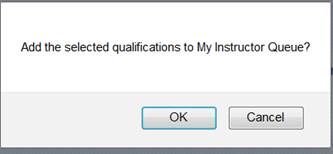
5. Open My Instructors Queue. Jane Austen is now included in your queue:
|
|
|
|
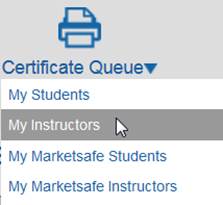

6. Print the instructor certificates in My Instructor Queue.
|
|

|
TIPS 1. Use the same process to move a certificate to your queue from the All HA-SA MarketSafe Instructors Queue. 2.
Until
you Clear My Instructor Queue, Jane Austen will still appear in the All HA-SA
Instructor Queue. |
16 OPEN SCHOOL AND THE FOODSAFE REGISTRY
System to system functions have been implemented in the
FOODSAFE Registry which allow the Open School system to query the FOODSAFE
Registry about student prerequisites for taking courses; and to allow Open
School to submit student and exam information to the FOODSAFE Registry
electronically:
16.1 Prerequisite to take FoodSafe Level 2
|
TIP For information about Level 2 pre-requisites, please see the Open
School site, Frequently Asked Questions: |
16.2 Prerequisite to take FoodSafe Level 1 Refresher
The Refresher course is only available to individuals who have
a valid (non-expired) FoodSafe Level 1 certificate. In order to take the
course, students must register online at Open School BC before the Level 1
certificate expiration date.
A valid FoodSafe Level 1 exam has a passing grade of 70% or
greater and is unexpired.
If students
took a different food safety course (not FOODSAFE) they are not eligible for
the Refresher, even if the certificate is valid.
|
TIP For more information about FoodSafe Level 1 recertification visit
Open School’s recertification page: |
16.3 FoodSafe Level 1 Equivalents
For students
who have met the requirements establishing a FOODSAFE Level 1 equivalency, the
equivalent is recorded in the FOODSAFE Registry under the FOODSAFE Level 2 exam,
with the Level 1 Equivalent field marked ‘Yes’.
For Level 2
exams marked with a Level 1 equivalent that are submitted by Open School, the
Level 2 certificate is automatically added to the Open School certificate queue
for printing.
For a student who takes Level 2 without a Level 1 prerequisite
or equivalent, their personal information and exam data is submitted to the
FOODSAFE Registry, but a certificate is not added to the certificate queue, and
the Print Single Certificate function is disabled.
|
TIPS The BC Centre for Disease Control
determines equivalencies for FOODSAFE Level 1. For more information about out-of-province
FOODSAFE Level 1 equivalents, visit: The Open School Frequently Asked
Question page at: http://foodsafe.ca/recertify.html#recert-faq7 The BCCDC Food Protection Services page
at: http://www.bccdc.ca/our-services/programs/food-protection-services |
16.4 Submission of Open School Exam Results for FOODSAFE Level 1 and Level 2
When a student completes the online Level 1 or Level 2 exam, Open School submits the
student details and exam results electronically to the FOODSAFE Registry. For
new students, new records are created. For returning students, records are
updated with any changes to the student details (for example: address or phone
number) and new exam results are added to their record. Each exam is registered
under the student’s Health Authority.
When exams with a passing grade are submitted to the Registry,
a certificate is automatically added to the
Open School Certificate Queue.
When exams with a failing grade are submitted to the Registry,
a certificate is not added to the certificate queue, and the print functions
are disabled for that exam.
16.5 Submission of Open School Exam Results for FOODSAFE Refresher
When a student completes the online Refresher exam, Open School submits the student details and exam
results electronically to the FOODSAFE Registry. The student’s record is
updated with the new Refresher exam data.
When Refresher exams with a passing grade of 80% or higher are
submitted to the Registry, a certificate is automatically added to the Refresher Certificate Queue,
administered by the Fraser Health Authority under the Simon Fraser default
service area.
When Refresher exams with a failing grade are submitted to the
Registry, a certificate is not added to the certificate queue, and the print
functions are disabled for that exam.
16.6 Submission of Open School Exam Results for MarketSafe
When a
student completes the online MarketSafe
exam, Open School submits the student details and exam results
electronically to the FOODSAFE Registry. For new students, new records are
created. For returning students, records are updated with any changes to the
student details (for example: address or phone number), and new exam results
are added to their record. The exam is registered under the student’s Health
Authority.
When MarketSafe exams with a passing grade of 70% or higher
are added to the Registry, a certificate is automatically added to the MarketSafe Open School Queue.
When MarketSafe exams with a failing grade are submitted to the Registry, a certificate is not added to the certificate queue, and the print functions are disabled for that exam.
16.7 Open School Roles in the Registry
16.7.1
The
Open School Role (FOODSAFE Level 1and 2 and MarketSafe queues)
The Open School and
MarketSafe Open School certificate
queues are available to users with the
Clerical role + Open School add-on role + default HA Service Area.
|
|
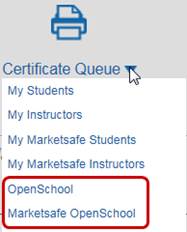
A default service area
has been chosen by each Health Authority for the purpose of administering Open
School’s FOODSAFE Level 1 and Level 2 records and Open School’s MarketSafe
records in the Registry.
The Open School add-on role must be assigned under the default service areas in order for the clerical
user to be able to access the Open School and MarketSafe Open School queues.
The default service areas
for each Health Authority are as follows:
|
Regional Health Authority |
Default Service Area |
|
FHA (Fraser Health Authority) |
6 Simon Fraser Service Area |
|
IHA (Interior Health
Authority) |
2 South Okanagan Service Area |
|
NHA (Northern Health Authority) |
8 Northern Interior SA |
|
VCH (Vancouver Coastal Health) |
9 Vancouver/Richmond SA |
|
VIHA (Vancouver Island
Health Authority) |
11 Capital Service Area |
When Open School FOODSAFE Level 1 and 2 student records
are submitted to the Registry, certificates for successful students are routed
to the Open School queue and their exam results are registered under the
default service areas.
When Open School MarketSafe
student records are submitted to the Registry, certificates for successful students
are routed to the MarketSafe Open School queue and their exam results
are registered under the default service areas.
For example, if a student lives in the East Kootenay service
area, their Open School record will be posted under the default service area
for Interior Health, i.e., South Okanagan service area. The Health Authority
field in the Exam Details will display the default service area, South
Okanagan. Regardless of which Interior Health service area the student exam is
registered under, their certificates will display the regional logo for
Interior Health.
16.7.2 The Open School Refresher Role
The Open School Refresher
certificate queue is available only to registry users with the
Clerical role + Refresher add-on role +
Simon Fraser default HA Service Area.
Regardless of the student’s Health Authority, all Refresher
course exam results for B.C. students are submitted to the FOODSAFE Registry
under the default service area for the Fraser Health Authority, which is the
Simon Fraser
Service Area.
Fraser Health prints Refresher certificates for all B.C.
students. In place of the Health Authority logo, the Open School logo is
printed on all Refresher certificates.
|
|
|
TIP: 1.
Any Health Authority can
print a replacement Refresher certificate. 2.
FOODSAFE Refresher
certificates for non-BC students are handled by BC CIPHI. |
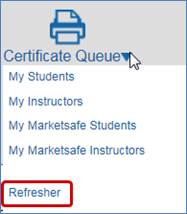
16.8 Print Open School Queue - FOODSAFE Level 1 and 2 Certificates
To open the Open School certificate queue:
1.
Click on the Certificate Queue icon and select Open School from the menu:
|
|
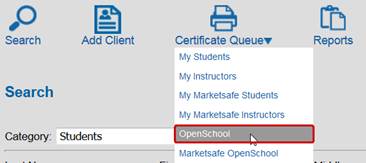
2.
In the Open School Queue, note that all the
records are created by Open School:
|
|
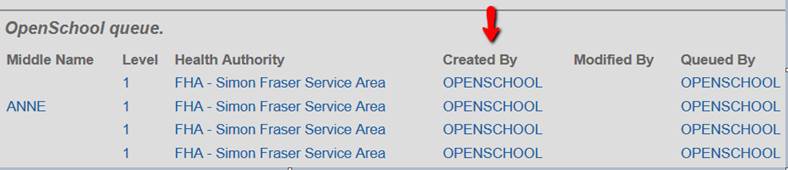
3.
If you need to review a
student’s details, click in the student’s row to open the record:
|
|

4.
In the student record, under
Exam Details, exams submitted by Open School will include ‘Open School’ in the Offered By field, and, if applicable,
the name of the Open School instructor in the Instructor field:
|
|
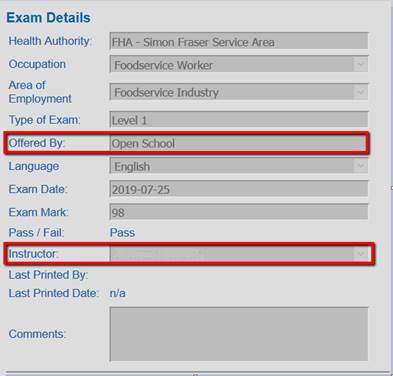
5.
To return to the
Certificate Queue, click on the Certificate
Queue breadcrumb above the Student Details:
|
|
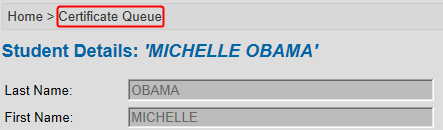
6.
To print all the
certificates in the queue, click on Print
Open School Certificates:
|
|
7.
When prompted to
download the certificates, click OK:
|
|
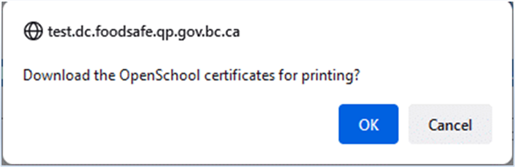
8.
At the Acrobat prompt, Open (or Save and Open) the PDF
document:
|
|
9.
A PDF document opens in
Adobe Acrobat Reader, containing certificates for all the students in the
queue.
If necessary, review the certificates using the Acrobat Reader navigation tools:
|
|

10.
A document file name is
automatically applied to the PDF document, containing the document type (for
example: certificate, wallet card, or label), the user who printed the queue,
and the date. If you haven’t already, save this document for tracking or billing
purposes using the Acrobat Save As
function:
|
|
11.
When you are ready to
print the document, follow the print instructions in Section 14.7 Print My Student Queue, substituting the
actions in the Open School Certificate Queue:
|
|
|
TIPS 1.
If any Open School records have been
posted to the Registry while you were processing the queue, they will be on
standby until you refresh the queue. To refresh the queue (after clearing the
queue) go to the Certificate Queue
menu and select the Open School queue. Any new records
will display in the queue. 2.
To gain access to the Open School
Queue, you must be assigned the Open
School add-on role, and the appropriate default Health Authority service
area. A person with the administrative role in the Registry is able to assign
add-on roles and service areas. |
16.9 Print Open School Refresher Queue - FOODSAFE Refresher Certificates
To open the Refresher
certificate queue:
1.
Click on the Certificate Queue icon and select Refresher from the menu:
|
|
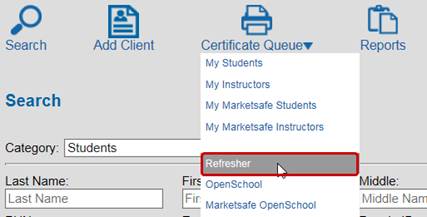
2.
In the Refresher Queue, all the records are
created by Open School, and the Health Authority is always
FHA – Simon Fraser Service Area (or ‘Out of Province’ for non-BC students
administered by BC CIPHI):
|
|

3.
If you need to review a
student’s details, click in the student’s row to open the record:
|
|

4.
In the student record,
under Exam Details, the Type of Exam
is ‘Level 1 Refresher’, and Offered By
is ‘Open School’:
|
|
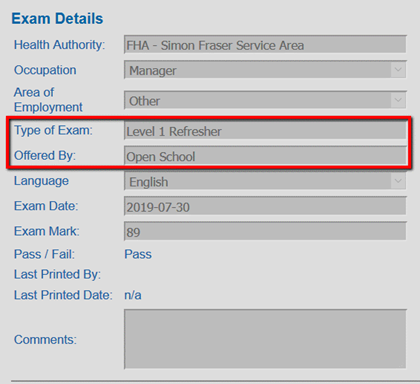
5.
To return to the
Certificate Queue, click on the Certificate
Queue breadcrumb:
|
|

6.
To print all the
certificates, follow steps 6 to 11 in Section 16.8 Print Open
School Queue, substituting the actions available in the Refresher Queue:
|
|
7.
After you have printed
the Refresher certificates you can run an R14 Report detailing the certificates
posted during a given time period, and manually enter the date the certificates
were printed and mailed.
For further information, see Section
18.5 R14 Refresher Certificates Report.
8.
The Refresher
certificates contain the course level ‘FOODSAFE
Refresher’, a 5-year expiry date,
and the
Open School logo:
|
|
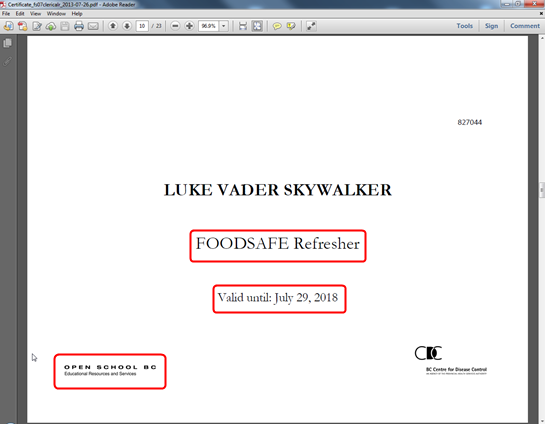
|
TIPS 1.
If any Open School Refresher records have been posted to the
Registry while you were processing the Refresher queue, they will be on
standby until you refresh the queue. To refresh the queue (after clearing the
queue) go to the Certificate Queue
menu and select the Refresher queue.
Any new records will display in the queue. 2. To gain access to the
Refresher Queue, you must be assigned the Refresher add-on role, and the FHA – Simon Fraser service area. A
person with the administrative role in the Registry is able to assign add-on
roles and |
16.10 Print Open School MarketSafe Queue - MarketSafe Certificates
To open the MarketSafe Open School queue:
1.
Click on the Certificate Queue icon and select MarketSafe Open School from the menu:
|
|
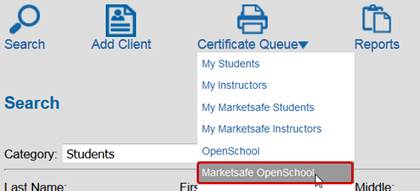
2.
In the MarketSafe Open
School Queue, all the records are created by Open School:
|
|
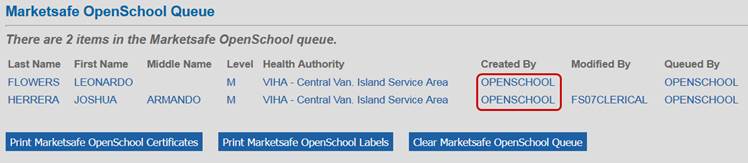
3.
To print all the certificates in the queue, follow steps 6 to
11 in Section 16.8 Print Open School Queue, substituting the actions
available in the MarketSafe Open School Queue:
|
|
4.
The MarketSafe certificates
contain the course level ‘Basic Food
Training Level for Temporary Market Vendors’, the date of exam completion,
and the Health Authority logo:
|
|
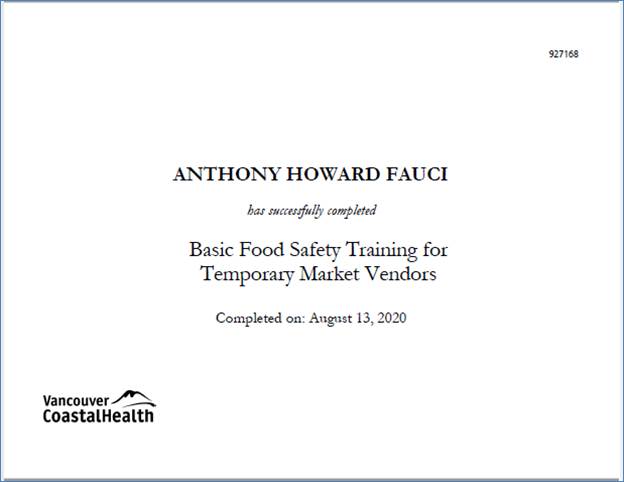
|
TIPS If any Open School MarketSafe records have been posted to the
Registry by Open School while you were processing the queue, they will be on
standby until you refresh the queue. To refresh the queue (after clearing the
queue) go to the Certificate Queue menu and select the MarketSafe Open School
queue. Any new records will display in the queue. |
17 BC CIPHI - Processing Out-of-Province Records from Open School
Users at BC CIPHI are assigned a clerical role plus an add-on
role called ‘BCCIPHI’ which enables manual entry of Open School exam records
into the Registry for non-BC students who have taken exams for FOODSAFE Level 1, Level 2 and Refresher,
and MarketSafe.
17.1.1 Add Client (Student)
1.
Click the Add Client
button:
|
|

2. The Student Details form opens.
Follow steps 4 to 15 in Section 6.1
Add Client.
|
|
|
TIPS 1. The ‘Province’ field accepts 2 characters for a Canadian province or US state abbreviation. For addresses supplied without a province or state, enter the two digits ‘00’. 2. The ‘Postal Code’ field accepts a 6-characters code (no space) or a 5-digit zip code. For example: V2V3A3, or 98281 For addresses supplied without a postal code in the required format, enter ‘00000’. 3. The ‘Telephone’ field accepts seven digits, no hyphen. For example: 5551234 4. The ‘Email’ field address must include the domain information. For example, name@domain.com: jsmith@gmail.com; john.doe@email.ca; janedoe@telus.net |
17.1.2
Add New Exam
Once the student details form has been submitted, the ‘Add New Exam’ panel displays in the student record.
|
|
To add a new exam:
1. Click on Add New Exam:
|
|

2. In the ‘Type of Exam’ field, select Level 1, Level 2, Refresher or MarketSafe:
|
|
3.
In the ‘Occupation’ field, select a menu
option:
|
|
4.
In the ‘Area of Employment’ field, select a
menu option:
|
|
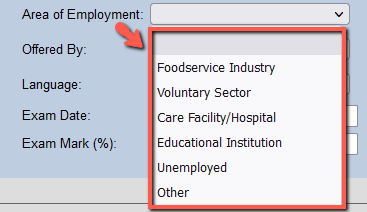
5.
In the ‘Offered By’ field
select ‘go2’ or ‘Open School’:
|
|
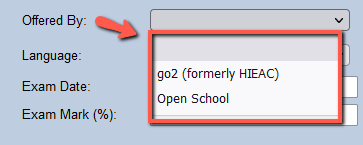
6.
In
the ‘Language’ field, select a menu
option:
|
|
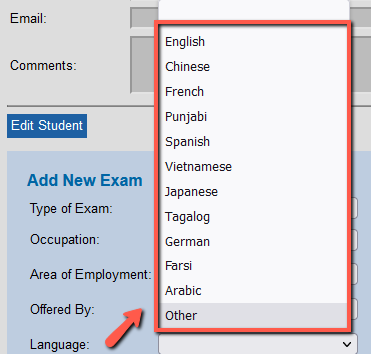
7.
In the ‘Exam Date’ field, enter the exam date using
the calendar, or manually enter the date in the following format, including
hyphens: YYYY-MM-DD
|
|
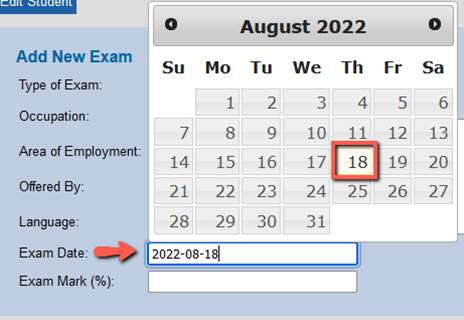
8.
In the ‘Exam
Mark’ field, enter the mark as a whole number:
|
|
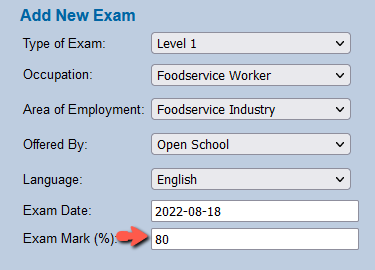
9.
If an Open School instructor name has been
submitted with the exam results emailed by Open School, enter the name in the ‘Comments’ field:
|
|
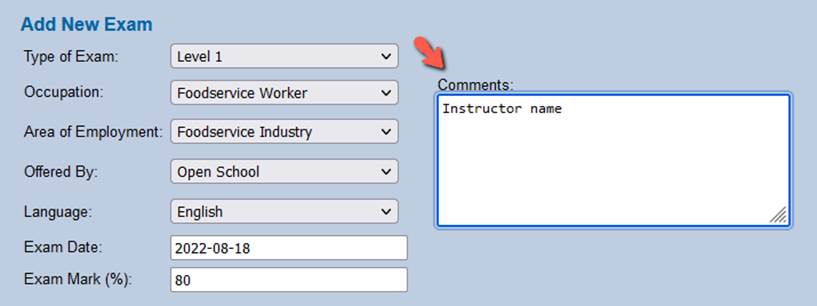
10.
When you have finished entering the exam data,
click on Submit:
|
|
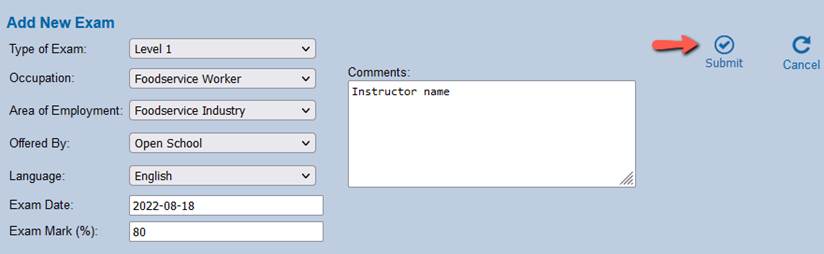
11. Once the exam is submitted, the Student Details page will display a summary of the exam(s) under ‘Exam History’, and the details of the selected exam under ‘Exam Details’:
|
|
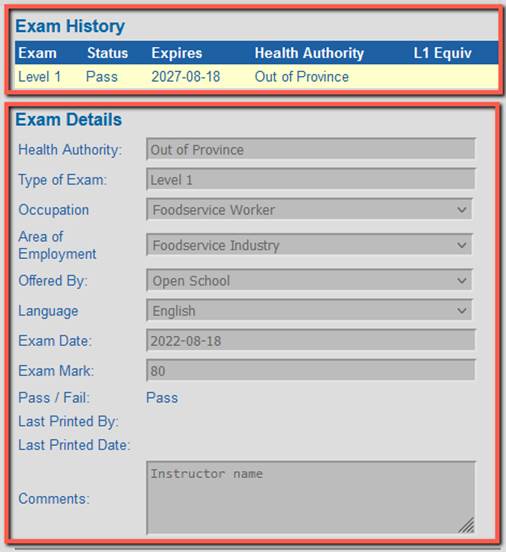
12. Under ‘Exam History’ and ‘Exam Details’, the pass or fail grade status is generated automatically based on the mark entered:
|
|

13. Under ‘Exam History’, the expiry dates for Level 1 and Level 1 Refresher are generated automatically based on the date of exam plus 5 years. There are no expiry dates on Level 2 and MarketSafe certifications.
|
|
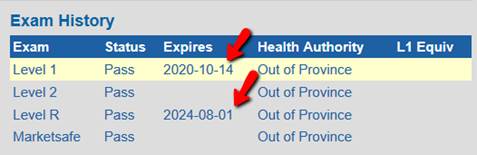
14.
Under ‘Health Authority’, the ‘Out of Province’ code is entered
automatically for records entered by
the BCCIPHI role:
|
|


15. Under the ‘Offered By’ field the ‘Open School’ or ‘Go2’ value is displayed:
|
|
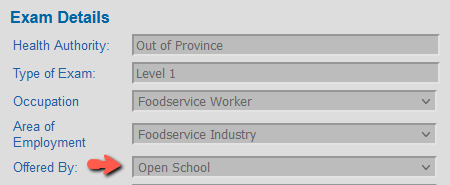
16.
When FOODSAFE Level 1 or Level 2 exam with a
passing grade is submitted, a certificate is automatically added to
My Students Queue for printing.
When a FOODSAFE Refresher exam with a passing grade is submitted, a certificate is automatically added to the Refresher Queue for printing.
When a MarketSafe exam with a
passing grade is submitted, a certificate is automatically added to
My MarketSafe Students queue.
|
TIPS Marks required to achieve a passing grade Foodsafe Level 1: A mark of 70 percent or greater. Foodsafe Level 2: A mark of 80 percent or greater. Foodsafe Refresher: A mark of 80 percent or greater. MarketSafe: A mark of 70 percent or greater is required. |
17.1.3
BC
CIPHI Print Queues
To print the certificates in the queues:
1. Click on the Certificate Queue icon to select a queue:
|
|
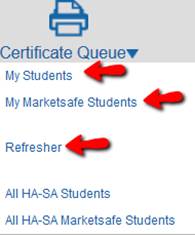
2. My Students Queue: Print FOODSAFE Level 1 and 2 certificates. See Section 14.7 Print My Student Queue
My MarketSafe Student Queue: Print MarketSafe certificates. See
Section 14.9 Print My MarketSafe
Student Queue
Refresher Queue: Print FOODSAFE Refresher certificates. See Section 16.9 Print Refresher Queue.
|
|
For information on the All HA-SA queues, see Part 15 The HA-SA Queues
|
TIPS 1. To print FOODSAFE certificates, use the same FOODSAFE certificate shell for all levels (1, 2 and Refresher) 2. To print MarketSafe certificates use the MarketSafe certificate shell. |
17.1.4
BC
CIPHI Certificates
|
FOODSAFE Level 1 and 2
Certificates Display
the BC CIPHI Logo |
|
|
|
FOODSAFE Level 1 and Level 2
wallet cards Displays
the ‘BC Branch – CIPHI’ name |
|
|
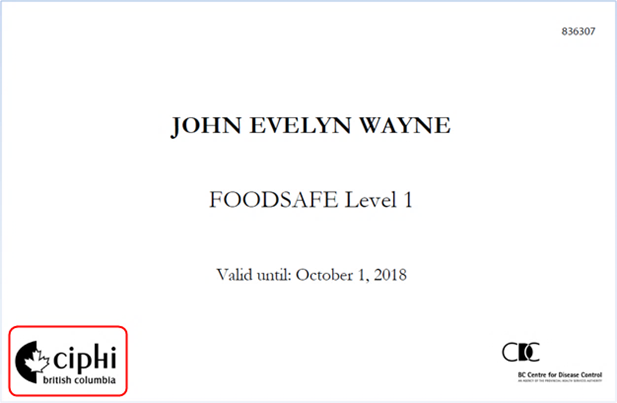
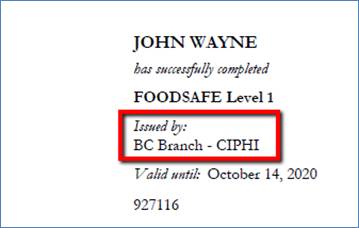
|
The FOODSAFE Refresher Certificate
Displays
the Open School logo |
|
|
|
The FOODSAFE
Refresher Wallet Card Displays the Open School name |
|
|
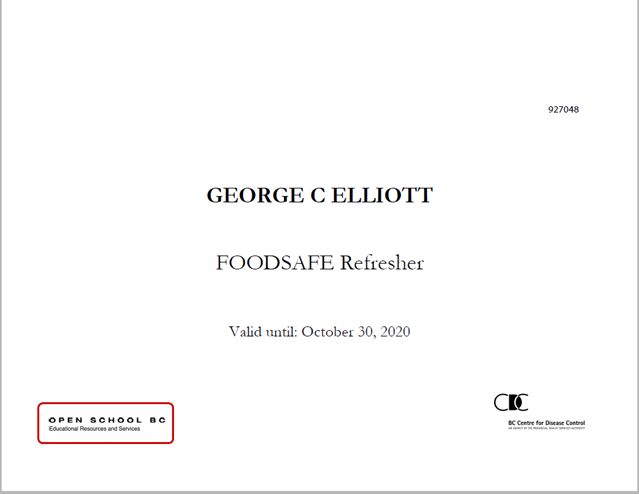
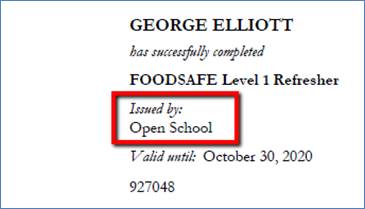
|
The MarketSafe
Certificatew Displays the BC CIPHI logo. |
|
|
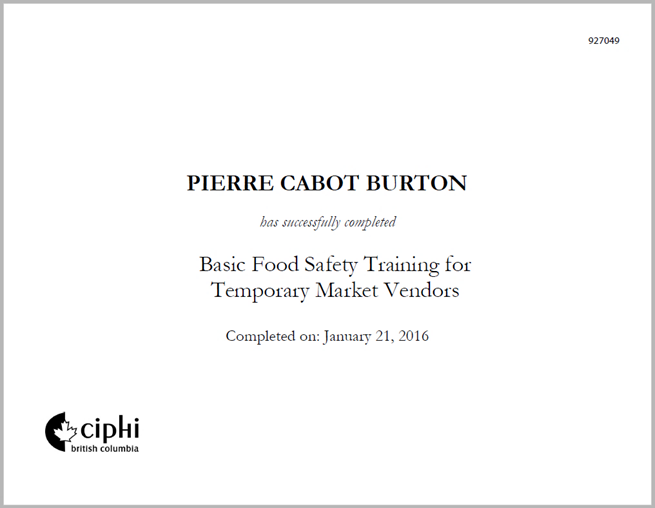
For more information on printing certificates, see Part 14 Print Certificates
18 REPORTS
The following reports can be created in the FOODSAFE Registry. Access is determined by the user role.
18.1 R01 Student Registry Report
The R01 report
lists all students in the users Health Authority service area who wrote their Level
1, Level 2 and Refresher exams during the date range selected. The report includes
name, address, telephone number, exam date, exam mark, area of employment,
language, occupation and where the exams were offered. The Level 1 students are
listed first, followed by the Level 2 students and the Level 1 Refresher
students, in alphabetical order.
To run a
report:
1. Click on the Reports icon:
|
|
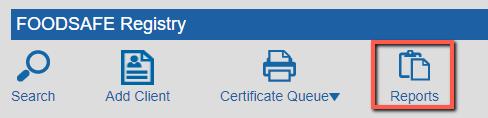
2. On the Reports page, select a report from the drop-down menu:
|
|
3. If the report selected displays date fields, enter a start date and end date. You can use the calendar to select dates, or enter dates manually in the following format, Including hyphens: YYYY-MM-DD.
For example: 2020-01-01 to 2022-07-31.
|
|
|
|

4. Click on the Submit button:
|
|

5. A report document in PDF format is generated. At the download prompt, open (or save) the document:
|
|
6. A PDF report document opens in Acrobat Reader. The file name includes the report type (R01), the user who printed the certificate, and the download date.
|
|

7. Review the report using the navigation tools in Acrobat Reader:
|
|

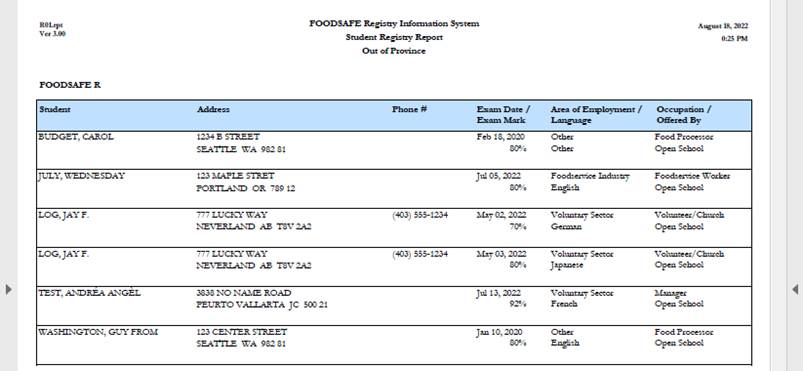
8. You can save and print the document, using the Acrobat Reader functions.
|
TIPS 1. Reports R01, R02, and R10 require a date range to be entered. 2. Reports R03, R04, and R11, require no date range. 3. Report M01 is selected by fiscal year and is generated in CSV format, readable in Excel. |
18.2 R02 Student
Statistical Breakdown
The R02 report lists the following student data for the user’s Health Authority service area:
Part One counts the number and percentage of students who passed FOODSAFE Level 1, Level 2 and Refresher exams according to their Occupation and their Area of Employment
Part Two counts the number and percentage of passes and fails for Level 1 Level 2 and Refresher exams.
Part Three counts the number and percentage of Level 1, Level 2 and Refresher exams taken according to the type of facility where the exam was offered.
Part Four lists the number and percentage of Level 1, Level 2 and Refresher exams by the language of the exam.
|
|
|
|
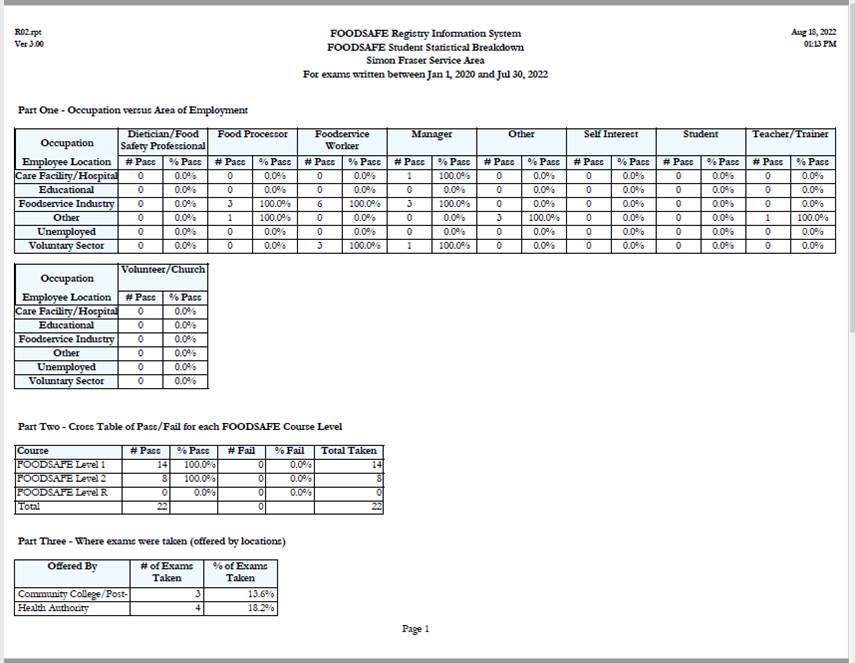
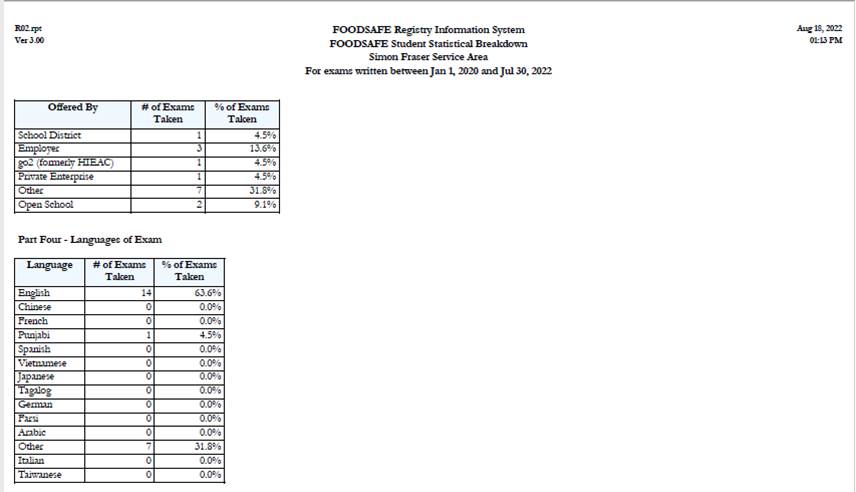
18.3 R03 Instructor Registry Report
The R03 report lists all the instructors who are certified
to teach in the user’s Health Authority service area. The report shows the
name, address, telephone number, teachable languages, expiry date, and the
other Health Authority service areas in which the instructor is authorized to
teach. No date range is required to run
this report.
|
|
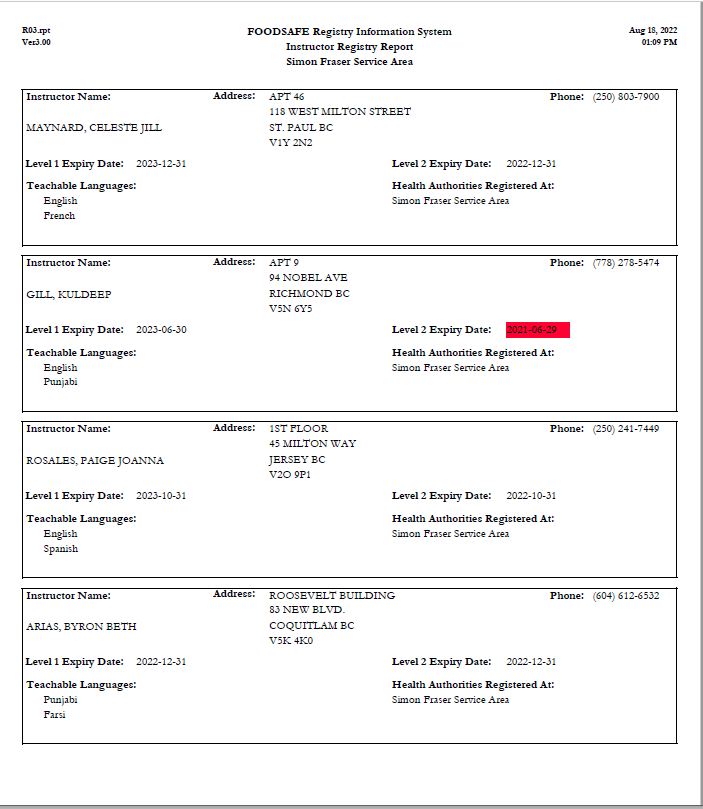
18.4 R04 Expired Instructors Report for Region
The R04 report lists the expired instructors in the user’s Health Authority service area. It includes the instructor’s name, address, telephone number, teachable languages, all the Health Authorities in which they are registered to teach and the expiry dates for their Level 1 and Level 2 certifications.
|
|
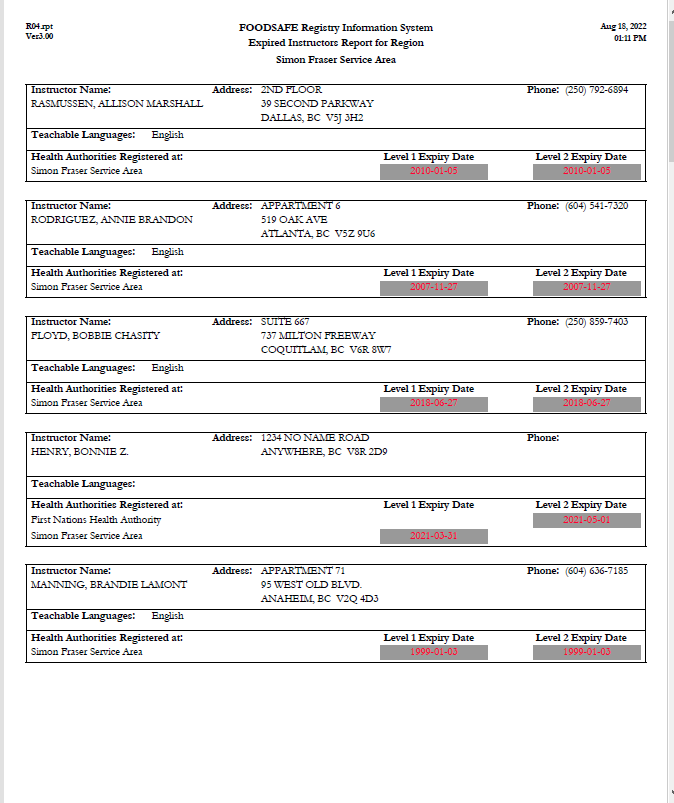
18.5 R14 Refresher Certificates Report (for Refresher Role)
The R14 Refresher Certificates Report is for users with a Clerical plus Refresher role in the registry, who are tasked with processing Refresher certificates for all Open School Refresher course students in British Columbia. To run an R14 report, the user must have the Refresher security role assigned to them.
The R14 report lists the number of Refresher certificates (with passing grades) posted by Open School to the FOODSAFE Registry during a selected time period. Only students with a passing grade of 80% will be posted to the Refresher print queue. The report is used for tracking printing of Refresher certificates, and for billing and reporting purposes.
To run an R14 Report:
1. Click on the Reports icon:
|
|

2. Select R14 from the menu:
|
|
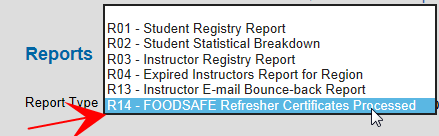
3. Enter the date range for the period you are processing and submit:
|
|

4. At the Adobe Reader prompt, Open or Save the report:
|
|
5. A Report in PDF format opens and has been named with the report type, the username, and date of the report:
|
|
6. The R14 report contains a numbered list of successful students whose Refresher certificates were posted to the FOODSAFE Registry Refresher certificate queue during the date range entered. The report includes the student’s unique People ID number, their name, address, and created date (the date Open School posts the student’s Refresher course data to the FOODSAFE Registry) and blank columns for filling in the printed date and mailed date:
|
|
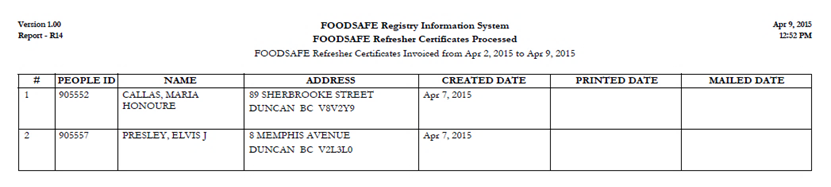
7. Save and print the report, then manually enter the dates the certificates were printed and mailed in the ‘Printed Date’ and ‘Mailed Date’ columns:
|
TIP: When Refresher certificates are printed from the Refresher queue, each student’s record will have the printed date entered automatically under the Last Printed field in the Exam Details:
The user who printed the certificates is
included inthe Printed By field: |
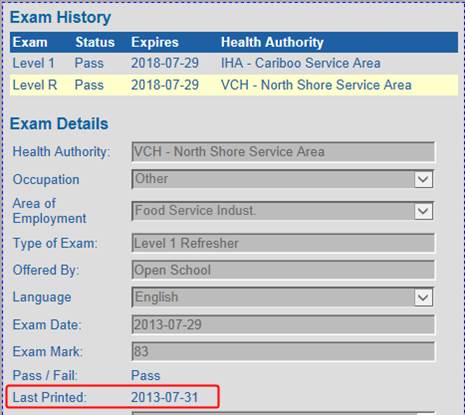
8. Use the business protocols established by your office to generate an invoice for billing, based on the information in the R14 report.
|
TIP: The R14 report is based on BC students whose exam results are submitted to Fraser Health. The Report does not include Out of Province/Country Refresher students submitted by Open School to BC CIPHI for issuance of certificates. |
18.6 M01 FOODSAFE Products
The M01 FOODSAFE Products Report is based on Registry data for the following exams: FOODSAFE Level 1, Level 2, Refresher; MarketSafe; ProcessSafe and Introduction to Food Microbiology.
The report produces data by Province and by Regional Health Authority. Currently exam data resides in the Registry under the old ‘service areas’. Each Regional Health Authority has several service areas.
For the M01 report, the service area data is amalgamated into the appropriate Regional Health Authorities to produce reporting by Regional Health Authority.
Personal data is not included in the M01 Report.
The report is based on fiscal year.
The report is generated in CSV format and can be read using Excel.
Sample:
|
Part 1 - Instructors Currently Certified to Teach
FOODSAFE Products – YYYY/MM/DD |
|
|
|
Part 2: Instructors Currently Certified to teach
FOODSAFE Products by Teachable Language – YYYY/MM/DD |
|
|
|
Part 3: Instructor Certification
Expiry During Fiscal Year Includes Teaching Certifications
for Fodosafe Level 1, Level 2, Refresher, MarketSafe |
|
|
|
Part 4: Student Enrolment in
FOODSAFE Products and Comparsion with Previous Fiscal Years Includes FOODSAFE Level 1, Level
2, Refresher; Marketsafe; ProcessSafe, Intro to Food Microbiology |
|
|
|
Part 5: Student Enrolment in
FOODSAFE Products – Fiscal Year Comparison Includes FOODSAFE Level 1, Level
2, Refresher; Marketsafe; ProcessSafe, Intro to Food Microbiology |
|
|
|
Part 6: Product Success Rates by
Mode of Delivery During Fiscal Year Includes FOODSAFE Level 1, Level
2, Refresher; Marketsafe; ProcessSafe, Intro to Food Microbiology |
|
|
|
Part 7: Language of Exams Written
– YYYY/MM/DD |
|
|
|
Part 8: FOODSAFE Level 1 – Student
Certification Expiry by Health Authority During Fiscal Year (five year
expiration) |
|
|
|
Part 9: Student Enrolment in
FOODSAFE Products – Fiscal Quarter Comparison Includes FOODSAFE Level 1, Level
2, Refresher; Marketsafe; ProcessSafe, Intro to Food Microbiology |
|
|
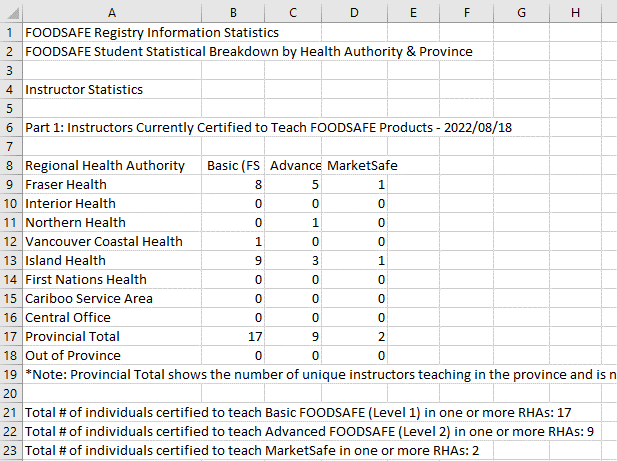
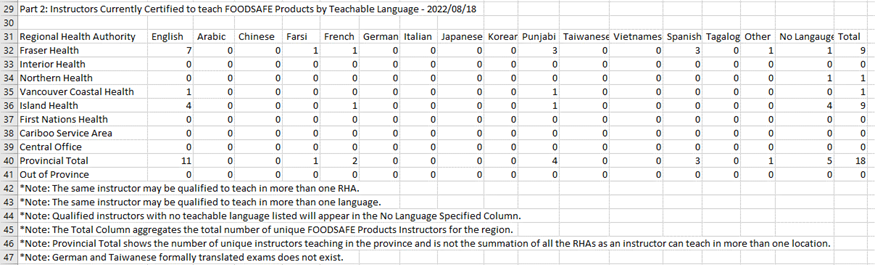
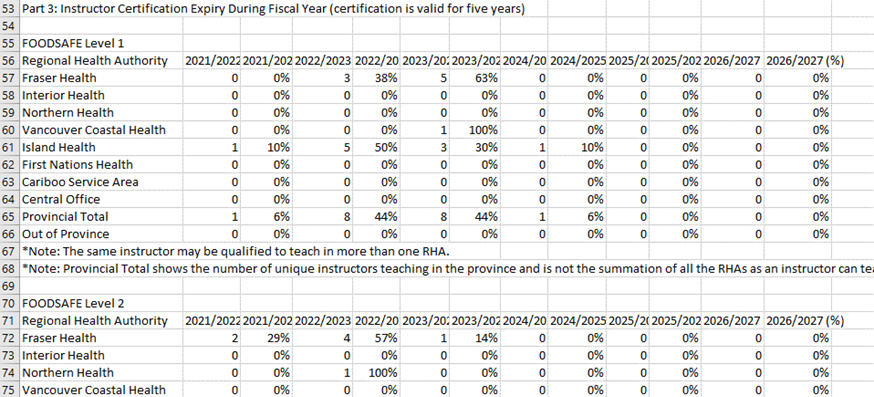
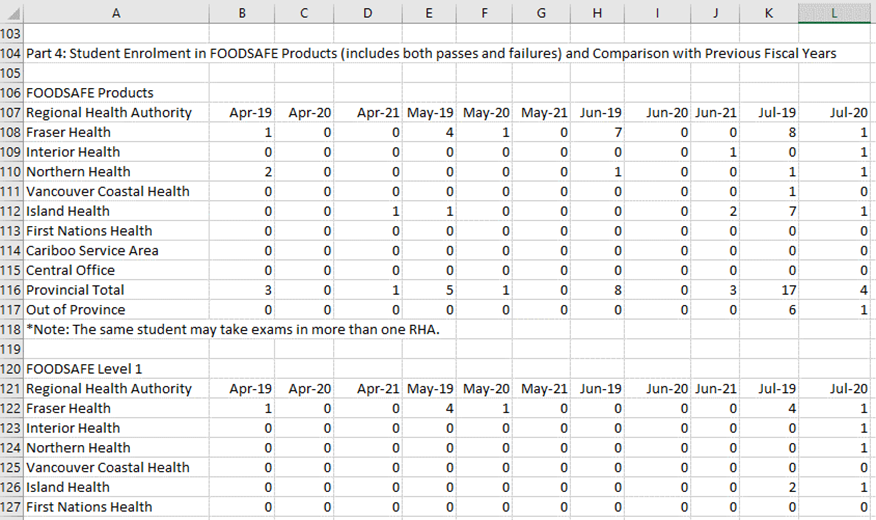
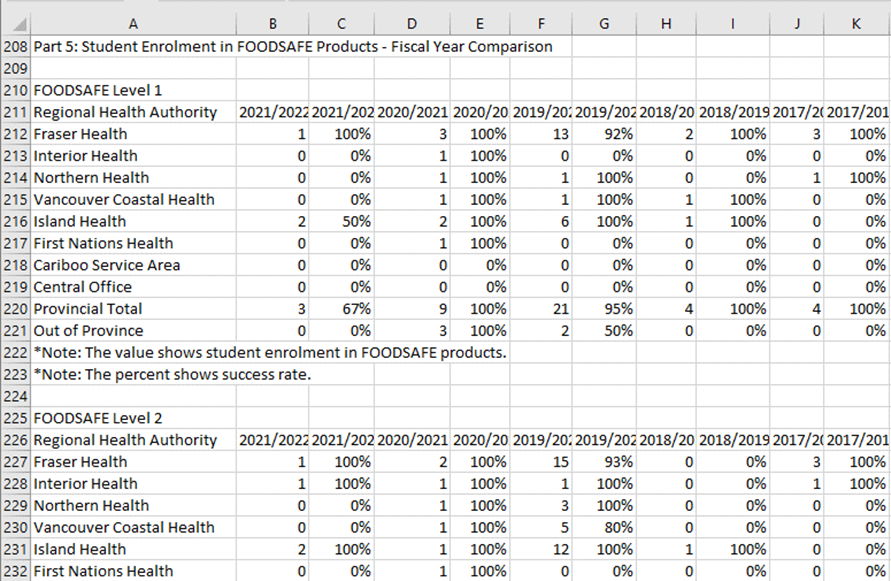
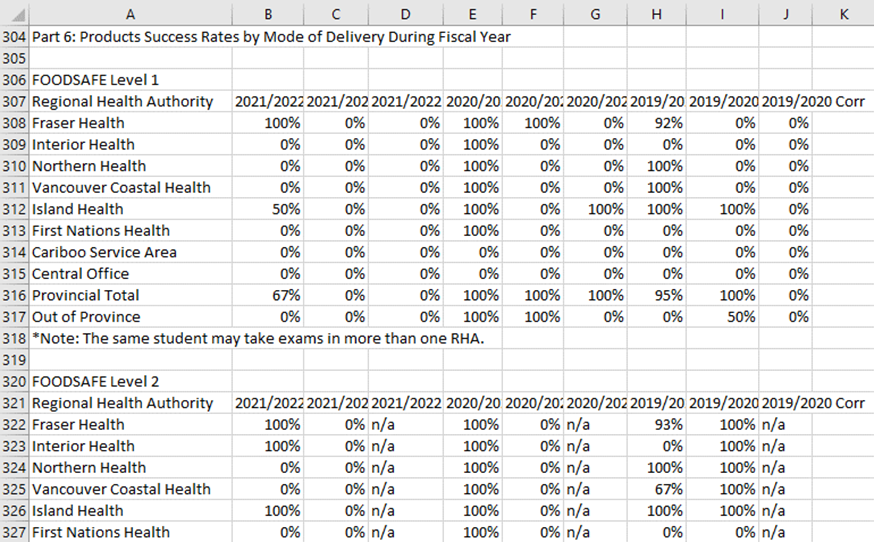
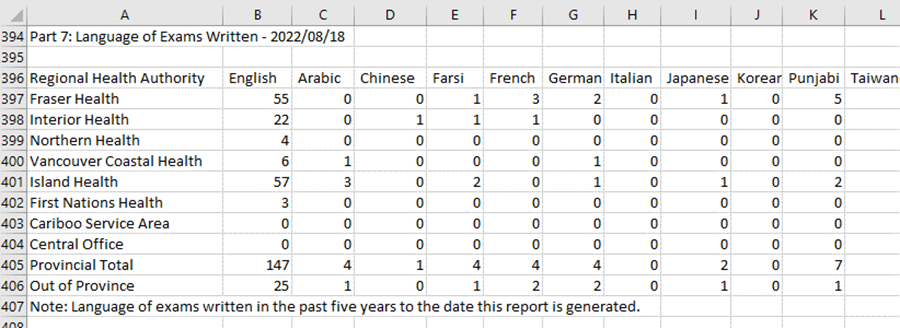
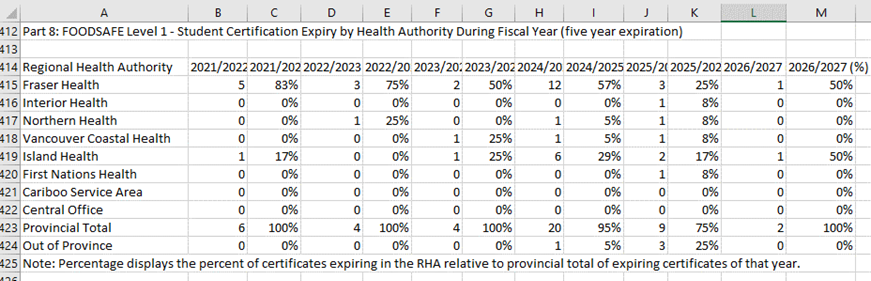
19 APPENDIX
19.1 Certificate Shells and Mockups
|
FOODSAFE Student
Certificate Shell (BC and Yukon) |
|
|
|
FOODSAFE Student
Certificate Mockup, including variable data |
|
|
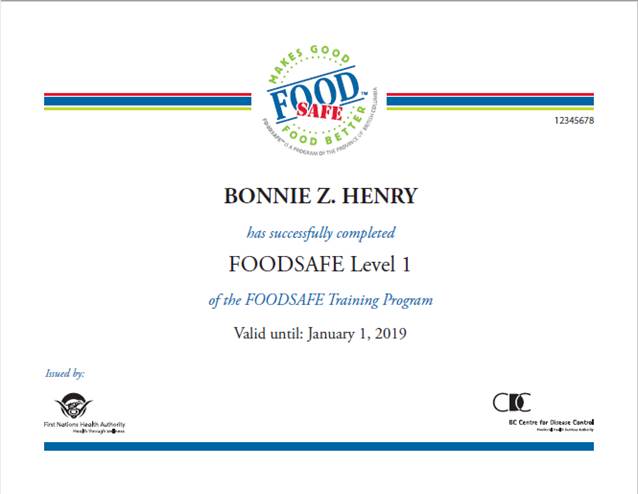
|
FOODSAFE Instructor Certificate Shell BC |
|
|
|
FOODSAFE Instructor
Certificate Mockup, including variable data |
|
|
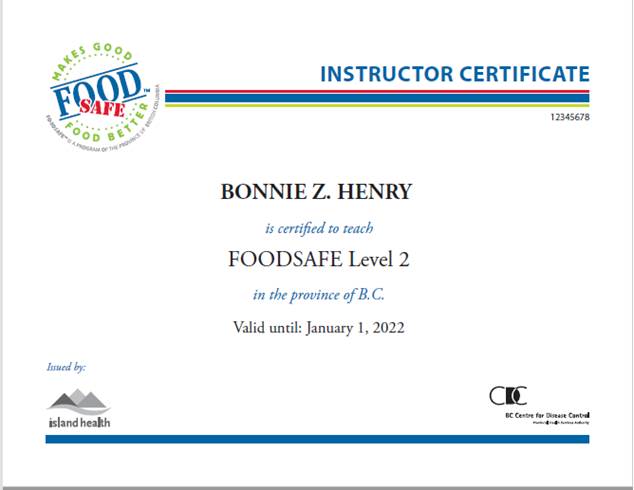
|
FOODSAFE
Wallet Card Shell and Mockup with variable data – Level 1, Level 2, Refresher |
|
|
|
|
|
MarketSafe
Student / Instructor Shell |
|
|
|
|
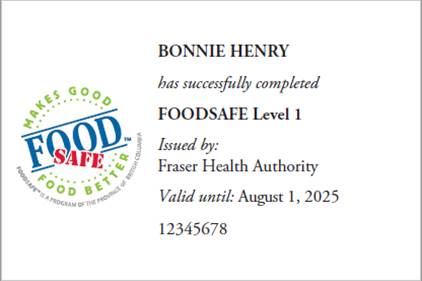
|
MarketSafe Student Mockup with variable data |
|
|
|
MarketSafe
Instructor Mockup with variable data |
|
|
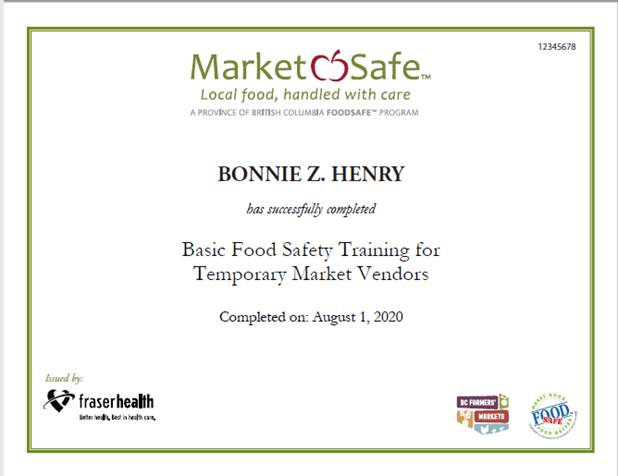
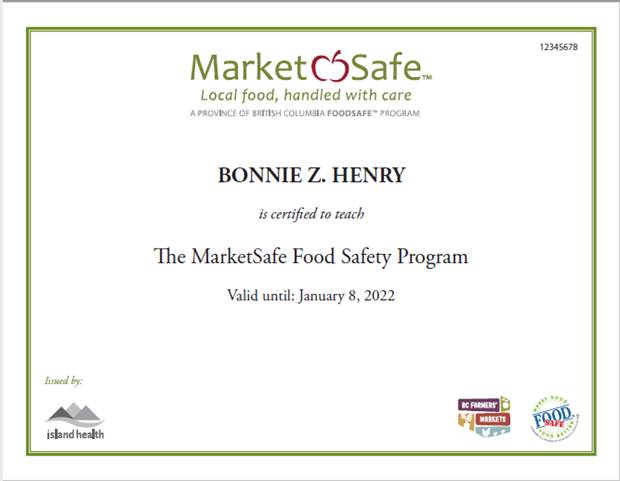
|
ProcessSafe Digital Certificate |
|
|
|
Introduction to Food Microbiology Digital Certificate |
|
|
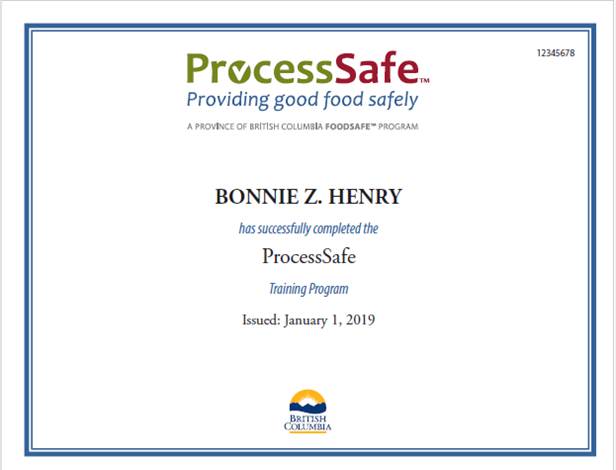
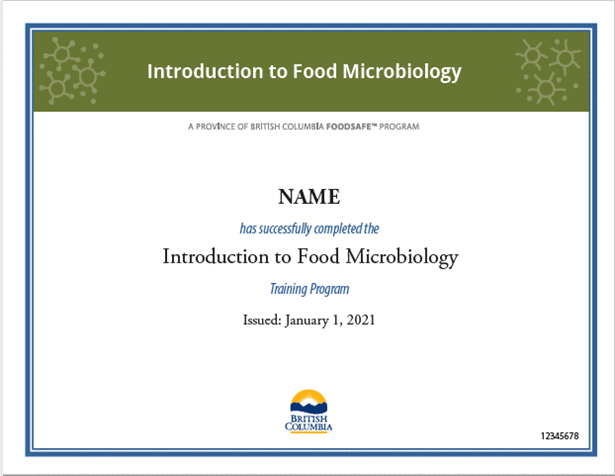
19.2 Security Matrix
Created: January 22, 2020
Updated: August 30, 2022
C = Create, add new data
R = Read – view data
U = Update – modify data
D = Delete data
Y = Yes, able to perform that function or run that report
N = No, not able to perform that function or run that report
|
Roles →
|
EHO |
Clerical |
Clerical + Open
School Queue |
Clerical + Refresher
Queue |
Clerical + |
Admin |
Ministry |
|
Student/Instructor |
R |
CRUD |
CRUD |
CRUD |
CRUD |
CRUD |
R |
|
FOODSAFE |
|||||||
|
Student Exam Details |
R |
CRU |
CRU |
CRU |
CRU |
CRU |
R |
|
Delete Student Exam |
N |
Y |
Y |
Y |
Y |
N |
N |
|
Instructor Levels |
R |
CRUD |
CRUD |
CRUD |
CRUD |
CRUD |
R |
|
Print Student
Certificate (single) |
N |
Y |
Y |
Y |
Y |
Y |
N |
|
Print Student
Certificates |
N |
Y |
Y |
Y |
Y |
N |
N |
|
Print Instructor
Certificate |
N |
Y |
Y |
Y |
Y |
Y |
N |
|
Print Instructor
Certificates |
N |
Y |
Y |
Y |
N |
N |
N |
|
Print replacement
certificates for any HA service area |
N |
Y |
Y |
Y |
Y |
Y |
N |
|
Print Open School
Level 1 and 2 Certificates |
N |
N |
Y |
N |
N |
N |
N |
|
Print Open School
Refresher Certificates |
N |
N |
N |
Y |
Y |
N |
N |
|
Y |
Y |
Y |
Y |
Y |
N |
Y |
|
|
Report R02 |
Y |
Y |
Y |
Y |
Y |
N |
Y |
|
R03 |
Y |
Y |
Y |
Y |
Y |
N |
Y |
|
R04 |
Y |
Y |
Y |
Y |
Y |
N |
Y |
|
N |
N |
N |
N |
N |
Y |
Y |
|
|
Report R11 |
N |
N |
N |
N |
N |
Y |
Y |
|
Report R13 |
Y |
Y |
Y |
Y |
Y |
Y |
N |
|
Report R14 |
N |
N |
N |
Y |
N |
N |
N |
|
N |
Y |
Y |
Y |
N |
Y |
Y |
|
|
Change Password |
Y |
Y |
Y |
Y |
Y |
Y |
Y |
|
Create user + role |
N |
N |
N |
N |
N |
Y |
N |
|
Re-set passwords |
N |
N |
N |
N |
N |
Y |
N |
|
Activate/deactivate
users |
N |
N |
N |
N |
N |
Y |
N |
|
Delete client record
(student/instructor) |
N |
N |
N |
N |
N |
Y |
N |
|
Change instructor
email message and schedule |
N |
N |
N |
N |
N |
Y |
N |
|
N |
N |
N |
N |
Y |
N |
N |
|
|
MARKETSAFE |
|||||||
|
Student
Exam Details |
R |
CRU |
CRU |
CRU |
CRU |
CRU |
R |
|
Delete
Student Exam |
N |
Y |
Y |
Y |
Y |
N |
N |
|
Instructor Levels |
R |
CRUD |
CRUD |
CRUD |
CRUD |
CRUD |
R |
|
Print
Student Certificate (single) |
N |
Y |
Y |
Y |
Y |
Y |
N |
|
Print Student
Certificates |
N |
Y |
Y |
Y |
Y |
N |
N |
|
Print
Instructor Certificate (single) |
N |
Y |
Y |
Y |
Y |
Y |
N |
|
Print Instructor
Certificates |
N |
Y |
Y |
Y |
N |
N |
N |
|
Student Exam Details |
R |
CRU |
CRU |
CRU |
CRU |
CRU |
R |
|
Delete Student Exam |
N |
Y |
Y |
Y |
Y |
N |
N |
|
Email
Certificate |
N |
Y |
Y |
Y |
Y |
Y |
N |
|
Print Student Certificate (single) |
N |
Y |
Y |
Y |
Y |
Y |
N |
|
INTRO TO FOOD MICROBIOLOGY |
|||||||
|
Student Exam Details |
R |
CRU |
CRU |
CRU |
CRU |
CRU |
R |
|
Delete Student Exam |
N |
Y |
Y |
Y |
Y |
N |
N |
|
Email
Certificate |
N |
Y |
Y |
Y |
Y |
Y |
N |
|
Print Student Certificate (single) |
N |
Y |
Y |
Y |
Y |
Y |
N |
|
Function |
EHO |
Clerical
|
Clerical + Open School Queue |
Clerical + Refresher Queue |
Clerical + |
Admin |
Ministry |
|
EDIT DETAILS |
|||||||
|
Roles
→ Function ↓ |
EHO |
Clerical (HA same |
Clerical (HA different from student) |
Clerical (HA same |
Clerical BC CIPHI (HA different from student) |
Admin |
Ministry |
|
Edit Student Details |
|
||||||
|
Last Name, |
N |
Y |
Y |
Y |
Y |
Y |
N |
|
People ID |
N |
N |
N |
N |
N |
N |
N |
|
Birth Date |
N |
Y |
Y |
Y |
Y |
Y |
N |
|
Gender |
N/A |
Y |
Y |
Y |
Y |
Y |
N |
|
Address 1 |
N/A |
Y |
Y |
Y |
Y |
Y |
N |
|
Address 2 |
N/A |
Y |
Y |
Y |
Y |
Y |
N |
|
City |
N/A |
Y |
Y |
Y |
Y |
Y |
N |
|
Province |
N/A |
Y |
Y |
Y |
Y |
Y |
N |
|
Postal Code |
N/A |
Y |
Y |
Y |
Y |
Y |
N |
|
Area Code/Telephone |
N/A |
Y |
Y |
Y |
Y |
Y |
N |
|
Email |
N/A |
Y |
Y |
Y |
Y |
Y |
N |
|
Comments |
N/A |
Y |
Y |
Y |
Y |
Y |
N |
|
Exam Details |
|
||||||
|
Health Authority |
N |
N |
N |
N |
N |
Y |
N |
|
Occupation |
N |
Y |
N |
Y |
N |
Y |
N |
|
Area of Employment |
N |
Y |
N |
Y |
N |
Y |
N |
|
Type of Exam |
N |
N |
N |
N |
N |
Y |
N |
|
Level 1 Equivalent |
N |
Y |
N |
Y |
N |
Y |
N |
|
Offered By |
N |
Y |
N |
N |
N |
Y |
N
|
|
Language |
N |
Y |
N |
Y |
N |
Y |
N |
|
Exam Date |
N |
N |
N |
N |
N |
N |
N |
|
Exam Mark |
N |
Y |
N |
Y |
N |
Y |
N |
|
Comments |
N |
Y |
N |
Y |
N |
Y |
N |
|
Roles
→ Function ↓ |
EHO |
Clerical (HA same as instructor) |
Clerical (HA different from instructor) |
Clerical (HA same as instructor) |
Clerical BC CIPHI (HA different from instructor) |
Admin |
Ministry |
|
Instructor Qualifications |
|
||||||
|
Level |
N |
N |
N |
N |
N |
N |
N |
|
Status |
Y |
Y |
Y |
Y |
N |
Y |
N |
|
Expiry date |
N |
Y
|
N |
Y |
N |
Y |
N |
|
Health Authority |
N |
N |
N |
N |
N |
N |
N |
|
Languages |
N |
CD |
N |
CD |
N |
CD |
N |